How to share a folder or hard drive on your home network
We run through everything you need to know to share a folder or hard drive on your home network.
Sharing a folder or an entire hard drive on your PC has a number of benefits. All your computers and devices on your home network can access the shared resource, you can use the shared resource to dump photos from other devices as well as music or films too, or you can use a share as another backup location.
Of course you can swap files and so on via a USB stick these days – with gigabytes to spare there’s no reason not to. But where’s the fun in that.
Sharing a folder
We’ll begin with how to share a folder on your PC, so it’s accessible from the other computers and devices – even a Smart TV – on your network.

For this example we’ll start with a newly created folder on our second, mass storage hard drive in the main PC on the network. We’ll call it Share.
Related: How to stream from a PC to a TV
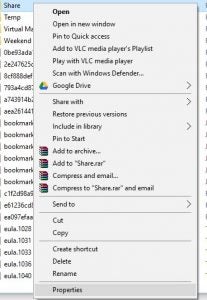
With the folder created (you can follow from this point on if you already have a folder you want to share), right-click it and click on the Properties option from the menu.
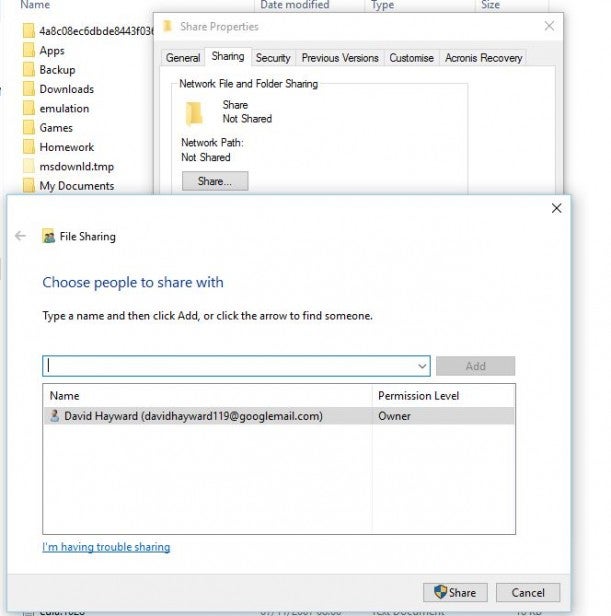
When the Properties have opened, click on the Sharing tab followed by the ‘Share…’ button under the Network File and Folder Sharing section. The new window that pops up will ask you to choose a user name to share the folder with. In this instance we’ll just assume that your home network is safe and secure. That being the case, use the pull down menu next to the ‘Add’ button to select Everyone from the list.
Related: Best routers
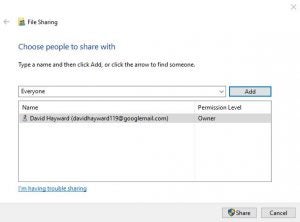
Now click the ‘Add’ button to include the group Everyone into the current list of authenticated users (your username should already be there). Depending on the type of access you want everyone to have, be that Read only or Read and Write, use the arrow next to the Permission Level to make your choice. We’ll opt for Read and Write in this instance as we want to create a dumping ground for all our connected devices and computers.
Related: How to speed up your internet
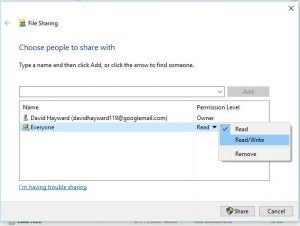
When you’re ready, click the ‘Share’ button at the bottom of the File Sharing window (the one with the shield next to it), and the new share will be created with the appropriate access level you specified. As a final notice Windows will display the link to the share, in our case that’s \WindowsShare which translates to \the name of the PC on the networkthe name of the shared folder we’ve created.
Once you’ve made a note of the share name, if you need to, then click the ‘Done’ button and the share will be active across the network.
Sharing a hard drive
That’s just one folder we looked at sharing, naturally you can do this procedure with every folder on the drive or just a few select folders. However, what if you wanted everyone and every device on the home network to access the entire drive?
The process of sharing a hard drive isn’t too different to that of the folder sharing we’ve just looked at. Start by right-clicking the drive in question, then drop down to the Properties option followed by the Sharing tab.
Related: Best Wi-Fi extenders
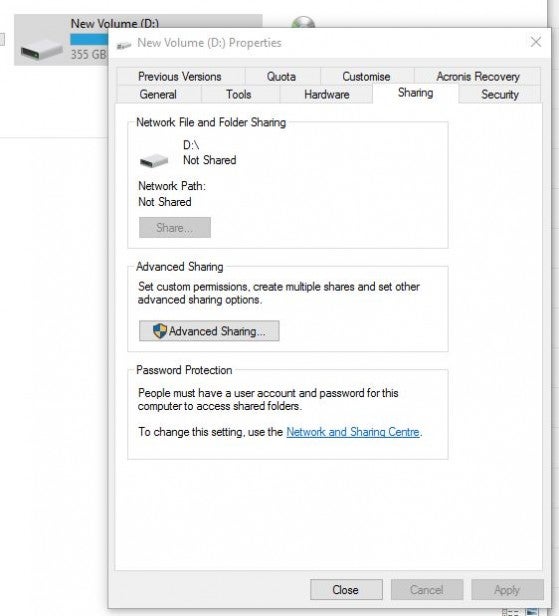
The difference here is that the ‘Share…’ button is greyed out, so you’ll need to click on the ‘Advanced Sharing…’ button bellow it under the Advanced Sharing section. However, before you click the button take a moment to read the statement below in the Password Protection section. This mentions that to access the share you’ll need to have an account on the PC where the share is located and you’ll need to provide a password to access the computer. We’ll deal with this in a moment, but for you can click on the ‘Advanced Sharing…’ button to continue sharing the drive.
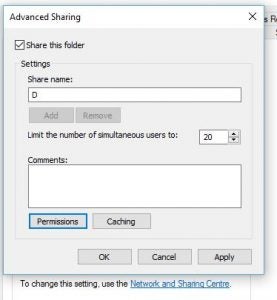
With the new window that’s popped up simply tick the box entitled ‘share this folder’ and give the drive a share name – we’ll stick with D for now. Before you click on the ‘OK’ button, click the ‘Permissions’ button below the Comments section.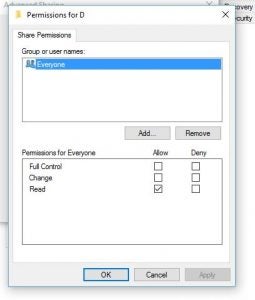
To give everyone on your home network read and write access to the share you’ll need to make sure that the Full Control tick box is selected under the Allow column for the user Everyone. This way every device will be able to read and write and access the drive’s contents without restrictions. When you’re ready, click on the ‘OK’ button followed by ‘OK’ again in the Advanced Sharing pop up window.
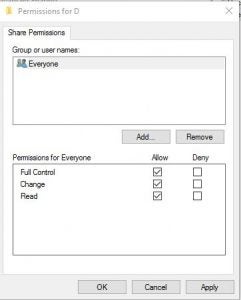
That’s it the drive is shared. To access it from another computer or device you’ll need to provide the share location, which in our case is: \WindowsD. If you’ll recall that translates to \name of the PC on the networkshare name that we opted for. However, when you come to access the share you’ll need to input a username and password, which can be a bit of a pain when you’re trying to access it via a Smart TV and the limited typing capabilities of a remote.
Remove the password protection
Before you make a comment, yes we know this is an unsecure approach and many of you will be tearing your hair out at the thought of removing the password protection. But as we said earlier, we’re looking at this from the point of view of a secure home network, where you’ll have access to all the shared resources. Otherwise, yes, we agree you should keep the password protection.
The statement we looked at earlier in the Password Protection section of the drive sharing reminds you that Windows 10 now by default requires every shared resource to have a username and password access.
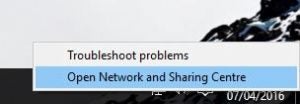
To remove this feature right click on the Open Network and Sharing Centre located in the Taskbar as your connected network icon.
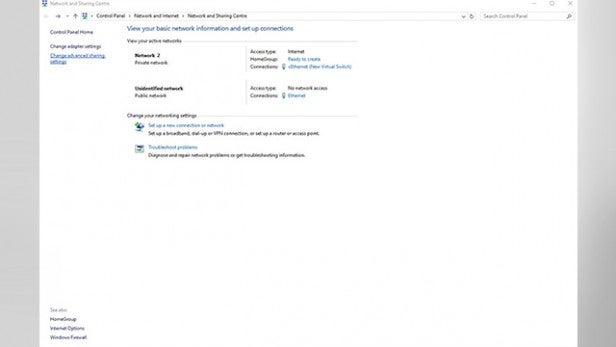
In the newly opened Network and Sharing Centre window, click on the ‘Change advanced sharing settings’ link in the left-hand side of the panel.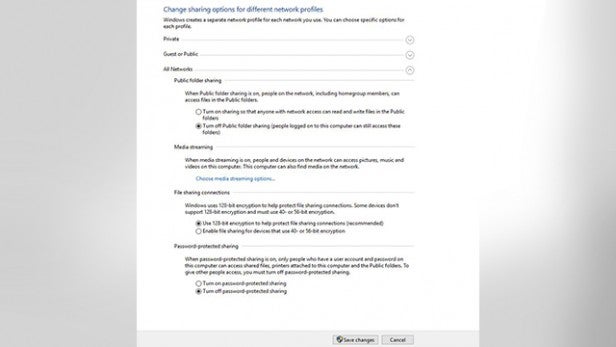
Next expand the All Networks section, and at the bottom you’ll notice a section called Password-protected sharing. To remove the password option from accessing a share, simply click on the radio button next to the ‘Turn off password-protected sharing’.
When you’re done, click on the ‘Save Changes’ button at the bottom of the panel and close the Network and Sharing Centre window.
Happy sharing
As we said the approach isn’t one of the most secure method of accessing a share, but it’s the easiest for a simple home network and for those who aren’t too fussed with regards to the potential that someone could hack their network.
On the plus side, you can now store all your movies, pictures and so on and access them from anywhere in the home and from any device without too much hassle, and it saves you having to hook up a separate NAS drive to house all your shared resources.

