How to virtualise your old PC
How to virtualise your old PC: Everything you need to know to create a virtual version of your old PC so you can save the operating system and all your files and ditch your old PC hardware.
Virtualisation has been the friend of the server room administrator for a number of years now, and although we at home have used it to try out the latest Linux distro, or experiment with an operating system before installing it permanently, we have missed one of the best virtues of the virtualisation industry: the virtualisation of a physical machine.
Virtualising a physical PC has many benefits. For one, you can finally ditch that old desktop unit you’ve clung onto purely because it’s the only PC in the house with Windows XP and you need that OS to run specific software. Similarly, the old laptop that’s now beginning to show signs of a premature hard drive death can be virtualised, and essentially saved for prosperity while the hardware goes to an early grave. Or perhaps you want to save space by virtualising a number of desktops performing various tasks and cluttering up the living space. Needless to say there are numerous scenarios whereby virtualisation can help us out.
Related: How to remote desktop to another PC
Whatever your reasons, virtualisation can make your life considerably easier. Luckily, a set of extremely easy steps will transfer a snapshot of your PC, along with the operating system and all installed applications, to a single file that can be stored on a portable USB hard drive or NAS unit, for example, and accessed via your main PC.
Unfortunately, despite being able to virtualise the software side, there’s very little that can done for more specialist items of hardware. Network cards, sound cards and so on are virtualised, and operate within the virtual environment, but items such as TV cards, external SCSI adaptors and the like are out of the question. It’s a trade off, and although virtualisation will work for 99 per cent of us, there will always be some who simply can’t virtualise due to a specific hardware requirement.
As with most things of a technical nature, there is usually more than one way to skin the proverbial cat, but in this instance we’ll just stick to the tried and tested method of using the software provided by those kind people at VMware.
In the example we’re going to be using here, we have two PCs, imaginatively named PC1 and PC2. PC1 is the machine that we are going to be virtualising, and PC2 is the more powerful machine that will be used to view and interact with the virtual image.
VMWare vCentre
To start, we’re going to need to download a copy of VMware vCentre Converter Standalone: the actual software that will convert our physical machine to a virtual image.
Related: How to secure your home network from hackers
You can download it direct from the VMware site, but in order to do so you’ll be required to sign up for a free account. If you don’t like the sound of creating an account, then try Softpedia’s offering. In both cases the download is around 128MB and, once finished, can be installed in the usual manner on PC1.
VMWare Player
The next item on the list is VMware Player; another free offering from VMware that allows you to open and operate the virtual machine that we’re about to create. Again this can be downloaded from the VMware servers, by going here, or by visiting the likes of FileHippo. Whichever takes your fancy.
Related: Best laptop
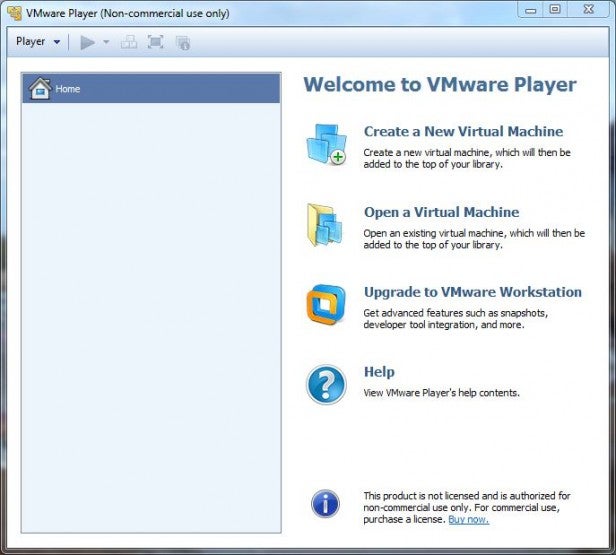
The VMware Player is about 73MB in size, but don’t install this just yet. If you can, copy it to another PC. In our case we’re copying it to PC2, the one where we will be viewing the virtualised image.
The virtualisation process
Now that we have VMware vCentre Converter installed on PC1, it’s time to actually convert the physical PC to a virtual image. To start with, you’re going to need to attach either an external USB hard drive, one large enough to accommodate a good 60GB+ image file (as this was the eventual size of our virtual image), or if you have a secondary hard drive make sure there’s enough room available.
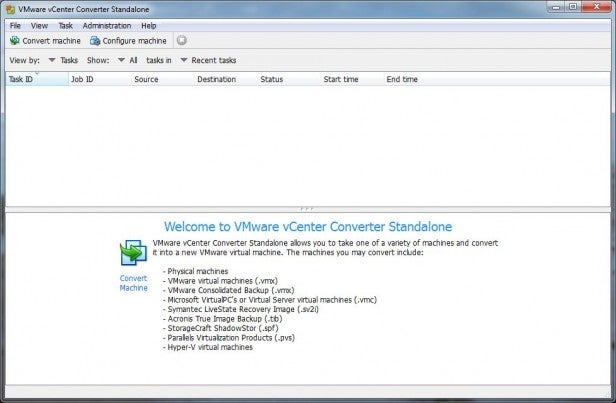
Step 1. Start by opening up the VMware vCentre application, as seen below, then click on the ‘Convert Machine’ button, located in the top left of the window to start the conversion wizard.
Related: How to become anonymous online
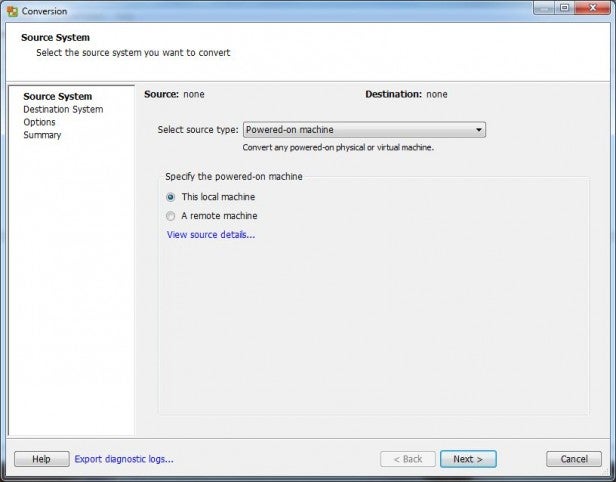
Step 2. Next, click on the drop-down menu next to ‘Select source type’ and choose ‘Powered-on Machine’ from the list. In addition to this, make sure that the ‘This Local Machine’ radio button is highlighted, as in our screenshot. When you’re ready to continue, click ‘Next’.
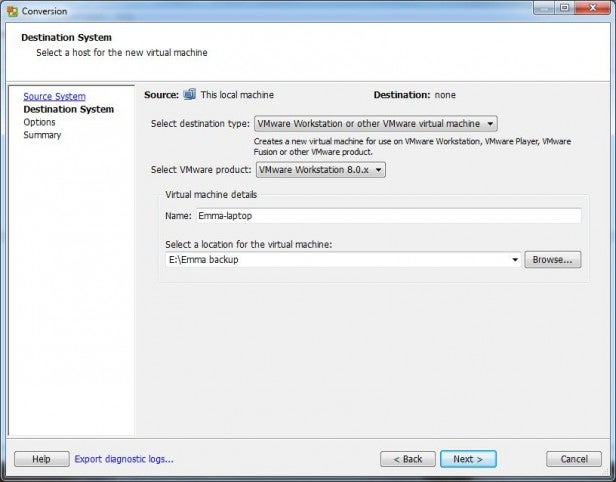
Step 3. After a brief pause, while VMware analyses the source machine, you’ll be presented with the Destination System options.
To create a simple virtual image, click on the drop-down menu next to ‘Select Destination Type’ and choose ‘VMware Workstation or other VMware Virtual Machine’ from the list. Now, use the drop-down menu next to ‘Select VMware product’ and choose ‘VMware Workstation 8.0.x’ from the list.
Finally, enter a name for the virtualised PC, and point the location of the virtual machine image file to your attached USB hard drive, or second hard drive. Click ‘Next’ when you’re ready to continue.
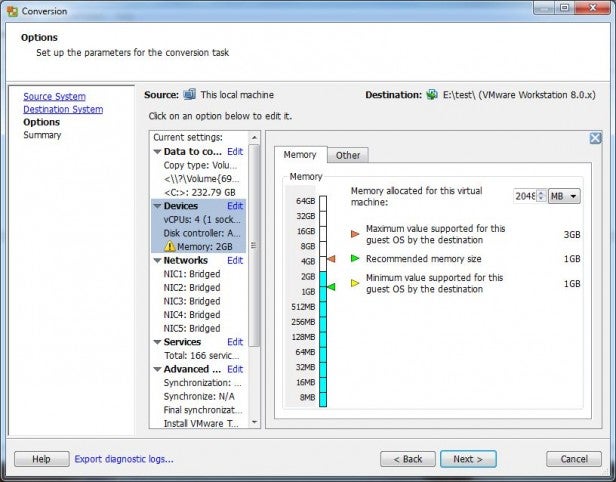
Step 4. This next screen is where the options for the virtual image can be tweaked, and additional settings can be added. The way the options are laid makes things fairly easy. Clicking on the ‘Edit’ link next to each section will open that particular section for scrutiny, allowing you to keep the virtualised image as close as possible to the original.
To be fair, the defaults will already achieve this, and you can quite happily click on the ‘Next’ button to continue to the next step without even going through the many options. But it might be worth a look in the ‘Devices’ section for a moment.
In here, you’ll be creating the base amount of RAM the virtual image will use when being run by the VMware Player. Of course, you can always alter this from the Player itself, but it may be a good idea to perhaps drop the amount of RAM assigned if the machine that’s being virtualised has 4GB or more, as the default will create a virtual image with 3GB being used by the Player. As we said though, you can always opt for more or less RAM when using the Player later.
Another section that’s worth having a look at is the ‘Services’. As you’ve probably already guessed, this contains a list of the services the OS currently uses. If you click on this section you’ll have the option of stopping one, or all of the services listed. Click on the ‘Next’ button when you’re ready to proceed.
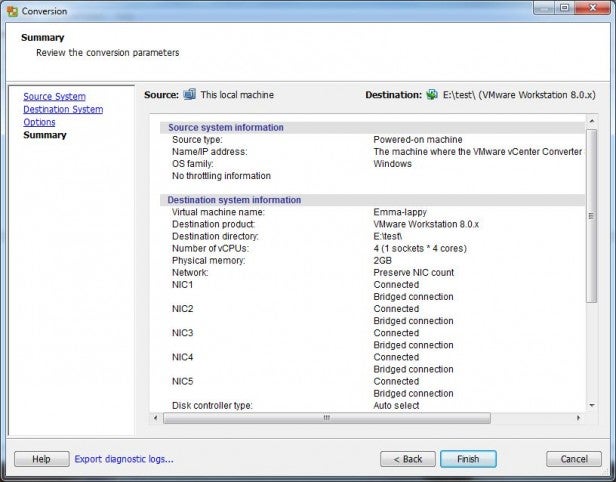
Step 5. The final step in creating the virtualised image, and merely a summary of the choices you’ve previously made. Have a browse through them, and use the ‘Back’ button if you suddenly discover that you’ve chosen a drive that only has a few gigabytes available as the destination of the virtual image.
If you’re satisfied that all is well, click on the ‘Finish’ button and the job will be submitted to the VMware manager.
Step 6. As you can see from the below screenshot, you’re going to have to set aside a good hour or two, depending on how much of the hard drive is used up, the speed of the machine being virtualised, and the transfer rate of the USB hard drive. Naturally, you can still use the PC in question while the imaging takes place, however, installing anything substantial, or downloading a large file isn’t really recommended. In fact, you’re probably best off leaving VMware to do its thing.
If you need to stop the imaging process at any point, click to highlight the running job, then click on the red stop icon next to the ‘Configure Machine’ button, located along the top of the vCentre window. If you do stop the imaging process though, you’re going to have to start all over again, through the ‘create new image wizard’, if you want to rerun it.
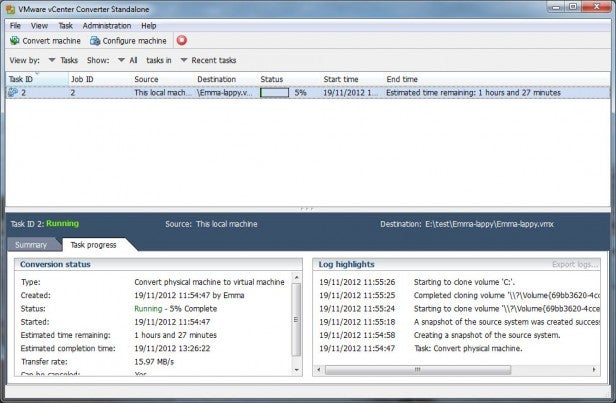
When the image has been created, and transferred onto the destination drive, close the VMware vCentre application. Disconnect the USB hard drive, or transfer the second hard drive over to the VMware Player PC, which in our case is PC2.
Install VMware Player on your equivalent of PC2. Running with the defaults is acceptable, unless of course you have specific needs as to where the program will be stored. Once installed you may be asked if you want to upgrade to the latest version of VMware Workstation, which is the ‘paid for’ version of VMware’s stable. In terms of what it offers, VMware Workstation contains a lot more functionality. For instance, you can snapshot images, integrate developer tools and so on. But, for our purposes we don’t need it in this instance.
Configuring the image
Now that we have the virtual image of the physical PC, PC1, stored on a hard drive of some description, and we have the VMware Player installed on the more powerful PC, PC2, we can hook everything up and start to configure the image so that it will load without any issues for future use.
Start by connecting the drive that contains the image of PC1, to PC2. Load up VMware Player by double clicking on the icon on the desktop and cancel any requests to buy the full Workstation package.
Once you’re in the main VMware Player screen, click on the ‘Open a Virtual Machine’ link, located in the right-hand pane. Browse to the location of the saved virtual image and either double click, or single click followed by the ‘Open’ button.
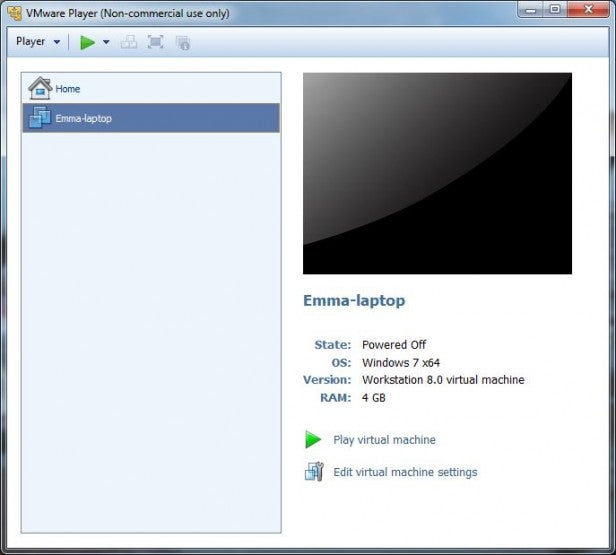
After a brief pause, while the Player loads up the essentials related to the image, you’ll see a window similar to that of our screenshot below, with the ‘State’ being Powered Off. You’ll also notice two links at the bottom of the right-hand window: Play virtual machine and Edit virtual machine settings.
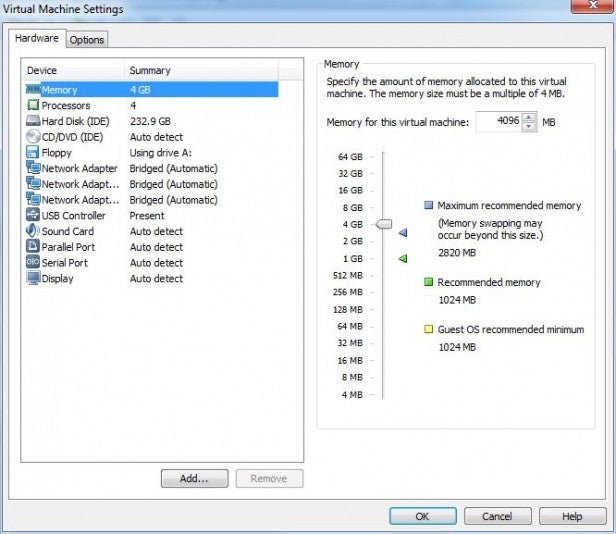
Rather than playing, or powering up, the new virtual machine image, take a moment to click on the settings link. You should see a more editable version of the options that appeared previously in Step 4, displaying the amount of RAM associated with the virtual image, the number of processors, hard disk size used, network adaptors, and so forth.
These are the core settings of the virtual image; the machine as it was when the virtualisation took place. The thing to look out for here is the amount of RAM being used for the virtual image, and the number of processors.
If your PC2 has considerable RAM installed, much more than the virtualised PC1, then you could probably leave this alone. For example, a virtualised image that had 2GB of RAM being loaded onto a PC with 8GB wouldn’t cause any issues, however a virtual image with 4GB being loaded onto a PC with 4GB will obviously start to create one or two problems with the host PC. The same goes for the number of processors. So use the Virtual machine settings link to fine tune the RAM and processor values before you power up the virtual machine image.
When you’ve finished tweaking the settings, click on the ‘OK’ button and you’ll end up back at the new VM window. When you’re ready, click on the ‘Play virtual machine’ link to power up your virtualised image of PC1.
Powering up the new VM
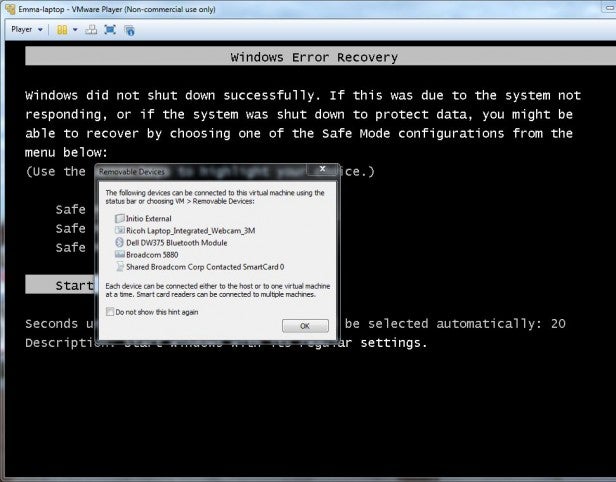
When starting up the new virtual machine image, you may get the ‘Windows didn’t shut down correctly’ message on the first boot, along with a pop-out window detailing the devices on the host PC that can be used with the virtual image. It’s not often the shutdown error occurs, but it’s nothing to worry about. Simply ‘OK’ the pop-out device information window, and hit Enter to continue booting into the virtual image.
You’ll also receive a message asking to install the latest VMware Tools for the image, as it starts to boot into Windows. Okay the dialogue boxes and start the install of the VMware Tools, as the package includes drivers for operating system specific images.
These tools allow you to update the graphics drivers, giving you the ability to use 3D acceleration and to dynamically change the resolution as you resize the virtual machine window. They also add the functionality to allow network access, install sound, and enable copying and pasting between the host and the virtual machine (and vice versa).
The download and install can take a good few minutes, and it’s likely you’ll need to reboot the virtual machine after the installation. But follow the on-screen prompts and VMware will sort out the new VM for you.
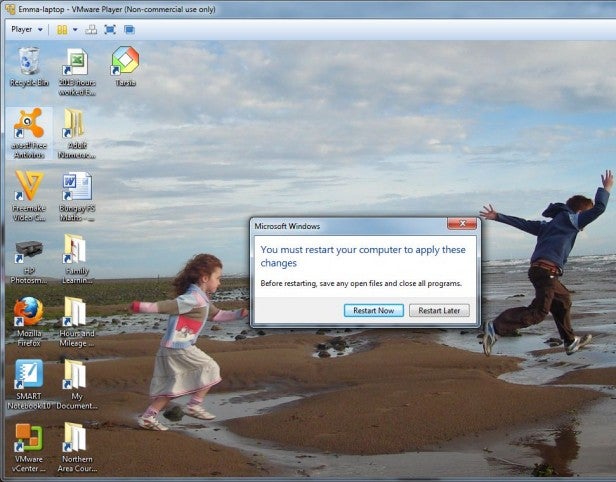
After the reboot of the virtual machine image you’ll come across another element of the virtualisation process: reactivating Windows. Basically, as many of you will already know, when you install Windows on a computer, you must activate it to use it. You activate Windows either over the Internet or by phone with Microsoft Support. When Windows starts up, it checks to see if it is running on the same hardware on which it was originally installed. If the hardware has changed, the Windows operating system requires reactivation.
Virtualising the original PC1 makes Windows think that the copy of Windows that was running is now being run on a different PC. Which, essentially, it is. Windows recognises the virtual hardware is different and so requires reactivation.
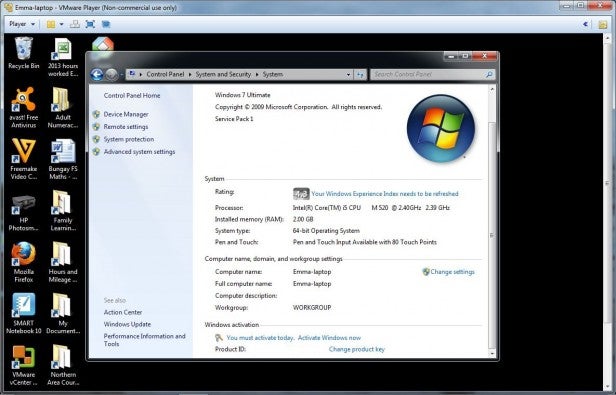
You’ll have to dig out your old Windows activation key, and go through the rigmarole of activating either via the automated telephone service, or via the Internet. You will also be required to keep within the agreements of the particular license you have, whether that’s OEM, retail, or enterprise.
If you have any issues, you’ll need to contact Microsoft, but it’s worth noting that the installation of VMware Tools keeps track of the activation keys, so once it’s installed you’ll be asked to reactivate for the virtual hardware. The reactivation of the Windows license key is probably the most annoying aspect of virtualisation.
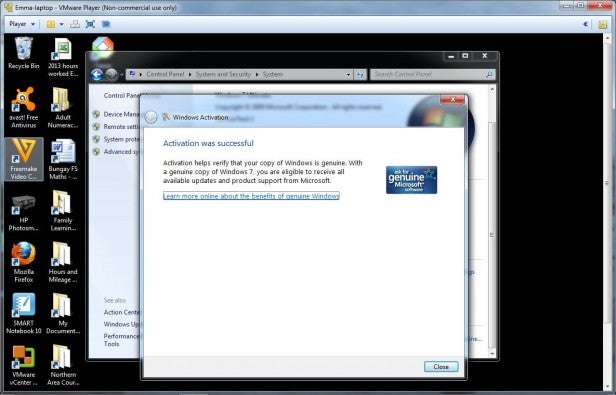
Once Windows has been activated, reboot the virtual machine. You should now have a virtualised, fully working image of the original physical PC, along with all the installed applications that were on that machine, plus any work, or files, you had saved. With the new VM being fully activated, you can go ahead and run a Windows Update just as you would on the ‘real’ PC.
Although we’re only using the free Player version of VMware, and not the full Workstation, we won’t be able to take snapshots of the system at various points. However, we can copy the image onto a backup source, if necessary. It might be one heck of a backup, being something in the region of 60GB in our case, but at least you’ll be safe in the knowledge that should the image become corrupt, or the OS die for some reason, then you can simply copy the backed up image from wherever it is you store it.
Conclusion
The virtualisation of a physical machine is, as we’ve shown, remarkably easy. Taking just a couple of hours, or less depending on the properties of the physical machine, you can create the image, transfer it across multiple drives (license depending), and run it from any PC that has enough resources to accommodate the virtual image, and is running a copy of the free VMware Player.
It’s hardly surprising then, that many sever room admins have gone virtual with their former hulking machines. As you’ll no doubt notice when you play around with the virtual machine, it attaches quite happily to your network. Copying and pasting across the host and virtual PC is seamless, thanks to the VMware Tools install, and it functions as any other networked unit. So, if you have any shared folders active on the old physical machine, they will still work on the virtualised image.
It’s worth mentioning that, like you would with a backup, you should double check the virtual machine image is working correctly, and that you can gain access to the system as you would on the physical machine, before taking the old PC down to the tip. However, the process is fairly fool proof, with VMware taking the role of imaging and converting for use within its own software, as opposed to using a third party converter that may corrupt the final image during the conversion process.
Let us know how your virtualisation process went in the comments.

