Verdict
Key Specifications
- Review Price: £309.00
Since the demise of the beige box, PC design has gone to extremes. You can go for the uber, pimped out approach, beautifully rendered by the likes of Vadim or you can go for something small, compact and yet, also very powerful. If the latter approach appeals you’ll almost certainly want to take a look at Shuttle’s new SD39P2.
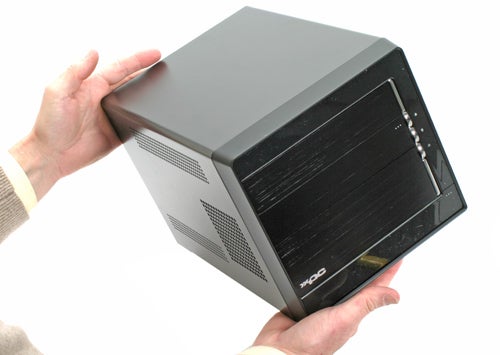
Shuttle is pretty much synonymous with small form factor PCs, which is hardly surprising considering it created the genre. The SD39P2 is billed as its flagship machine – it supports Intel socket LGA775 dual-core and quad-core processors including the top-end Core 2 Quad QX6800. Add-in support for up to three hard disks, including RAID 0, 1 or 5 and the ability to take a dual-slot graphics card – even a GeForce 8800 GTX, and you can see that it has the potential to be an incredibly powerful machine for either gaming or workstation use.
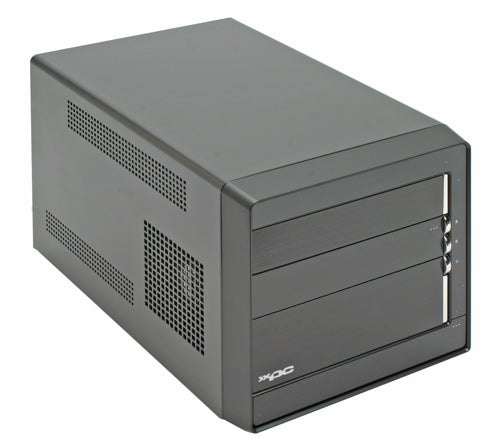
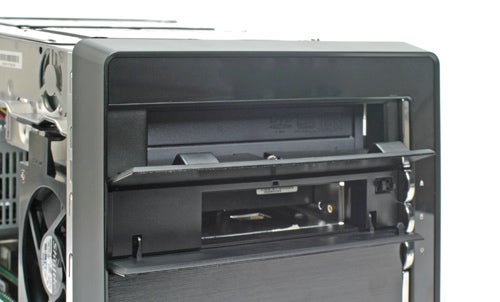
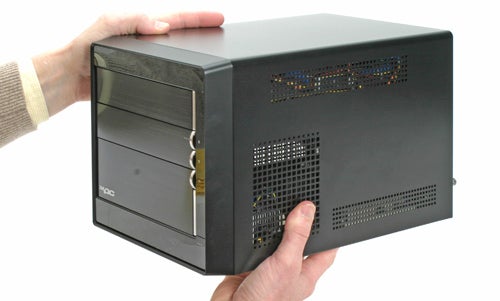
It’s a smart box with understated looks. The front is uncluttered with a smooth brushed metal effect. There are two 5.25in bays and three bulbous silver buttons running down the side. The top button ejects the optical drive, the middle doesn’t actually do anything but has a light in it that indicates hard disk activity, while the third is the power switch and has a small blue light that shines when the system is powered on. The middle flap opens by pressing at the top right – this is if you have placed a floppy disc drive (why!) or a card reader (that’s better) in the lower 5.25in drive bay. Down the sides of the case are several grilles for airflow, so don’t put a drink on top in case it spills.
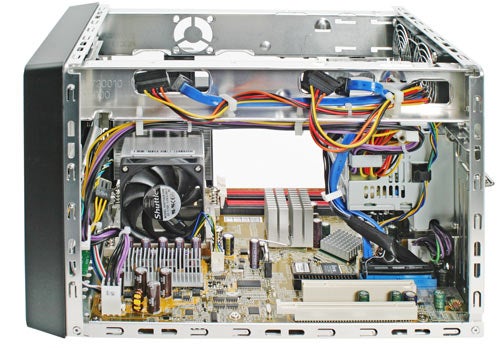
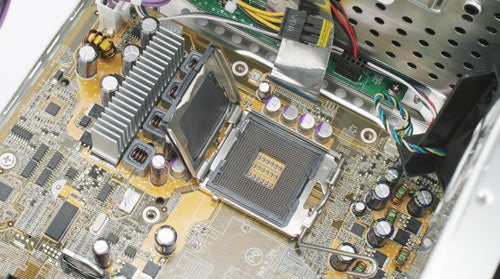
Let’s take a look at the specification. The SD39P2 is based on Intel’s 975X chipset that supports LGA775 processors at a FSB of up to 1,066MHz. It is combined with the ICH7-R southbridge – older that the ICH8 chipset that accompanies that P965 chipset, and therefore supports fewer USB ports. There’s a single PCI-Express x16 slot and next to it a regular PCI slot, which differentiates it from its predecessor, the SD37P2, which offered two x8 PCI Express card slots. While this gave it the ability to run two single slot ATI cards in CrossFire mode it prevented use of things such as TV Tuners or sound-cards. However, if you do go for a dual-slot graphics card on the SD39P2 then access to the PCI slot is obstructed anyway.
You also get four dual-channel memory slots giving you the potential for up to 8GB of RAM, should it take your fancy. Another improvement is that the motherboard now supports 800MHz memory, whereas the previous version was limited to 667MHz, though in reality there will be virtually no difference in system performance, at stock speed.
In terms of features the motherboard has pretty much everything you’ll be likely to need. It offers a total of four USB ports – two at the front and two more at the rear – which is just about enough. You’ll also find three SATA ports down on the motherboard – enough for the RAID 0, 1, 5 or 10.
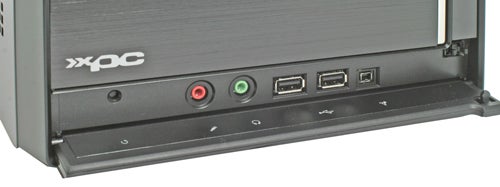
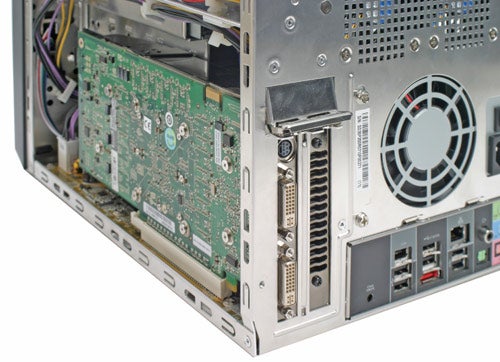
Also at the front is a mini-Firewire port and microphone and headphone sockets. Practically hidden is the reset button, which will need a small pen nib or such like to access it.
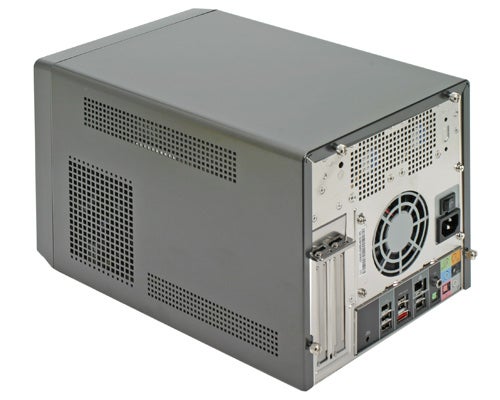
At the rear you’ll find a full size Firewire port and an external E-Sata port, perfect for adding drives such as Seagate’s Free Agent Pro. The Ethernet port is Gigabit capable, so you can avoid bottlenecks when transferring data. There’s no integrated Wi-Fi so you’ll have to add a dongle or a PCI card to get that though the included manual does point out a place on the chassis for an aerial – it’s just not supported by this motherboard.
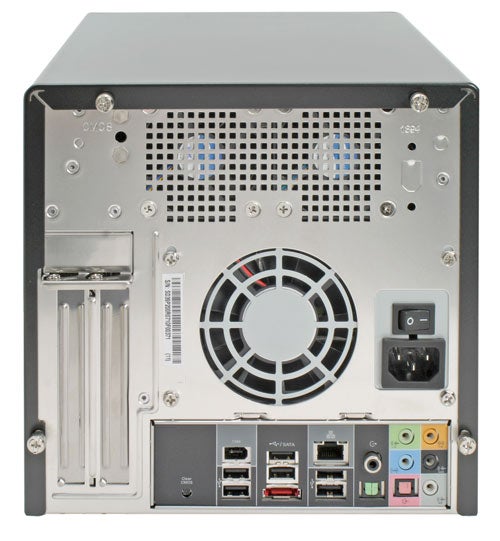
On the audio side there are the four line-out connections that will give you 7.1 surround from the integrated Realtek High Definition Audio chip. There’s also an analogue mini-jack line-in and an optical line-in. Both optical and coaxial line outs are also provided. What you won’t find are legacy connections such as parallel and serial ports, which won’t be missed by the vast majority of potential buyers. As on the front a small reset button is present, though this one is for the CMOS. This is here as due to the relatively cramped interior it would be almost impossible to reset the CMOS the conventional way with a jumper on the motherboard.
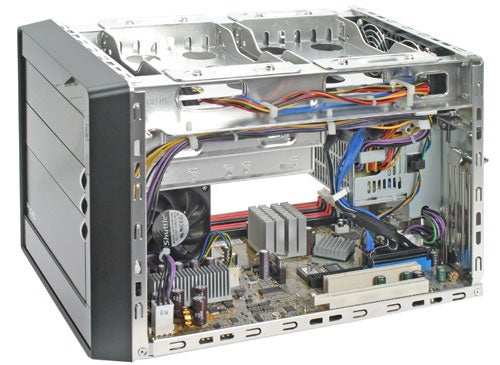
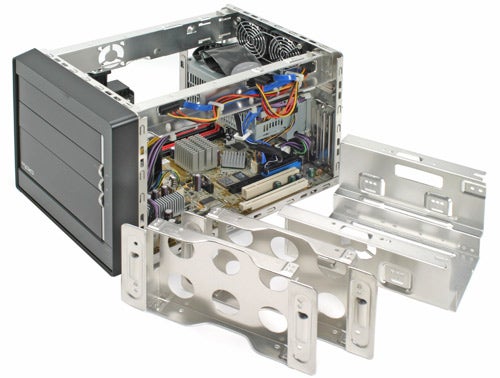
Getting inside the Shuttle is easy – you just need to remove the four standard thumbscrews to slide the lid back and off. The first thing you’ll see is two drive bays for two hard disks – and it’s eight more screws to remove those. Underneath this is another 3.5in drive bay, for floppy, card reader or third hard disk.
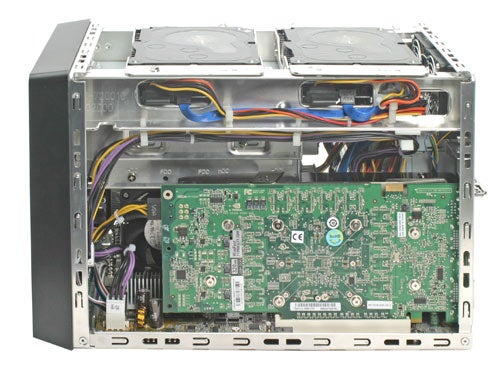
One of the benefits of Shutttle’s ICE cooling system is that it uses as few fans as possible, so the northbridge and southbridge are passively cooled. The CPU heatsink is chunky and has an 80mm fan pulling in air on one side, and a 60mm fan on the other. At the rear are two 50mm fans pulling the warm air out of the rear of the case. The dual-slot GeForce 8800 GTX I used for testing however, pushed a serious amount of hot air out at the rear, and I was intrigued to find out if it would all remain stable when working under load. The memory slots are relatively accessible as they’re at the side, so you can upgrade without having to dismantle the thing.
When I realised what it was possible to fit inside the SD39P2 I got quite excited by its potential. As such I endeavoured to get hold of some of the best components I could and put them inside to see if this machine could really operate reliably when properly specced up. As such I populated it with a 2.4GHz Intel Core 2 Quad Q6600 – not the fastest quad-core CPU Intel does, but at around £340, a lot cheaper than either the X6700 or the X6800 and therefore a fair match for the SD39P2.
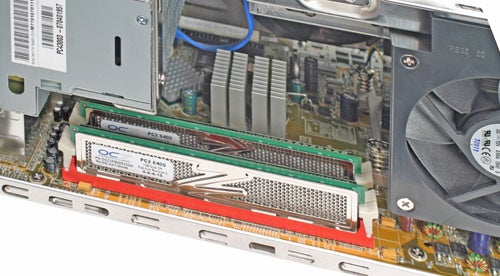
I wanted to make sure I used some decent memory, and OCZ kindly helped out by providing a matched pair of PC2 800MHz PC2 6400 1GB DIMM, with 4-4-4-15 timings. These are also fetchingly covered in gold heatsinks. After all when running under load you need your memory to be reliable.
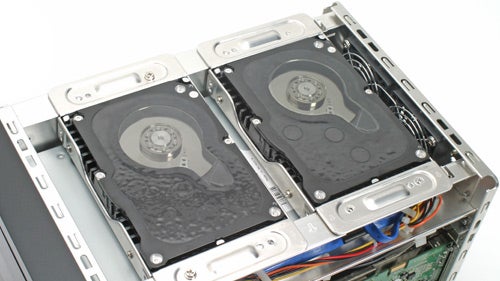
I also went to town on the hard disks, fitting not one, but two, Western Digital Raptor X hard disks in RAID 0. These are specialist drives aimed at gamers and high-end workstation users and spin at 10,000rpm, the only SATA drives on the market that do so, delivering blistering performance. I was actually sent the versions of the drives with a glass lid, which actually let you see what’s going on inside. It is actually pretty cool to see the discs spin up and watch the actuator head move incredibly fast across the spindle – though it’s all rendered rather pointless once the lid goes on. It could be a great incentive to mod a Shuttle case, which if you look around the web has been done.
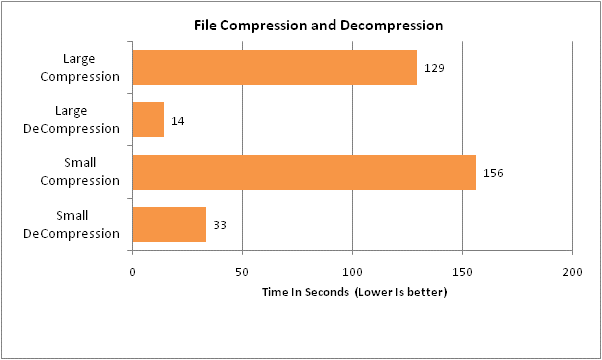
There are two downsides to the fantastic performance you get from the Raptors – they generate quite a bit of heat, which will make a good test for the cooling performance of this compact system, and that the capacity of each disk is limited to a relatively measly 150GB. This is why I went for RAID 0 – though striping two discs together increases the chance of data loss and does not necessarily give significantly better real world performance than one drive, at least you get the benefit of having a decent sized 300GB partition. Still that’s not enough these days, hence the addition of a 750GB Seagate hard drive too. That’s a system that’s pretty sorted for storage.
Finally, I went with a GeForce 8800 GTX card to get the best gaming performance possible and to see if the 400watt PSU could really deal with three hungry hard disks and an optical drive.
Putting it together was quite straightforward, with a couple of minor issues slowing me down. In my eagerness to try out the double slot graphics card I forgot to wire up the third hard disk, so had to remove it again and the other hard disks to get to the SATA port. Getting a dual-slot card in is a little tricky, but if you’re careful it can be done quite easily and I took one in and out several times. There was a question on whether the SD39P2 would properly support an 8800 GTX as it requires two 6-pin PCI Express power connectors and only one comes off the board. You can use a Y-Adaptor that splits the connector into two but this is not provided. I was told by Shuttle that this connector comes with 8800 GTX graphics cards, but if you don’t have this adaptor you can still use a Molex to 6-pin adaptor. I successfully benchmarked in this configuration but it’s potentially less stable as the optical drive and the second power connector on the graphics card are coming off the same power rail, which isn’t ideal.
I also had trouble lining up the optical drive – after screwing it in, the button on the front wasn’t pressing on the eject key, which meant some fiddling about, but I got there in the end. Another issue was the SATA connectors running along the side for the drives in the top bays – at first I thought they wouldn’t fit, but in fact they did, I just had to bend them a little.
The BIOS options were straightforward and I went with the default RAID cluster size. I noticed however that the memory had defaulted to 667MHz. When I manually moved it up to the supported 800MHz, the system refused to boot – upping the voltage by 0.2V, solved this straight away and all was happy from then on.
Powering on, installing Vista proved straightforward and once completed I installed all the drivers from the included CD in one hit – before using Windows update to get the latest versions. It was all delightfully speedy and smooth.
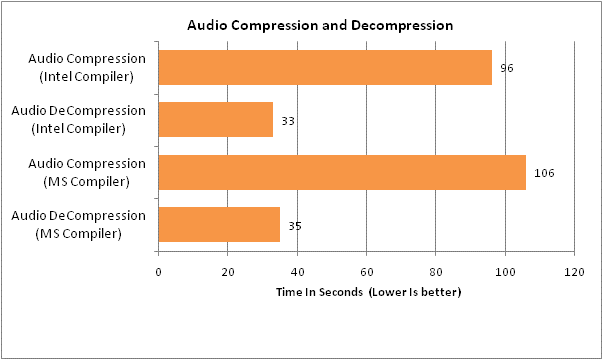
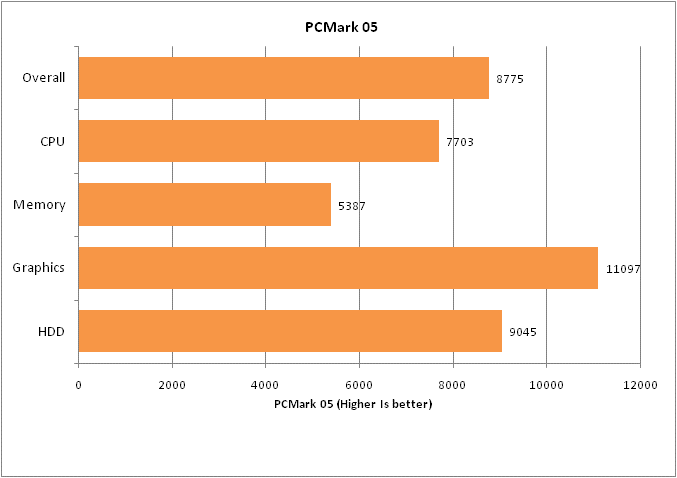
To see if it all proved stable we ran the full gamut of tests and I was pleased to find that it ate its way through them with no crashes – there’s a fair amount of heat chucked out the rear and there’s some background noise from the two Raptors, but if you go with a single slot card and a regular hard disk, this could be a very quiet system indeed. There are actually four fan settings in the BIOS, Ultra-slow,. Slow, Mid, and High. I actually conducted all tests with it on ultra-slow, making the stability even more impressive.
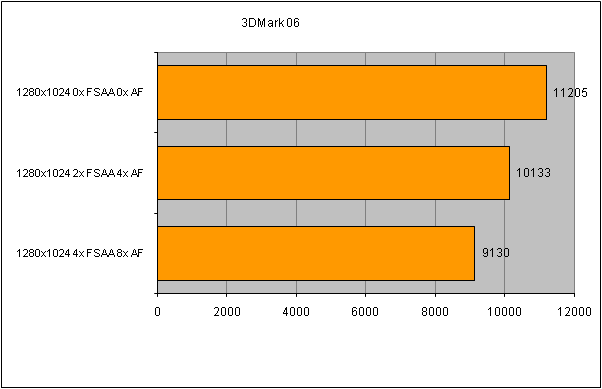
Performance was pretty much blistering – and the results are not a million miles away from the heavily overclocked Vadim, which costs over four grand.
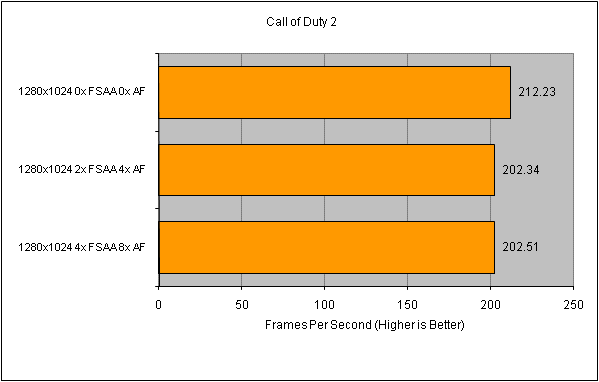
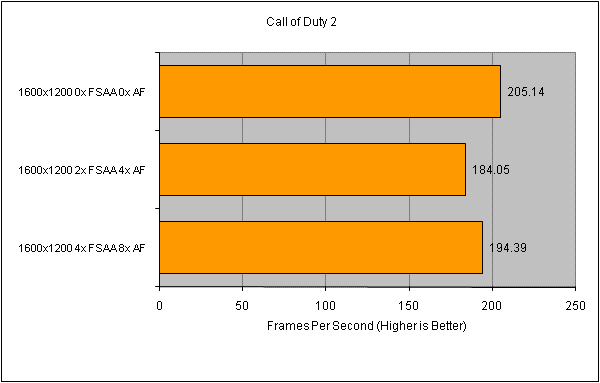
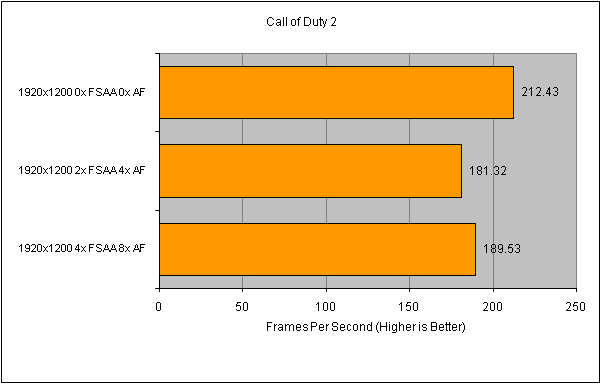
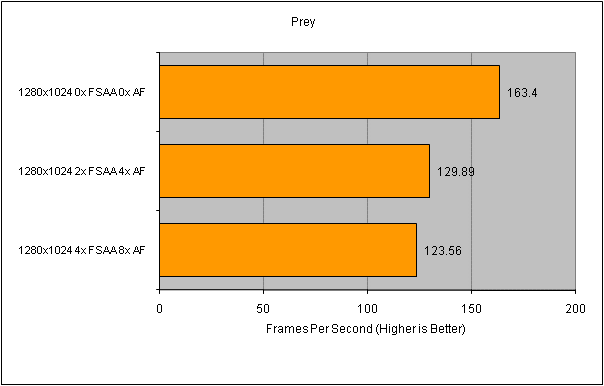
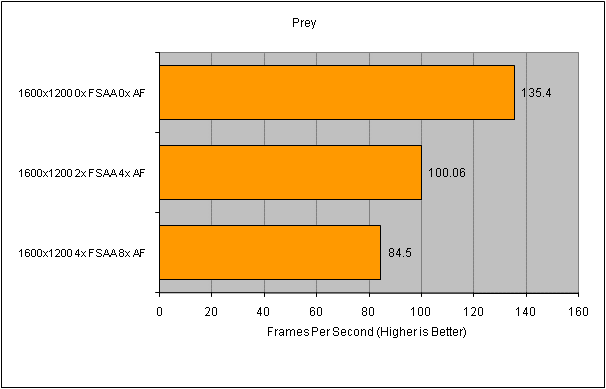
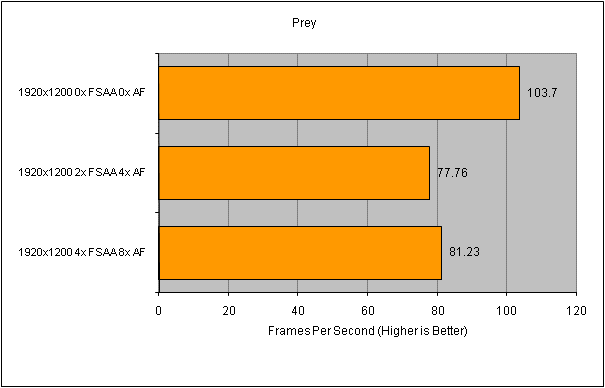
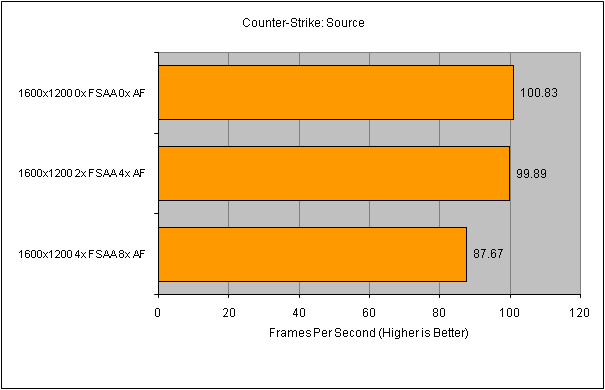
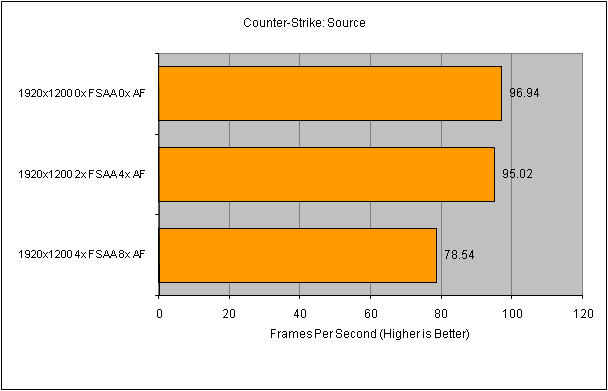
As well as our regular benchmarks I loaded up one of my favourite games, Oblivion. This is still one of the most demanding games around for systems, stressing the graphics card heavily in outdoor scenes and the hard disk on loading times. The experience on the kitted out SD39P2 was just fantastic, with levels loading speedily and none of the stuttering I experience in my home system.
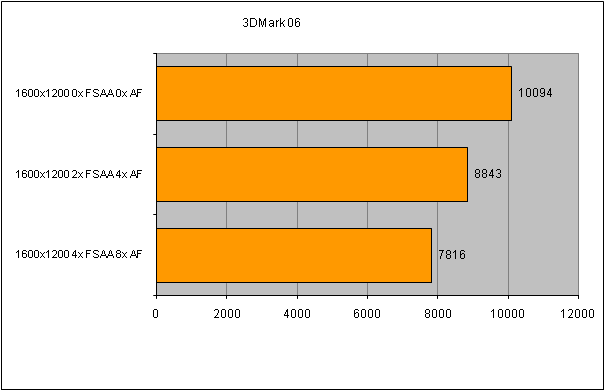
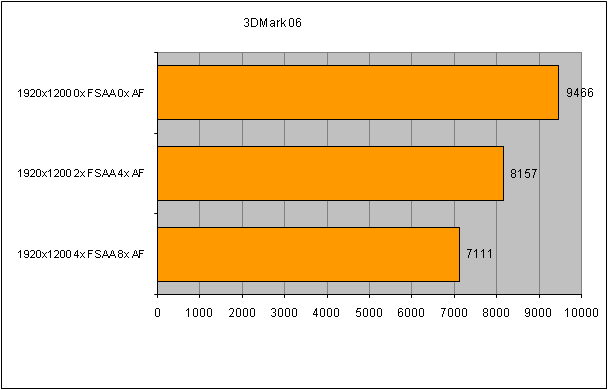
Interestingly, I found that if you want a high image quality level of 4x FSAA and 8x anisotropic filtering even this system was limited to 1,680 x 1,050 resolution. It could do 1,920 x 1.200 but the frame rate dropped to around 15fps in busy scenes.
If you’re a gamer and you go for a dual-slot card, the only thing of note that you’ll miss would be a dedicated sound card such as an X-Fi. However, the Realtek audio still sounds decent and considering all the other benefits I’d say it was a sacrifice worth making. Wouldn’t it be great if Shuttle could get Creative to embed a basic X-Fi into a system? Then there would be no compromises. Sure this would add to the cost, but this is already a premium option.
The cheapest I could find the SD39P2 was £310, and you can get a regular 975x mobo for under a £100 – spend the same on a case and £50 on a PSU and you’re still looking at a big difference. Still, I was so impressed with the completed system that I’d say it’s a price worth paying. It may be expensive, but that’s not to say it’s not decent value.
If you want real power then in a small case, the Shuttle SD39P2 proves emphatically that it really is possible.
”’Verdict”’
Shuttle soldiers on with this latest design. It handles Intel quad core, a trio of hard disks, and a super fast 8800 GTX graphics with ease so whatever you want to put inside this machine, you can be confident it’ll deliver the goods – compact, stylish, quiet and powerful, the SD39P2 is worth the extra over standard cases.

Trusted Score
Score in detail
-
Value 8
-
Features 9
-
Performance 9

Editorial independence
Editorial independence means being able to give an unbiased verdict about a product or company, with the avoidance of conflicts of interest. To ensure this is possible, every member of the editorial staff follows a clear code of conduct.
Professional conduct
We also expect our journalists to follow clear ethical standards in their work. Our staff members must strive for honesty and accuracy in everything they do. We follow the IPSO Editors’ code of practice to underpin these standards.