The enforced home working movement has, in some ways, aided the pursuit of a healthy work life balance, but has also presented some new challenges.
The increased use of tools like Slack have given managers and peers greater access to colleagues for frequent “just a quick one” requests – even when work hours are over. Likewise, many of us are now working less traditional working hours, meaning pings can flood in when we’re off the clock.
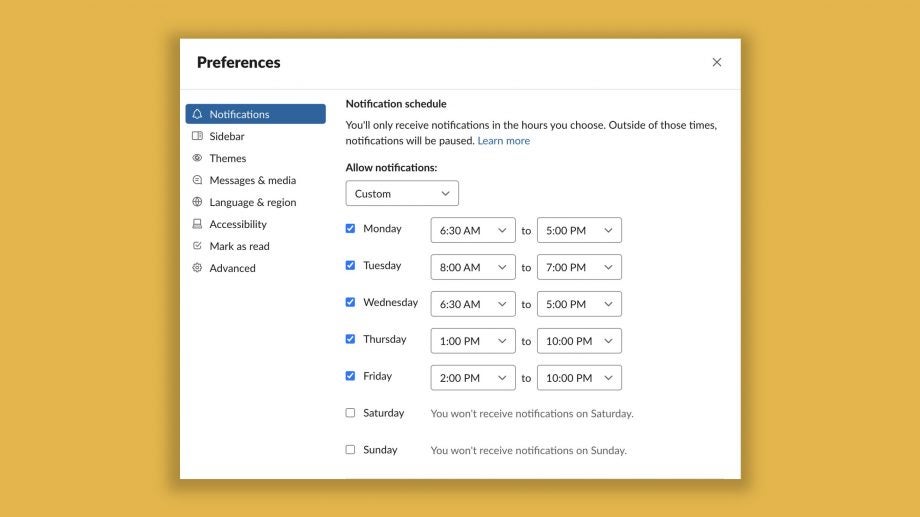
Perhaps realising this, the popular Slack office communications tool is now enabling users to schedule their alerts to better suit their working hours.
The recently-added tool enables users to input their available hours for the week, with notifications automatically muted the rest of the time. Previously it had been possible to turn off notifications, but it had to be done manually. Now Slack is explaining how to set the schedule.
Here’s how it works on desktop:
- Click your workspace name in the top left corner of the app
- Hover over Pause notifications then select Set a notification schedule from the menu.
- Scroll down to Notification schedule.
- Open the drop-down menu below Allow notifications and select an option: Every day, Weekdays, or Custom. If you select Custom, uncheck the box next to any days you don’t want to receive notifications.
- Choose a start and end time for notifications. Your settings will automatically save, so click the close icon when you’re done.
It's the moment some of you have been waiting for! You may now customize your notifications on a per-day basis. If your schedule doesn't conform to traditional work hours, this one's for you. ? https://t.co/VVSQvzNIbI pic.twitter.com/SLPUCW2NCf
— Slack (@SlackHQ) June 25, 2020
The tools are perhaps more useful for the iOS and Android mobile apps though, given we can always close down our laptops, but smartphones tend to be in use whether we’re working or not.
For iOS, the scheduling tool works as follows, while the Android methodology is practically identical:
- Tap the You tab at the bottom of the screen.
- Tap Notifications.
- Tap Notification Schedule.
- Tap Allow notifications at the top of the screen and select an option: Every day, Weekdays, or Custom. If you choose Custom, tap any day you don’t want to receive notifications, then toggle notifications off.
- Choose a start and end time for notifications. For Every dayor Weekdays, tap Start or End to choose when you’ll receive notifications on those days. For Custom, tap any day, then select your Start and End times.
The change was actually made in late June, but is getting a little more press coverage this week.

Editorial independence
Editorial independence means being able to give an unbiased verdict about a product or company, with the avoidance of conflicts of interest. To ensure this is possible, every member of the editorial staff follows a clear code of conduct.
Professional conduct
We also expect our journalists to follow clear ethical standards in their work. Our staff members must strive for honesty and accuracy in everything they do. We follow the IPSO Editors’ code of practice to underpin these standards.