Android 6.0 Marshmallow: Tips and tricks

Poking the Marshmallow: All the best tips, tricks and hidden features to get the most out of Android 6.
Another year, another big Android update. The new version of Google’s mobile software is Android 6.0 Marshmallow and its currently available on all the Nexus devices released in the past two years, and comes as standard on the fantastic Nexus 6P and Nexus 5X.
We’ve been deep diving into the new software to find out exactly how it ticks. On the surface it may seem a lot like Android 5.0 Lollipop. But get a grip on its new semi-hidden extras and you’ll find it lets you snag information more quickly, and in a smarter way, than any version of Android before.
We’ve put together the hit-list of all the tips and tricks you need to get the most out of the new release of Android M. Check ‘em out.
Related: Best sim-only deals
Just say ‘Ok Google’ from the home screen for instant assistant access
Android Marshmallow makes the Now assistant way more useful than it has ever been. It’s all about being quicker to access, and Android one-ups Apple by not even requiring a button press to turn on voice activation.
As long as you’re on the home screen, you can simply say ‘Ok, Google’ to start Google Now’s voice commands. We presume this works without killing your battery because unless you’re one of those awful people who idly flicks around your home screen in the cinema half-way through a film, it’s not as if you spend all that much time on there, is it? If you do, you’re doing it wrong.
Related: Android Marshmallow – Everything you need to know

Hold down the Home button for an instant info injection
Voice interaction is one thing, but there’s a much better way to get a quick Google Now injection without talking to your phone. Wherever you are, just hold down on the Home soft key and the Google Now overlay will pop up.
What this does is to scan through all the text on-screen to find any topics it might be able to offer-up Google Now info cards on. It’s perfect for quickly finding phone numbers for restaurants, looking up reviews for films and getting directions to places. It’s not going to do anything you couldn’t have done with your phone before, but the new Google Now style really greases your path from one stage to the next. In a good way.
Related: iPhone 6S Plus vs Galaxy Note 5

Enter the system-UI tuner
Hidden within the settings in Marshmallow is a nifty new UI tuner that lets you switch about some of the options in the quick-settings bar. To enable this, drag down the notification panel, hold down the cog until it spins and a little message pops-up. Then head into Settings, scroll to the bottom and tap System UI tuner.
Turbo-navigating the apps menu
The Android Marshmallow apps menu may seem a bit jarring at first. It’s pretty different from the old one. However, Google does its best to make the transition easy.
One of the bits you might not notice at first is that you can quick-scroll through the apps menu by moving a thumb up and down the extreme right edge of the apps panel. This then moves through the alphabet, rather than just flicking through the apps as arranged, letting you jump to the apps that, for example, begin with ’s’. It’s the quickest way to navigate through a huge apps collection.

Personalise your lock screen
Want to name your phone, or at least put your own name on it? Android Marshmallow lets you do this with a Lock Screen Message, as Google calls it.
This is just a little sentence, word or phrase, that appears just below the time and date on your lock screen. You input the thing yourself in Settings > Security > Lock Screen Message.
We imagine it’ll be mostly used for vanity purposes, but company phones can be stamped with ‘property of X’, or you could always leave an abusive message there for any would-be phone thieves.
Related: What is Google Now On Tap?

How to unlock the easter egg
As ever, Android M has a little easter egg feature. It’s a bit of fluff that acts as Google’s sideways wink to all us geeks.
The way you access it hasn’t changed. Just go to Settings, scroll all the way down to About Phone and then tap a bunch of times on the Android Version Number entry. This will then bring up a big Android M logo. Tap on that again a few times to unlock the meat of the easter egg.

How to use Android Pay
Android Pay isn’t available in the UK yet: sorry British readers. However, Americans out there can already check out Android Pay in all its glory.
While not something entirely new, it has been given a renewed push with Android Marshmallow. There’s a Tap & Pay section in the Settings menu, but you’ll actually need to install separate apps that support Android Pay to get going.
You see, Android Pay works using an API, a sort of ‘plug in’ that slots into third-party apps to make them work with the Pay platform. However, the lone Android Pay app is what lets you get started using the service on the high street. Can’t find it? You won’t be able to download it unless you’re in a territory that supports Pay.
Related: Android Pay vs Apple Pay
Unlock developer mode
Want developer-like control? Switch on developer mode to get access to all sorts of tech switches and dials. You do this by going to Settings > About Phone and tapping seven times on the Build Number entry.
What this does is to unlock a new submenu in Settings called Developer Options. Looking down it, there’s nothing too interesting that hasn’t featured in previous versions of Android. However, one bit you might want to check out is the set of animation scale controls. These alter how quickly menu transition animations play out, and can affect how fast or smooth a phone feels.

How to customise Silent mode
Like Android Lollipop, Android Marshmallow uses a ‘Do Not Disturb’ feature rather than a traditional Silent mode. You see, the issue is that so many of us use our phone for all sorts these days that a Silent mode can mean you miss a really, really important alert or alarm.
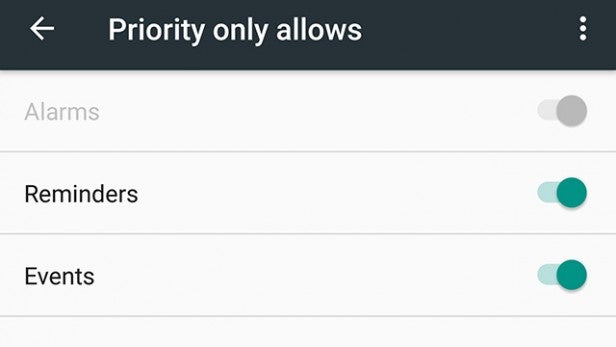
It’s pretty sensible, then, that Android M lets you pretty thoroughly customise how Do Not Disturb works. The key is to work out what your want to label a ‘priority’ notification.
In Settings > Sound & Notification > Do Not Disturb > Priority Only Allows, you can select priority contacts, choose whether events/reminders get past the barrier and whether to let insistent repeat callers through.
Related: App permissions – The most important feature in Android Marshmallow

Check out the Memory screen if you have performance issues
A lot of fuss has been made about how Android Marshmallow is meant to be more careful about memory use than Lollipop. However, we don’t see much of that on the surface. Memory management in Android is all about the little tech gremlins in the background doing a good job.
You can monitor things more carefully, though. In Settings > Memory you can look at what apps are using the most RAM, and how the RAM usage has panned out over the last 3-24 hours.
To be clear: this is a way to identify problems, not to fix them. You see, Android’s memory management is so automatic that giving you more control just wouldn’t really work.

How to switch your default browser, SMS app and dialler
As usual, Android Marshmallow lets you switch out core parts of the Android experience for third-party ones. It’s not proud.
The top bits you can change are the texting (SMS) app, the browser, the phone app and the keyboard. There are loads of each kind available for free from Google Play, but a few worth checking out are Chomp SMS, Dolphin browser and the Swype keyboard.
To alter the SMS/phone/browser defaults, go to Settings > Apps > Settings (cog icon) > Default Apps. Want to switch the keyboard? Go to Settings > Language & Input > Current Keyboard. Make sure you’ve installed a third-party keyboard before trying this, though, or there’ll be nothing to switch over to.

Use Battery Saver to make your phone last longer in emergencies
One of the neat features Google introduced with Android Lollipop is Battery Saver, a power-saving mode. Yep, it’s the sort of feature we’ve seen in custom Android UIs for years but it’s still relatively new in the stock version.
It doesn’t seem radically changed in Marshmallow, but is worth using if you’re ever seriously low on juice and need the phone to last. The downside is that it’s really not suitable for everyday use as it makes the top and bottom of the screen turn orange (just to make sure you know it’s on).
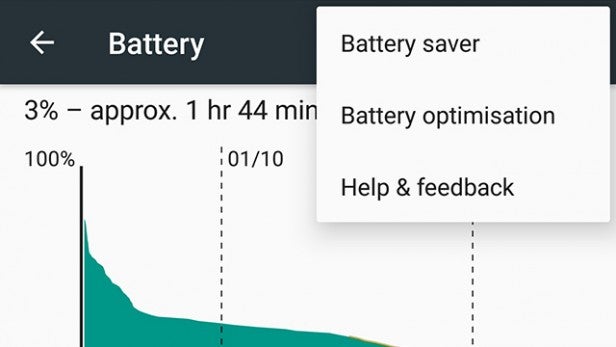
To turn Battery Saver on and off, go to Settings > Battery, then tap the three-pip button in the top-right of the screen. It holds the Battery Saver menu. Here you can also make Saver turn on automatically when the charge level starts circling the drain.

Switch off battery optimiser to make apps react quicker
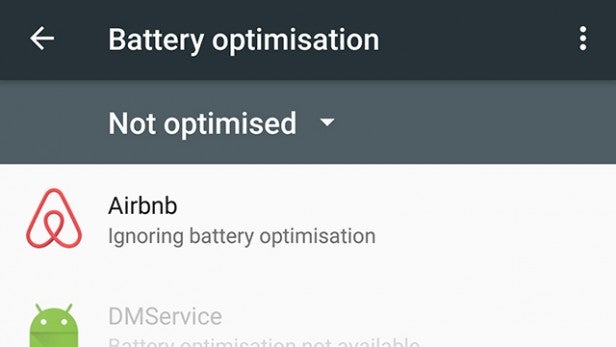
As well as having Battery Saver, Android Marshmallow introduces more involved battery optimisation settings. These control things like how apps access mobile data in standby. By default all installed apps use battery optimisation, meaning that mobile data requests will likely be batched together to save power.
If there’s an app you want to stay totally responsive even when not in use, you can turn off these optimisation features for specific apps. To pick out some ‘above the law’ apps, go to Settings > Battery and tap the three-pip icon at the top-right of the screen.
Now select Battery Optimisation in the drop-down menu and tap the drop-down menu in the screen that follows. Select All Apps. Now you’ll see a list of all your installed apps. Tapping on each will let you choose whether to keep optimisation on or switch it off.

How to manually check for software updates
Think you might be due a software update? These days pretty much all the updates we get appear automatically OTA (over the air). However, you can also manually check if you think you’ve missed out.
To do this, go to Settings and scroll down to the bottom. Now tap on About Phone and select System Update. Down at the bottom of this page there’ll be an option to check for a software update.


