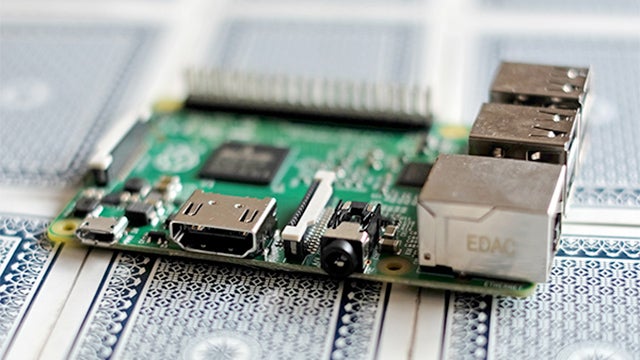
Turn your Raspberry Pi into a media demon
If you want to make your Raspberry Pi or Raspberry Pi 2 into a little media centre, you need a version of XBMC, nowadays known officially as Kodi. As you’re reading this you’ve probably heard of it, but XBMC stands for Xbox Media Center.
We’re going to look at how to get up and running with this great piece of software, and have your Pi boot straight into it so you can treat the Raspberry Pi more like a Now TV box than a little computer.
SEE ALSO: Raspberry Pi 2 vs Raspberry Pi
Step One: Pick your XBMC version
As an open-source piece of software, there’s not just one version of XBMC floating around. There are several for the first-generation Raspberry Pi models.
The most popular are Raspbmc and Openelec, two projects that bring the XBMC software to Raspberry Pi. What’s the difference? For most people, not a great deal. They all use the same media player base, so should be able to handle the same sorts of files.
There are subtle differences in performance and how they use plugins, but you can’t go wrong with either. Openelec works for both generations of Pi, but Raspbmc only works for the older type.
Creator of Raspbmc, Sam Nazarko, has said his software won’t support the Raspberry Pi 2, as development is moving to a newer piece of software called OSMC (Open Source Media Center). You can try this out right now for either generation of Pi, although as it’s in Alpha it’s less stable than the established flavours of XBMC.
Our tip for Raspberry Pi 2 owners: try out Openelec and OSMC.

Step Two: Download the image
What we’re going to do now is to create a bootable SD card, and the simplest way to do this is to download the software in image form, avoiding having to compile the files ourselves. The .img file will include everything we need.
You’ll find both generations of Openelec Raspberry Pi images over at the Openelec website, and just for the first Pi model over at the Raspbmc download page.
These images are distributed as Gz zip files, which can be opened using the built-in compression utility in OS X, or using 7zip for Windows users. Unzip and drop the .img file in a folder of your choosing, we’ll need it later.
Alternatively, the newer OSMC is available in image form, but also offers a one-button installer that avoids needing any tech know-how at all. It’s available for Mac OS X or Windows, and supports both generations of Raspberry Pi.
OSMC looks to be the future of Raspberry Pi as a media centre, but at present it’s in quite an early state, so we advise checking out both it and Openelec/Raspbmc if you have the time.
Step Three: Prepare the bootable SD card
On Windows
If you’re using a Windows computer, we need to get hold of an application that will let us write the image to the SD card. We’re going to use Win32 Disk Imager, available for free from Sourceforge.
Before writing the image, we’re going to format the card, essentially to ensure it’s formatted so the Raspberry Pi can read it properly. It needs to use the FAT file format, although cards use this by default anyway. Download the SD Formatter tool from the SD Association, install and run it.
Make sure you pick the right volume when using the SD formatter,
otherwise you may lose an awful lot of important data. Here you can also
pick a new name for the card. We recommend a volume name you’re not
going to mistake for anything else: PIXBMC, perhaps. Select Overwrite
Format in the app then set it formatting. This will take a good few
minutes if you’re using a larger-capacity card.
Next, run Win32 Disk Imager and select the .img file we downloaded earlier. This will write all the required data to the card. But as when formatting, make sure you select the right drive before doing so. Giving the SD card a clear label during formatting is one way to help out here.
When the image has finished writing, eject the card before removing it. This is done by right-clicking on it and selecting Eject in Windows Explorer.
On OS X
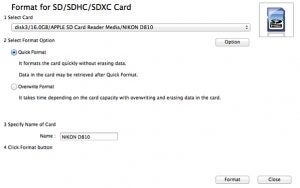
The first thing we need to do is to prep our SD card by formatting it. We’re going to use the SD Formatter tool from the SD Association.
Run it, select Overwrite Format and pick a new name for your card. Choose something easily recognisable.
Hit the Format button and wait: it can take a while for larger cards.
Next we need a utility to let us write the SD image downloaded to the card. You can do this with command line prompts, but there’s a little graphical tool that’s much friendlier to use. It’s called RPi-SD Card Builder, and takes away any need for tech know-how.
Run this app, select the image we downloaded earlier and it’ll do the rest of the hard work. Before removing the card from you Mac, right click its entry in the Finder window and select Eject to ensure there’s no data corruption on yanking the thing out.
Step Four: Install OSMC
As it has a dedicated installer, producing an OSMC card is a lot simpler. All you need to do is to format the card using the SD Formatter tool as above then run the installer app.
Part of this process lets you choose the generation of Raspberry Pi you’re using, and the software does the rest. As with the other installations, though, make sure you eject the card before taking it out of your laptop/PC.

Step Five: Finishing up and alternative methods
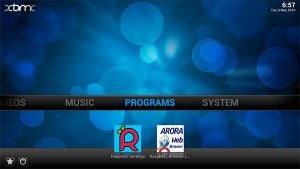
Once your card is prepped, you can just put it in the Raspberry Pi and get going. However, there are other methods you may want to explore, especially if you don’t want your Pi to just run XBMC/Kodi/OSMC and nothing else.
NOOBS is an SD card image that allows installs of multiple packages at once, including Raspbian and the most popular XBMC clients. As the name suggests, it’s there for people who don’t really know what they’re doing with Linux, the software upon which Raspbian is based.
To get on board with NOOBS, just download the image from the Raspberry Pi website and write it to an SD card, just as we did with the other images above. It will then boot up into a menu system that lets you pick the packages you want to install.
The downside of this approach is that you don’t get the seam-free experience on offer in something like Raspbmc, but it is a lot better for tinkering with, meaning you don’t need a whole bunch of SD cards on hand.

Editorial independence
Editorial independence means being able to give an unbiased verdict about a product or company, with the avoidance of conflicts of interest. To ensure this is possible, every member of the editorial staff follows a clear code of conduct.
Professional conduct
We also expect our journalists to follow clear ethical standards in their work. Our staff members must strive for honesty and accuracy in everything they do. We follow the IPSO Editors’ code of practice to underpin these standards.