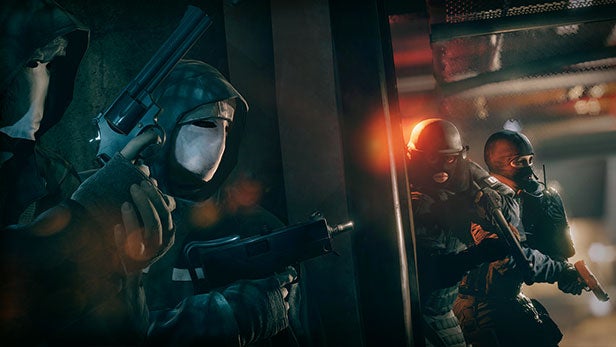
Get ahead in Ubisoft’s 5v5 shooter
Rainbow Six Siege is finally out, and although you might feel like you’re prepared, Siege is a rather different FPS from the rest – and it’s predecessors.
Because of that, TrustedReviews is here to help make sure you’re fully prepared for the various modes, especially the excellent 5vs5 PVP mode.
Although we might focus on PVP tips and tricks, you should still bare these tactics in mind as you play the co-op PVE and single-player Situations components too.
After all, who doesn’t want to go into a fire fight totally prepared?
We’ve also drilled down into all 20 Rainbow Six Siege Operators to give you an extra head start. So go on, dive in.
Don’t forget to read our extensive Rainbox Six Siege review
1. Learn the traits of each Operative
Team composition is crucial, so you’ll need to be very familiar with the 20 Operators available across the attacking and defending sides and their respective roles.
On a very basic level, Operators are split into five roles: Pointman, Breacher, Trapper, Blocker and Support.
Pointmen are the ones who are the first in line to face the threat. They’ve usually got a ballistics shield, which is great for protecting themselves and their teammates.
Breachers excel at creating new entry points and taking out enemies via destruction. Each one has a unique weapon for blowing stuff up and they’re all lots of fun.
Trappers, on the other hand, specialise in defensive manoeuvres, turning each location into a deadly fortress. Booby traps and more can make moving around a treacherous endeavour when there’s a Trapper about.
Then there are the Blockers. These guys have gadgets that aim to slow down the enemy, even if they are non-lethal. But they can often neutralise offensive gadgets and tools, turning the flow of the game to your advantage.
Finally, you can play as a Support. They specialise either in providing intel, extra armour or other useful items.
You’ll also need to keep in mind that each Operator moves at a different speed and has a varying level of armour. It’s the usual deal: The faster you move, the less armour you’ll have, while the slower you are the more armour you’ll be carrying.
Take a look at all the Operatives below, check out their gadgets, weapons and other details to make the best choice for you:
Glaz
Team: Attackers
Armour Rating: Medium
Speed Rating: Medium
Primary Weapon: 0TS-03
Secondary Weapon: PMM, GSH-18
Gadget 1: Smoke Grenade
Gadget 2: Breach Charge
Unique Gadget: HDS Flip Sight
Glaz’s HDS Flip Slight allows him to swiftly alternate between a standard scope and an increased magnification of the barrel mounted rifle sight.
Fuze
Team: Attackers
Armour Rating: Heavy
Speed Rating: Slow
Primary Weapon: Ballistic Shield, 6P41
Secondary Weapon: GSH-18, PMM
Gadget 1: Breach Charge
Gadget 2: Stun Grenade
Unique Gadget: Cluster Charge (APM-6 “Matryoshka”)
Fuze’s Cluster Charge is a rather effective way to clear a room. It burrows through walls or floors, dispersing live cluster grenades as it spins for lots of damage.
It’s best for situations where collateral damage won’t be an issue, i.e don’t use it in a hostage situation unless you want to kill them and force the other team to win.
Kapkan
Team: Defenders
Armour Rating: Heavy
Speed Rating: Slow
Primary Weapon: 9x19VSN, SASG-12
Secondary Weapon: PMM, GSH-18
Gadget 1: Barbed Wire
Gadget 2: Nitro Cell
Unique Gadget: EDD MKII
Known as the “Entry Denial Device”, the EDD MKII really does what it says on the tin. It can be mounted on windows and door frames, exploding when enemies enter trapped entryways, projecting shrapnel at the enemy.
It’s really a glorified C5 charge, but it’s rather effective.
Tachanka
Team: Defenders
Armour Rating: Heavy
Speed Rating: Slow
Primary Weapon: SASG-12, 9X19VSN
Secondary Weapon: GSH-18, PMM
Gadget 1: Barbed Wire
Gadget 2: Deployable Shield
Unique Gadget: Mounted LMG
Tachanka is a formidable force for the defending team, thanks to his tripod-mounted LMG to take out oncoming enemies.
It does have limited movement though, so make sure you’re not surprised from behind.
Instead, position the LMG in a corridor or doorway, or in conjunction with a deployable shield or barbed wire.
Jager
Team: Defenders
Armour Rating: Light
Speed Rating: Fastbandit
Primary Weapon: M870, 416-C
Secondary Weapon: P12
Gadget 1: Deployable Shield
Gadget 2: Barbed Wire
Unique Gadget: ADS-MKIV “Magpie”
It might sound a little strange, but Jager’s Magpie is an active defence system that can come in quite handy. It can be mounted on walls or floors and is kitted out with four surveillance cameras for precise targeting and a grenade launcher.
You can pretty much guess what comes next.
Bandit
Team: Defenders
Armour Rating: Light
Speed Rating: Fast
Primary Weapon: MP7, M870
Secondary Weapon: P12
Gadget 1: Nitro Cell
Gadget 2: Barbed Wire
Unique Gadget: CED-1 Shock Wire
Bandit’s excellent CED-1 (“crude electrical device”) might be relatively low tech, but it can electrify any metallic elements to shock assailants as they come through a door.
To be honest, we’ve never found a use for Bandit yet.
Blitz
Team: Attackers
Armour Rating: Heavy
Speed Rating: Slow
Primary Weapon: Ballistic Shield
Secondary Weapon: P12
Gadget 1: Smoke Grenade
Gadget 2: Breach Charge
Unique Gadget: G52-Tactical Shield
Blitz’s special gadget is very self-explanatory. It’s a huge ballistic shield fashioned with rows of flash-bang grenades for a bold entrance.
It obviously gives you cover while you take out enemies with your well-aimed pistol.
IQ
Team: Attackers
Armour Rating: Light
Speed Rating: Fast
Primary Weapon: AUG A2, 552 Commando
Secondary Weapon: P12
Gadget 1: Breach Charge
Gadget 2: Stun Grenade
Unique Gadget: Red MKIII “Spectre”
The Spectre is a fantastic gadget that can detect any active electronic components in the immediate vicinity, from IEDs to other types of specialised military gear.
Great for making sure the defending team aren’t planning a nasty surprise.
Montagne
Team: Attackers
Armour Rating: Heavy
Speed Rating: Slow
Primary Weapon: Ballistic Shield
Secondary Weapon: P9, LFP586
Gadget 1: Stun Grenade
Gadget 2: Smoke Grenade
Unique Gadget: Le Roc Extendable Shield
Montagne’s seriously impressive shield is made of a composite of reinforced alloys and Kevlar. That means it’s fantastic for protecting its user – and team members scurrying behind him – from arms fire and close quarters combat.
It also collapses to half its size, making sure you can move a little more quickly if required.
Twitch
Team: Attackers
Armour Rating: Medium
Speed Rating: Medium
Primary Weapon: G2, 417
Secondary Weapon: LFP586, P9
Gadget 1: Breach Charge
Gadget 2: Smoke Grenade
Unique Gadget: RSD Model 1 Shock Drone
Twitch’s Shock Drone can scout enemy locations and deliver an electric shock that can take out electrical devices and distract hostiles.
What’s more, the little drone holds more than one electric shock, so you can thoroughly confuse your enemies.
Doc
Team: Defenders
Armour Rating: Heavy
Speed Rating: Slow
Primary Weapon: SG-CQB, MP5
Secondary Weapon: P9, LFP586
Gadget 1: Barbed Wire
Gadget 2: Deployable Shield
Unique Gadget: MPD-0 Stim Pistol
Doc’s handheld, trigger-operated stim pistol delivers a 1mg dose of epinephrine in a saline solution. What that means is that Doc can deliver a sudden reviving jolt to anyone in distress, bringing them temporarily back to full health until they can seek further medical assistance.
You’ll need to stay within close proximity of your teammates if you’re to be of any use as Doc. Maybe buddy up with someone with a ballistic shield too. 
Rook
Team: Defenders
Armour Rating: Heavy
Speed Rating: Slow
Primary Weapon: P90, MP5
Secondary Weapon: LFP586, P9
Gadget 1: Deployable Shield
Gadget 2: Barbed Wire
Unique Gadget: R1N “Rhino” Armour
Rook’s unique trait is that he can drop a bag full of armour for his fellow defending teammates to equip themselves with pre-fight.
It allows them to don the lightweight, yet sturdy armour before the preparation phase is over.
Thermite
Team: Attackers
Armour Rating: Medium
Speed Rating: Medium
Primary Weapon: M1014, SIG 556
Secondary Weapon: M45-MEUSOC, 57USG
Gadget 1: Frag Grenade
Gadget 2: Breach Charge
Unique Gadget: Brimstone BC-3 Exo-thermic Charge
The Brimstone is designed to breach reinforced locations using a portable explosive load.
Basically, Thermite is a formidable foe because the Brimstone can blow through reinforced walls by remotely detonating the exo-thermic charge. Just don’t be standing behind the wall when it goes off.
Castle
Team: Defenders
Armour Rating: Medium
Speed Rating: Medium
Primary Weapon: UMP 45, M1014
Secondary Weapon: 57USG, M45-MEUSOC
Gadget 1: Deployable Shield
Gadget 2: Barbed Wire
Unique Gadget: Armour Panel UTP1-Universal Tactical Panel
Castle’s armour panel can be rolled like a blanket and then attached to door frames and windows to secure breach points and potential lines of sight.
Ash
Team: Attackers
Armour Rating: Light
Speed Rating: Fast
Primary Weapon: G36C-C, Remington R4
Secondary Weapon: M45-MEUSOC, 57USG
Gadget 1: Breach Charge
Gadget 2: Smoke Grenade
Unique Gadget: M120 Crem (Compact Rifle Entry Munition) Breaching Round
Don’t be fooled by the strange name of Ash’s special gadget. This modified grenade launcher is equipped with 40mm breaching rounds that drill into their targets. That means she can breach through barricades, destructible walls and floors.
Pulse
Team: Defenders
Armour Rating: Light
Speed Rating: Fast
Primary Weapon: M1014, UMP45
Secondary Weapon: M45-MEUSOC, 57USG
Gadget 1: Barbed Wire
Gadget 2: Nitro Cell
Unique Gadget: HB-5 Cardiac Sensor
If you’re Pulse, you’ve got a handy way to help your teammates in those precious moments where you’re waiting for the attacking team’s assault.
The HB-5 Cardiac Sensor is capable of reading thermal signatures of the oncoming attackers through walls and other obstacles.
However, it only works when the attackers are nearly on top of you, but it’ll certainly give your defence the edge.
Sledge
Team: Attackers
Armour Rating: Medium
Speed Rating: Medium
Primary Weapon: 591A1, L85A2
Secondary Weapon: 226 MK 25, MAC 11
Gadget 1: Frag Grenade
Gadget 2: Breach Charge
Unique Gadget: The Caber Tactical Breaching Hammer
Our personal favourite attacking Operator, Sledge has the rather fearsome Breaching Hammer as his unique gadget.
As its name suggests, the Caber is swung by Sledge and can blast through walls and other barriers without the use of explosives.
It’s not a weapon to be on the receiving end of.
Mute
Team: Defenders
Armour Rating: Medium
Speed Rating: Medium
Primary Weapon: 591A1, MP5K
Secondary Weapon: 226 MK25
Gadget 1: Nitro Cell
Gadget 2: Deployable Shield
Unique Gadget: MONI GC90 Signal Disruptor
Mute’s Signal Distruptor is great protection against drones and breach charges. It blocks the signal from any remote-controlled devices within a small radius, rendering them utterly useless while the devices or the detonators remain within that radius.
It’s great for barricaded area to stop drones entering and seeing your defences, or placed at the bottom of a wall to prevent the detonation of breach charges.
Smoke
Team: Defenders
Armour Rating: Medium
Speed Rating: Medium
Primary Weapon: 591A1, FMG-9
Secondary Weapon: 226 MK25, MAC 11
Gadget 1: Nitro Cell
Gadget 2: Barbed Wire
Unique Gadget: Compound Z8 Remote Gas Grenade
As Smoke’s name implies, his special gadget is a portable defence system in the form of gas grenades.
The remote-detonated grenades are filled with noxious gas that incapacitates anyone that is exposed to it.
Thatcher
Team: Defenders
Armour Rating: Medium
Speed Rating: Medium
Primary Weapon: K33, L85A2
Secondary Weapon: 226 MK25
Gadget 1: Stun Grenade
Gadget 2: Breach Charge
Unique Gadget: EMP Grenade
These EMP Grenades are fitted with a self-contained micrscopic nuclear reaction that releases a blast of gamma radiation. This ionises with the atmosphere and creates a powerful electrical field that fries all electronic devices in the nearby area.
Related: Metal Gear Solid 5 tips and tricks
2. Don’t waste your attacking preparation time
“Knowing the position of your enemy or denying them access to yours should be one of your team’s top priorities. At the start of the preparation phase, the attackers spawn as drones. Your main priority is to scout out tracks, enemy positions and the objective locations. This will be key to the success of your mission.
Split up, tackle different levels and make sure you discover the locations of your enemies’ traps and the objective itself.
As the prep phase comes to an end, try to put your drone in a useful position, out of sight of the enemies. That’ll make sure it stays alive and can act as your eyes in the enemy camp mid-attack.
If you keep it safe and keep it hidden your drone can even tag enemies and keep them visible through walls for your team mates.
Related: PS4 vs Xbox One
3. Have a defence strategy
Use the preparation time when you’re defending to work out your defence strategy. Work out which areas of the map you want to zone off and make your base. Then fortify them with barricades, barbed wire and well-placed traps, that will make it harder for the opposing team to get to you.
Attackers will then find themselves slowed by your defences, and hopefully be left exposed.
Avoid the temptation to barricade yourselves in the objective room too. It’ll give your enemies the opportunity to surround you and your teammates, with little room for you to plan a counter attack.
Related: PS4 vs PS3
4. Take out drones
The defending team can help themselves a lot by keeping their eyes out for drones during the preparation phase. If you manage to shoot them before they spot the objective, you’ll give your team some more time to defend the target.
Just be careful, one tactic we adopted was to jump our drone around the hostage, with the defending team trying to shoot it and accidentally killing the hostage. Round 1 to us, but it makes for some very irate opponents next time around.
Also remember that if you don’t see any drones, the attacking team don’t know where you’re hiding out. In that case, the clock is your best ally. The more time that passes, the less time the attacking team has to find you and take you out.
Related: Xbox One vs Xbox 360
5. Keep your eyes open
Wherever you are in Siege, whatever side you’re playing on, it pays to keep your eyes open.
There are things that you’ll notice that will reveal the enemy’s location whether you’re playing PVP or PVE. Is there a wall that’s been additionally fortified? Is there some barbed wire poking out from under the door? Or even some boot prints on the floor?
Anything can be a clue, so stay alert.
Related: Best Xbox One Games 2015
6. Your ears are a weapon
Although sight is very important, so is your hearing. If you can’t see anything and don’t want to go in blind, you’ll often learn a lot more by lying in wait and listening for some audio cues.
It’s possible to hear enemies walking through barbed wired and breaking down barricades from quite a way away on a map. Plus, you’ll be able to hear your enemy’s footfall on the other side of a wall if you’re patient enough.
It can give you some insight into their location and give you the advantage if there’s a bit of a stalemate – particularly in the Situations modes.
Related: Best PS4 Games
7. Silence is not golden
If you don’t talk to your teammates, you’re not going to get very far in Rainbow 6: Siege. Period.
Communication is key here, right from the point you pick your Operators, through the preparation stage and into the fire fight.
You’ll need to talk tactics, choose various entry points, discuss fortification methods and more. If you’re the only one not talking, you’re going to be the first one taken out.
Related: The Witcher 3 Tips and Tricks
8. Destruction is an asset
Destruction opens up many opportunities in Siege, such as new navigation paths and lines of sight. You might understand the map layout, but you need to learn how to use different structures to your advantage.
You can shoot through certain walls to create a brand new vantage into the enemy camp, and might just catch them unawares. Shoot through them, throw flashbangs in or use other tactics to distract the enemy while the rest of the team hits them where it hurts.
Don’t forget there’s often the option to come in from above too. Some floors – along with the walls – are destructible and can open up new entry paths. There’s nothing better than dropping in on unsuspecting enemies via the roof. They’ll never see it coming.
Learn which surfaces are destructible and to what level quickly, then use them to your advantage whether you’re attacking or defending.
Related: Halo 5 Tips and Tricks
9. Try not to die
It goes without saying, but be careful when walking around a map. Rainbow 6: Siege practices permadeath, so a small mistake can cost you your life, and possibly the whole round for your team.
Make everything you do count, and for goodness sake don’t go all kamakaze on your team or lone wolf. Everything here is about communication and cooperation – unless you’re the last soldier standing of course.
10. But you can still be useful dead
Even if you are dead, you’re not deadweight to your team. Players out of the round can scroll through the feeds from the security cameras dotted around the map to locate advancing enemies and communicate the information to their team.
There’s a compass at the bottom of your screen that will help you make that information a bit more relevant too.
Related: Destiny Tips and Tricks
11. If you see the men in white coats, run
It might not be applicable for the PVP portions of Rainbow Six Siege, but in the PVE mode or Situations, if you see an enemy staggering towards you in a white coat, just run.
Well, if you can, try and unload a full mag of bullets into his chest and then run. These little bastards are strapped up to the neck in C4 and will explode when they get near you.

Editorial independence
Editorial independence means being able to give an unbiased verdict about a product or company, with the avoidance of conflicts of interest. To ensure this is possible, every member of the editorial staff follows a clear code of conduct.
Professional conduct
We also expect our journalists to follow clear ethical standards in their work. Our staff members must strive for honesty and accuracy in everything they do. We follow the IPSO Editors’ code of practice to underpin these standards.