The Pixel 4 and Pixel 4 XL have great “fire and forget” cameras. You don’t really have to learn how to use them to get great results.
However, a bit of know-how opens up their more advanced features and can help make sure your images are ready to post after you shoot them and are much more likely to get you nice comments from your followers and friends online.
- Read our Pixel 4 review
- And our Pixel 4 XL review
Here are some tips and tricks to get that bit more out of the Pixel 4 and Pixel 4 XL cameras.
How to use astro mode
Astrophotography mode is the most interesting new feature of the Pixel 4 camera. It is a turbo-charged version of Night Sight. And while shooting the night sky may produce the most remarkable results, it’s not the only situation in which you’d use it.
This mode is used automatically when you take a photo of a very dark scene using the Night Sight mode and keep the phone completely still using a tripod or another clamp or hard surface.
You can tell it’s working by the on-screen countdown clock. If it’s 2-4 minutes long, that’s Astrophotography. If capture takes just a few seconds, that’s plain old Night Sight, not the astro mode.
Related: Best camera phones
![]()
![]()
The results are remarkable, pulling incredible detail and clarity out of a small phone sensor. However, you may be disappointed if you try to shoot the sky in a big city. This may be a marvel of phone photography, but it can’t defeat light pollution, which obscures stars by effectively lowering the contrast of the night sky.
Give it a go, though, as even in London the Pixel 4’s Astrophography mode can pick out some stars. Consider buying a phone tripod too. You can get one for just a few pounds on eBay.
Exposure controls explained
Most phones give you some form of exposure control. This determines the brightness of the photo, and will affect deeper elements like the shutter speed and ISO sensitivity.
The Pixel 4 phones take a different approach, with “dual exposure” control. You can alter the dark and light parts of an image separately, for greater creative control.
This is actually closer to HDR tone mapping, which makes sense because every image the Pixel 4 captures uses dynamic range enhancement to some extent. That is where more detail is pulled out of the shadows without blowing out the brighter parts by simply making the image brighter.
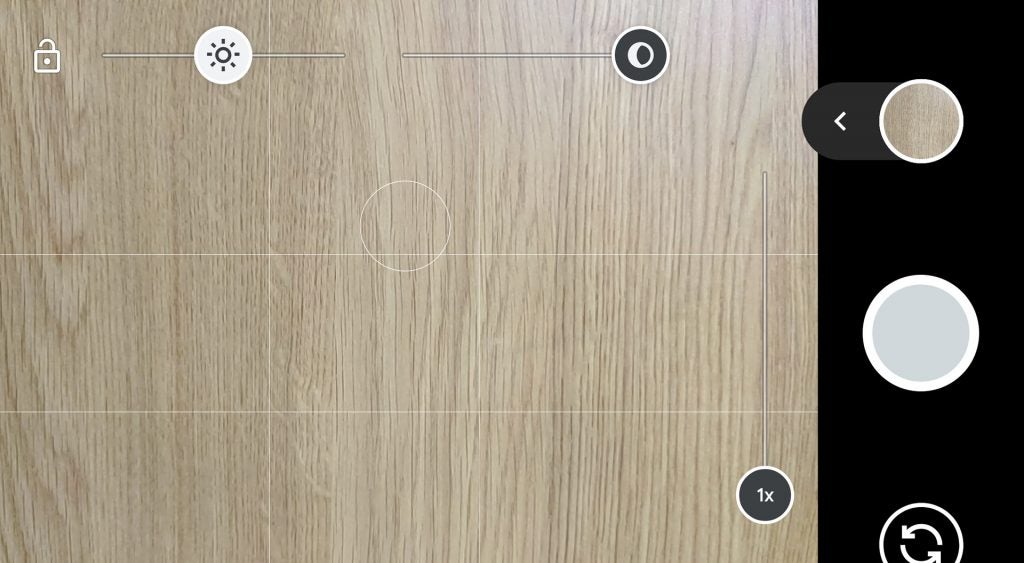
Why complicate things? The Pixel camera already has unusually good exposure metering, so you don’t really have to touch any of the controls if you just want to take “normal” looking photos.
The left slider controls the brighter parts, the right one the darker. To bring up these controls you simply tap on your subject, or any part of the camera view.
Want to get to grips with them? Start by moving the left slider, and notice the point at which the lightest parts of the image stop looking like blocks of plain white (assuming you are not shooting plain white boxes, of course).
How to shoot RAW images
The Google Pixel 4 can shoot RAW files. This is the photo before it has been processed and compressed into the JPEG format.
You can turn RAW capture on in the Settings menu of the camera app. Flick from the left side of the screen, tap the cog icon, then Advanced. You’ll find the RAW slider here.
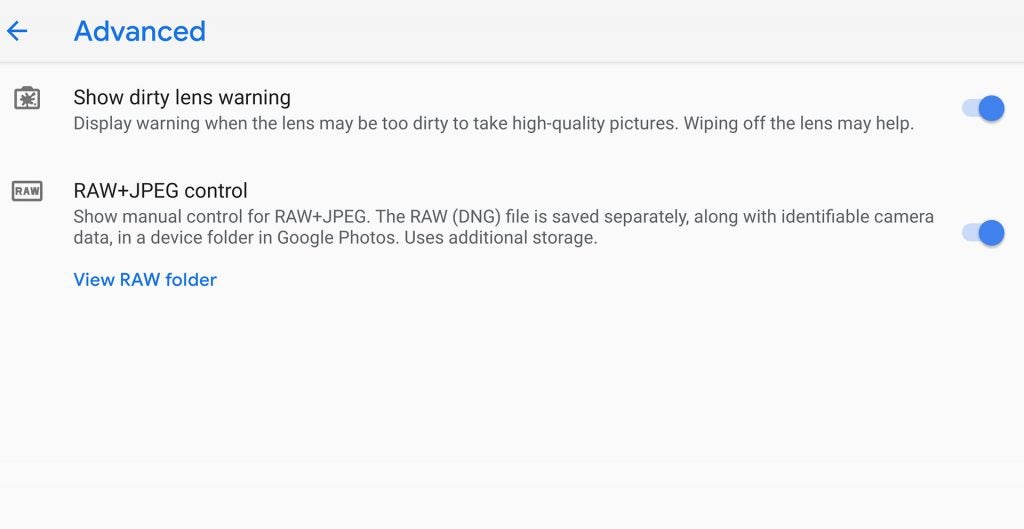
These files use the DNG format, and you’ll need an application like Photoshop, Lightroom or Adobe DNG Converter to use them. Opening one up in Photoshop was a reminder of quite how good Google’s JPEG processing is, though. You’d be hard pressed to come up with anything better if you’re after a natural look.
However, RAWs give you much better control over exposure and tone mapping, and at times you will be able to recover a little more highlight detail.
RAWs are saved in a “RAW” folder in the Google Photos app.
Using the zoom
Most phones with rear zoom cameras or ultra-wide lenses use a button that cycles between the various focal lengths. The Pixel 4 does not. It uses the traditional approach of a pinch to zoom feature that scrolls smoothly between 1x and 8x. Or you can double tap and the app will zip over to 2x zoom.
Which focal lengths offer the best image quality? As you head to the further reaches of the zoom, the Pixel 4 has to use more software enhancement, even though it also uses Google’s Superzoom feature. This moves the sensor by a fraction of a pixel when capturing exposures to allow for more detail.
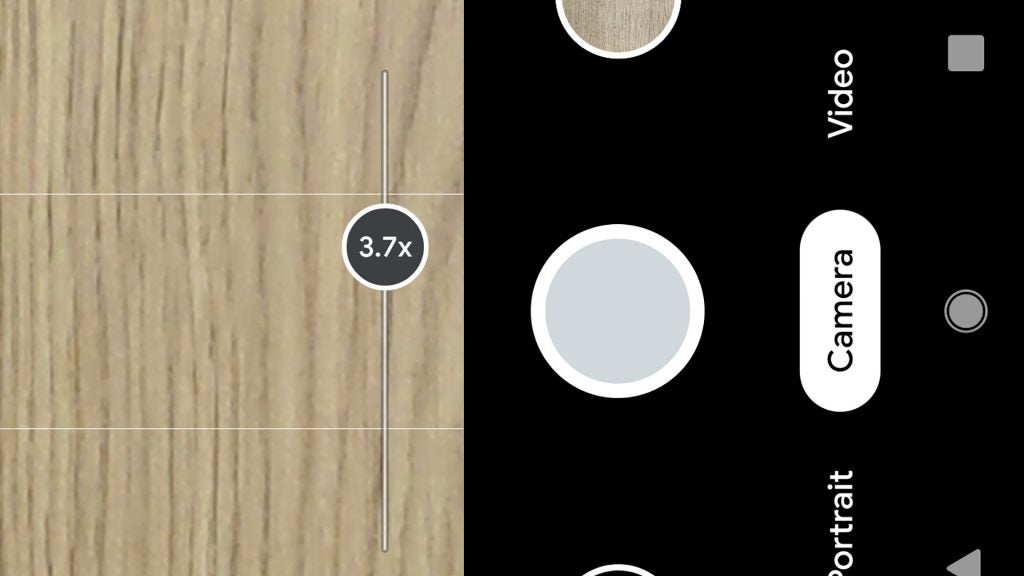
Think about the tech a little more carfully and you start to wonder: what happens between 1x and 1.5x?
This is where part of the image is covered by the zoom sensor and standard camera, but the borders are not. In a badly executed take on this concept you might see a line where the view of the 2x camera began. But here there’s no obvious border.
And even if there is a slight degradation in image quality in the final sliver of the frame, it is no more obvious than the standard slight loss of sharpness at the edge of the lens.
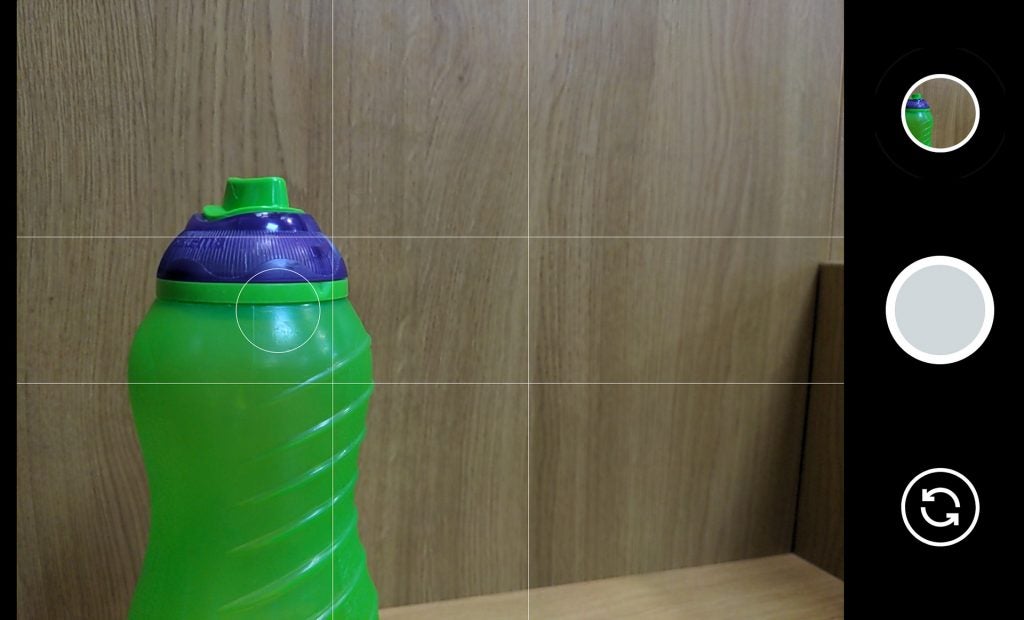
Use subject tracking focus
The Pixel 4 camera has smart subject-tracking focus. It is particularly useful if you want to shoot a fast-moving object like a dog.
There’s nothing special to enable here. Just tap your subject and you should see a circle appear on it. This should move even if you move your view, or if the subject itself moves.
How to use Portrait mode
Portrait mode is found on the top layer of the camera app, and it blurs the background to give your subject dramatic “pop”.
Engage it and you’ll see the camera view “zoom in” slightly, as it seems to use the parallax difference of the two rear cameras to judge depth. Google’s approach to this common feature is much more subtle than most.
You don’t have any control over the extent of the blur effect, and if your subject is quite far away there will generally be little perceptible blurring. Keep your subject 1-2m away for optimal results. And avoid objects with very complicated edges as the Pixel 4 tends to mess these up.
To check out how the phone did, go into the gallery part of the camera app. You should see a little pair of buttons towards the bottom of the image. These let you flick between the non-blurred and blurred versions.
How to get AR Pokemon
The Pixel 4 camera is low on fluff, but there is some of the stuff, and it is particularly well-suited to younger users. Playground mode lets you put 3D objects into the scene, and they stay in place as you move the camera, using augmented reality environment tracking.
You’ll find Playground in the More section of the camera app. Playmoji are the most advanced objects you can add in this AR mode. They react to your taps, making them a little more fun than your average AR camera mode.
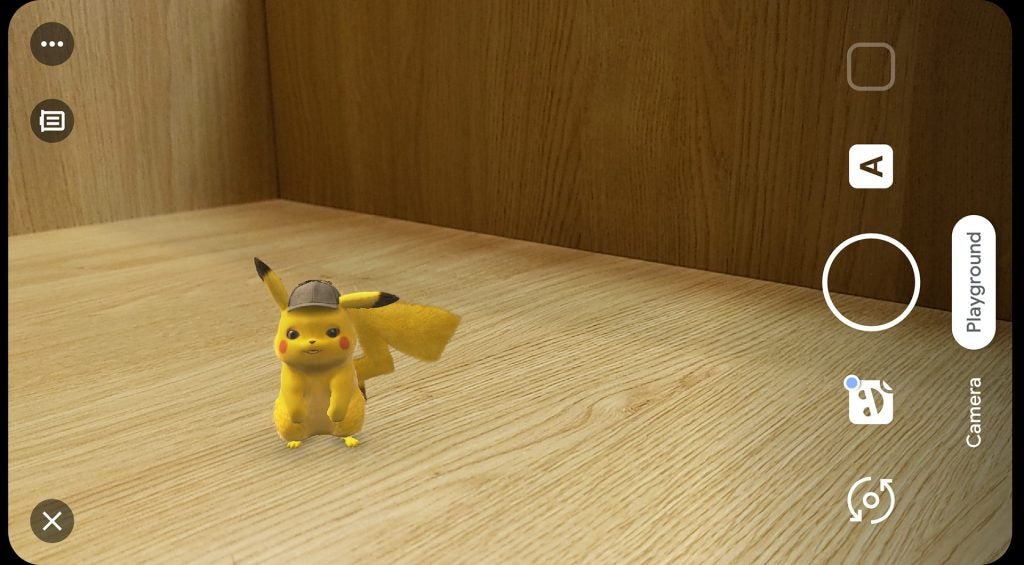
To add these, tap the shortcut that looks like a face and select the Playmoji tab. You should see options for big-brand packs like ones liked to movies Detective Pikachu and Avengers: Endgame.
Composing your photos
Great camera hardware won’t get you very far if you don’t know how to compose a photo. The Pixel 4 app gives you a helping hand, with three different grid overlays. They are found in the Settings part of the camera app.
These are 3×3, 4×4 and the “golden ratio”, which has a slightly less even-looking split. You should use these as a reminder not to simply plonk your subject in the centre of the image. It rarely results in a particularly pleasing image. Instead put your subject where these gridlines intersect.
These add interest to your compositions, and the golden ratio in particular is meant to result in a harmonious-looking composition.
Gridlines are also extremely useful for levelling-out your images. Just line up the grid with the horizon to makes your photos look straight. An off-kilter image can look great, but one just a degree or two off simply looks like a mistake.

Editorial independence
Editorial independence means being able to give an unbiased verdict about a product or company, with the avoidance of conflicts of interest. To ensure this is possible, every member of the editorial staff follows a clear code of conduct.
Professional conduct
We also expect our journalists to follow clear ethical standards in their work. Our staff members must strive for honesty and accuracy in everything they do. We follow the IPSO Editors’ code of practice to underpin these standards.