How to remote desktop to another PC
We run through all you need to know to remote desktop to another PC.
One of the great aspects of networked computers is the ability to remote control the desktop of any connected machine and the servers.
Ever since the early Novell days, and before that too, taking control of another PC’s desktop remotely was one of the greatest tools at the network/computer technician’s disposal. Fixing remote server issues, applying updates and so on could all be done while sipping at your coffee at your desk – even if the server was located at the other end of the city.
Related: Best laptop

At home, using a remote desktop can save you from having to run up and down stairs to fix an issue, and it can be used to connect to a machine that doesn’t have a monitor, keyboard or mouse attached – such as a headless Raspberry Pi strung up behind the TV.
Remote desktop is certainly an advantage, but how on earth do you go about setting one up?
Remote access, to and from

Let’s say we have two computers; one running a flavour of Linux, Ubuntu for example, and the other running Windows; both computers exist on the same network, i.e. they are both attached to the home router. What we want to do is use one computer to remotely access the other.
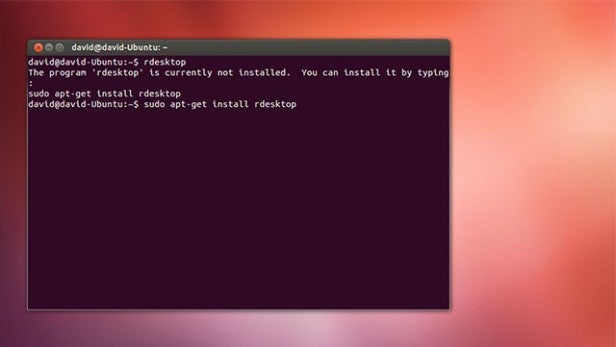
Let’s start with the scenario where we want to access the Windows PC from the Ubuntu PC. First, boot up the Ubuntu PC, then drop into the Terminal. The program we’ll use in this instance is called rdesktop, and under normal circumstances it isn’t installed by default on Ubuntu, so you can install it by typing in the following:
sudo apt-get install rdesktop, and press Enter.
Enter your password, and the system will run through the installation process of rdesktop.
Related: Best free Antivirus
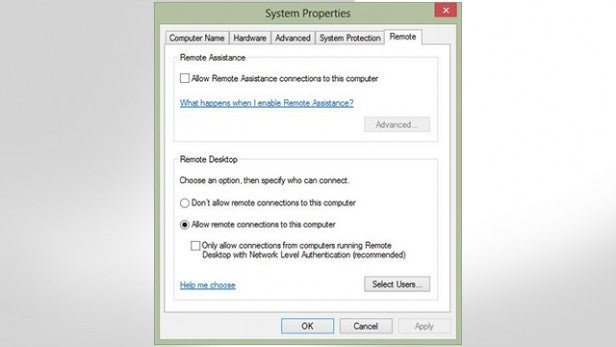
Next, making sure that the Windows PC is powered up, open up the Control Panel by right-clicking the Windows button and selecting Control Panel in the menu. When the Control Panel opens, in the top right of the window you’ll see a ‘Search Control Panel’ box. In here type: ‘remote’, and you’ll be offered a number of choices.
Click on the ‘Allow remote access to your computer’ link, and make sure that the ‘Allow remote connections to this computer’ radio button is selected (you can untick the ‘Only allow connections from computers running Remote Desktop with Network Level Authentication’ box as we’re just using this as an internal/home example for the moment). Click ‘OK’ when you’re ready, and return to the Ubuntu PC.
From the Ubuntu PC, enter the following command into the Terminal:
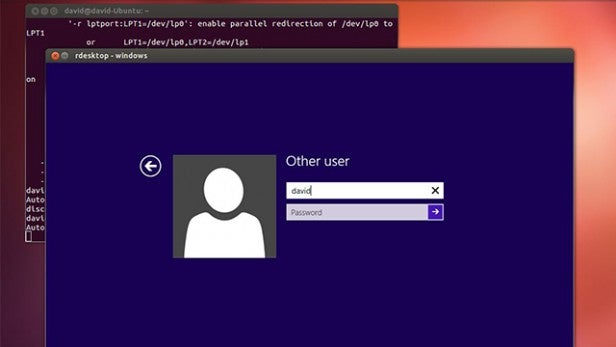
rdesktop –u david –g 1024×768 windows
Replace the ‘david’ and ‘windows’ parts with the remote user name of the Windows PC (the user name you log into that computer with), and the name of the computer as it appears on the network (in our case, that name was windows). When you’ve entered your correct details, press Enter.
With luck, the Windows login screen will appear and you can enter the password for that user. Once the password is entered, you’ll have control over the Windows PC’s desktop as if you were sitting in front of it.
Related: Windows 10 vs Windows 7
Naturally there are a few limits to this. For example, running the latest game may be nigh-on impossible, as would watching a full HD movie. Although, these restrictions are purely down to the speed of the network in your house. If you have everything connected up via a Gigabit switch, then doing the above may very well be possible, but under normal circumstances, the remote desktop sessions you’ve created are for administrative purposes only.
Accessing Ubuntu from Windows
There are a couple of ways of connecting to a Linux computer from Windows. SSH is one of the most common methods, but in our case it doesn’t display the desktop by default, just the Terminal, which is more than enough for the Linux expert.
Related: Windows 10 vs Windows 8
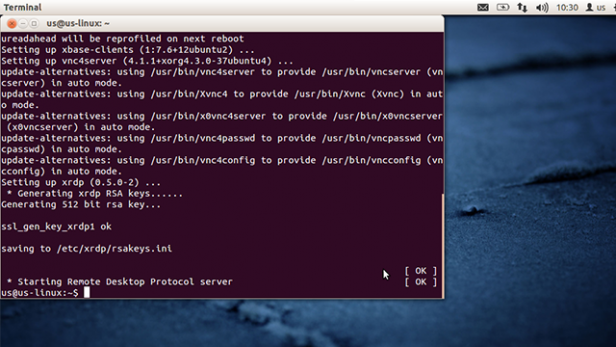
For our purposes here, there is a handy program called ‘xrdp’ which can be installed by dropping into a Terminal and typing the following:
sudo apt-get install xrdp, and press Enter.
Again, enter the password and accept any messages regarding the installation. It’s worth noting that xrdp doesn’t play too well with modern 3D desktop graphics, such as Cinnamon, GNOME 3, Unity and so on.
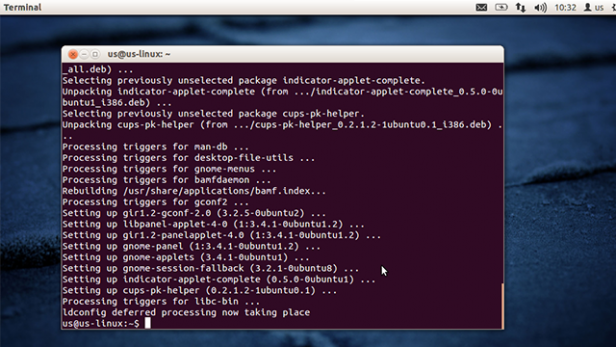
To allow it to work under Unity, or one of the other desktops mentioned, you’ll need to install the Gnome Fallback Session. It’s very easy to do, just type the following into the Terminal:
sudo apt-get install gnome-session-fallback, and press Enter.
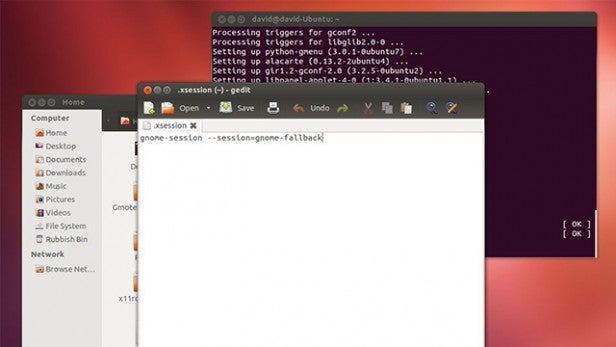
Accept the installation, and once it’s installed enter:
sudo gedit .xsession, and press Enter.
This will create a hidden file called xsession, which xrdp will use to fall back on when it comes to the Unity/3D desktop issue. Within Gedit, the text editor you just opened up, enter the following line:
gnome-session –session=gnome-fallback
Save the file and exit Gedit. Now from the Terminal type the following:
sudo service xrdp restart, and press Enter.
This will restart the xrdp servce, and now allow you to access your Ubuntu desktop without any problems when using xrdp.
Before you finish with the Ubuntu PC, from the Terminal enter:
ifconfig, and press Enter.
This will display the PCs IP Address, under the eth0 section (if you’re connected to your network via an Ethernet cable) inet addr:, or under wlan0 if you’re connected via WiFi. Remember this address, it’ll be something along the lines of 192.168.1.153. This is how you’ll connect to the Ubuntu PC remotely.
Now return to your Windows PC and click the Windows Start icon. Start typing ‘remote’ and you’ll have the ‘Remote Desktop Connection’ icon available.
Click this, and you’ll open up the RDC window, which, in its most basic form, will ask you for a computer name and display the ‘Connect’ button. You can now enter the IP Address of the Ubuntu PC – the 192.168.1.153-like number you obtained from the ifconfig command – into the Computer section of Remote Desktop Connection.
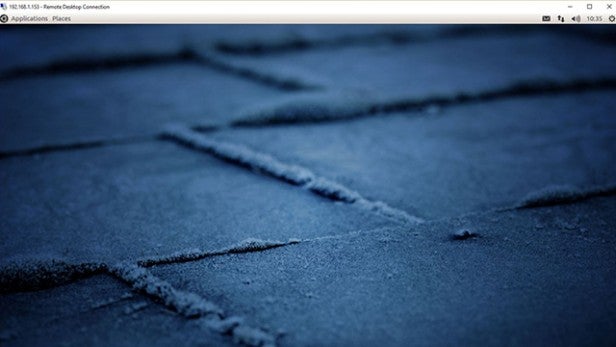
Once you click on Connect, you’ll have a choice of which module to connect to the Linux machine with. For our purposes, use the default ‘sesman-Xvnc’ connection and enter the Ubuntu username and password. Then when you’re ready, click the ‘OK’ button to initiate the connection.
Using the TightVNC option
TightVNC has been around since 2001, and has come on in leaps and bounds since those early days. It’s a relatively easy program to get to grips with, although it can be something of a resource hog at times.
However, it serves adequately enough to provide a connection between two computers of different makes and operating systems, allowing the user to control the desktop of the other machine.
Install TightVNC on Windows
First off, point your browsers to www.tightvnc.com and follow the links on the left to download the latest version, which at the time of writing was 2.7.10.
Download the package, which is something like 2.3MB, and double click to start the installer. After you’ve accepted the license agreement, you’ll be offered three install options: Typical, Custom, and Complete. For our purposes and to highlight certain features of TightVNC, go for the Custom option.
The next screen will ask you if you want to install the Viewer only, or the Server, or both. The difference being that the viewer will let you attach to a current TightVNC setup; the server will allow you to host a connection, in other words this will allow other TightVNC Viewers to attach to you, and choosing both will obviously allow you to serve as well as view. For this instance, just try both.
After clicking ‘Next’ you’ll have various tick-boxes that will associate .vnc files with TightVNC, register TightVNC as a service and as an exception to the Windows Firewall. Generally you’d accept all these options, unless you have a specific reason not to.
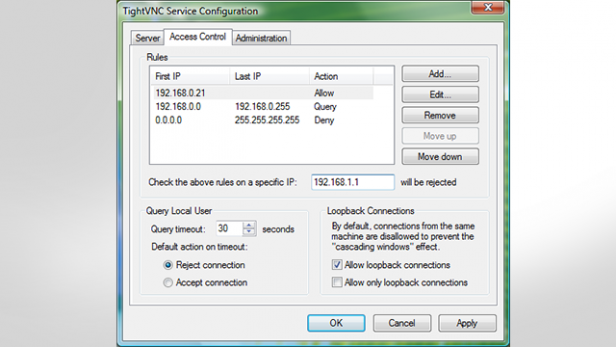
When you’re ready, click ‘Next’, followed by ‘Install’ to finish the setup. The next screen, which will appear half way through the install, will ask you for a set of passwords: one for Remote Access, the other for Administration. The Remote Access password will need to be entered when you are attaching to the computer, and the Administration password is required to alter the settings of TightVNC once it’s installed on your system.
Once TightVNC is installed, it will drop down to your system tray, and can be clicked on to view the settings.
Connecting to the PC
Using the basic, default settings, do the same on another Windows PC (we’re using two Windows PCs in this example for now). Once TightVNC is installed, run the TightVNC Viewer, which can be found in the same program group, or by typing in ‘TightVNC Viewer’ in to the Windows Start Button.
When the viewer is up and running, enter the IP Address of the other Windows PC, or alternatively, enter the network name and click on the Connect button.

All going well, you should now have a connection to the other Windows computer, and be able to control the desktop via the mouse and keyboard on the computer you’re currently sitting at.
Windows to Linux
Now let’s connect from one of the Windows machines to a Linux computer. For this example, we’re using our trusty Linux Mint PC.
Start by powering up the Linux computer, then drop into a Terminal and type the following:
sudo apt-get install tightvncserver, and press Enter.
Enter your root password, the one you created when you first installed Linux, and allow the install processes to do their thing.
When it’s installed, enter the following into the Terminal:
tightvncserver, and press Enter.
You’ll now be asked for a password in order to grant access for other VNC viewers, followed by a password verify section in which you have to type it in again. Next you’ll be asked if you want to enter a view-only password, in our case we answered ‘N’ to this.
After a couple of seconds, you’ll get a ‘New X desktop is david-TRHowTo:1’, with the david-TRHowTo being your user name and the name of your Linux system.
To connect to the new Linux TightVNC server, simply go back to the Windows machine, start up TightVNC Viewer as before and enter the IP Address or name of the Linux system. In our case, this would be the IP Address of the Linux PC from earlier:
192.168.1.10:1
Don’t forget the colon, as that denotes the session number, as stated in the message above. Click Connect, then enter the password you created in the first step of setting up TightVNC on the Linux machine and click OK.

All going well you should now be in control of the Linux desktop via the magic of TightVNC and other various networking protocols. From here you can run all the usual functions you would normally be able to do.
Linux to Windows
Let’s now swap things around, and connect to the Windows computer via our Linux PC.
First, make sure the Windows computer is running the TightVNC server, and that you know what its IP Address is. To get your Windows PC IP Address, click on the Windows Start Button, type cmd and click on the Command Prompt icon in the available options. When in the Command Prompt, enter ‘ipconfig’ and your IP Address will be displayed much in the same fashion as on the Linux PC.
On the Linux computer, drop into a terminal and type the following:
sudo apt-get install xtightvncviewer, and press Enter.
Enter your password again, if necessary, and allow the install to run through its various processes.
Once it’s finished installing, all you need to do is enter the following command into the Terminal:
Xtightvncviewer 192.168.1.65:5900, and press Enter.
Obviously, you’ll need to replace the IP Address we’ve listed with the one your Windows computer is using; additionally, the ‘:5900’ part is the default port that TightVNC Server runs on Windows, and although you don’t always need this addition, it’s quite useful to add as it can speed up the connection process and make the system admin a little neater, especially if you have a particularly strict firewall in place.
Keep connecting
As with most computing projects there’s more than one way to skin a cat, or as in this case connect to another PC.
Using Remote Desktop, xrdp, TightVNC and so on are just a few ways in which you can connect to and control other desktops on different platforms.
If you have any methods to help others out with a remote desktop connection, please mention them in the comments section below.

