How to add an Amazon Echo Sub and configure Alexa EQ settings

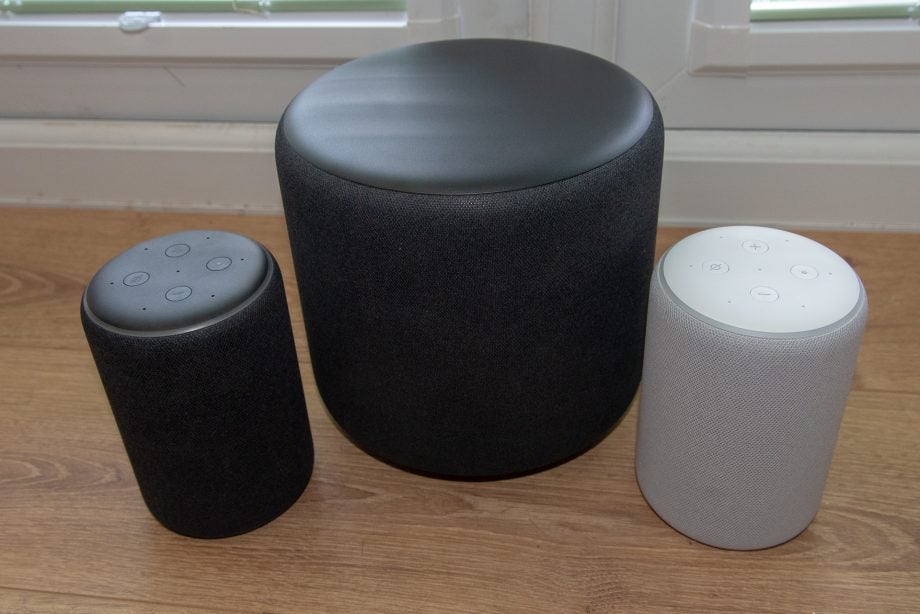
The Amazon Echo Sub is a standalone product that adds extra bass to an existing Echo speaker. In this guide, we’ll show you how to add an Amazon Echo Sub and configure Alexa EQ settings, so you can get the most out of the bass speaker.
You add an Echo Sub in the same way you would any speaker. When you first add the speaker, Alexa will take you through the pairing process with another Echo speaker (or two for a stereo pair). If you’ve already created a stereo pair, as in our guide on how to create an Amazon Echo stereo pair, you’ll first have to delete that pair. We’ll show you how to add the Sub manually.
Finally, you need a supported Echo device. The current list of supported devices includes the Amazon Echo (1st Gen), Amazon Echo (2nd Gen), Echo Dot (3rd Gen), Echo Plus (1st Gen), Echo Plus (2nd Gen), Echo Show (1st Gen) and Echo Show (2nd Gen). Only the Echo (2nd Gen), Echo Dot (3rd Gen) and either generation Echo Plus can be used as a stereo pair with the Sub.
Before we get into the main instructions, it’s worth mentioning some of the restrictions of the Sub. First, if you use an Echo Show device then the Sub will not work on video content from any source. So, if you were hoping to blast through your list of shows and films in your Amazon Prime Video account, you’ll have to make do with the Echo Show’s speakers only. Next, Echo Show devices may still produce some of the bass frequencies, so the effect might not be as pronounced.
Related: Amazon Prime Day 2019
The Echo Sub only works on music content; you won’t hear the Sub if you listen to an app. Finally, the Sub has no microphone and only a low-frequency speaker, so you can’t use it as a traditional Echo speaker to make requests.
Related: Amazon Alexa guide
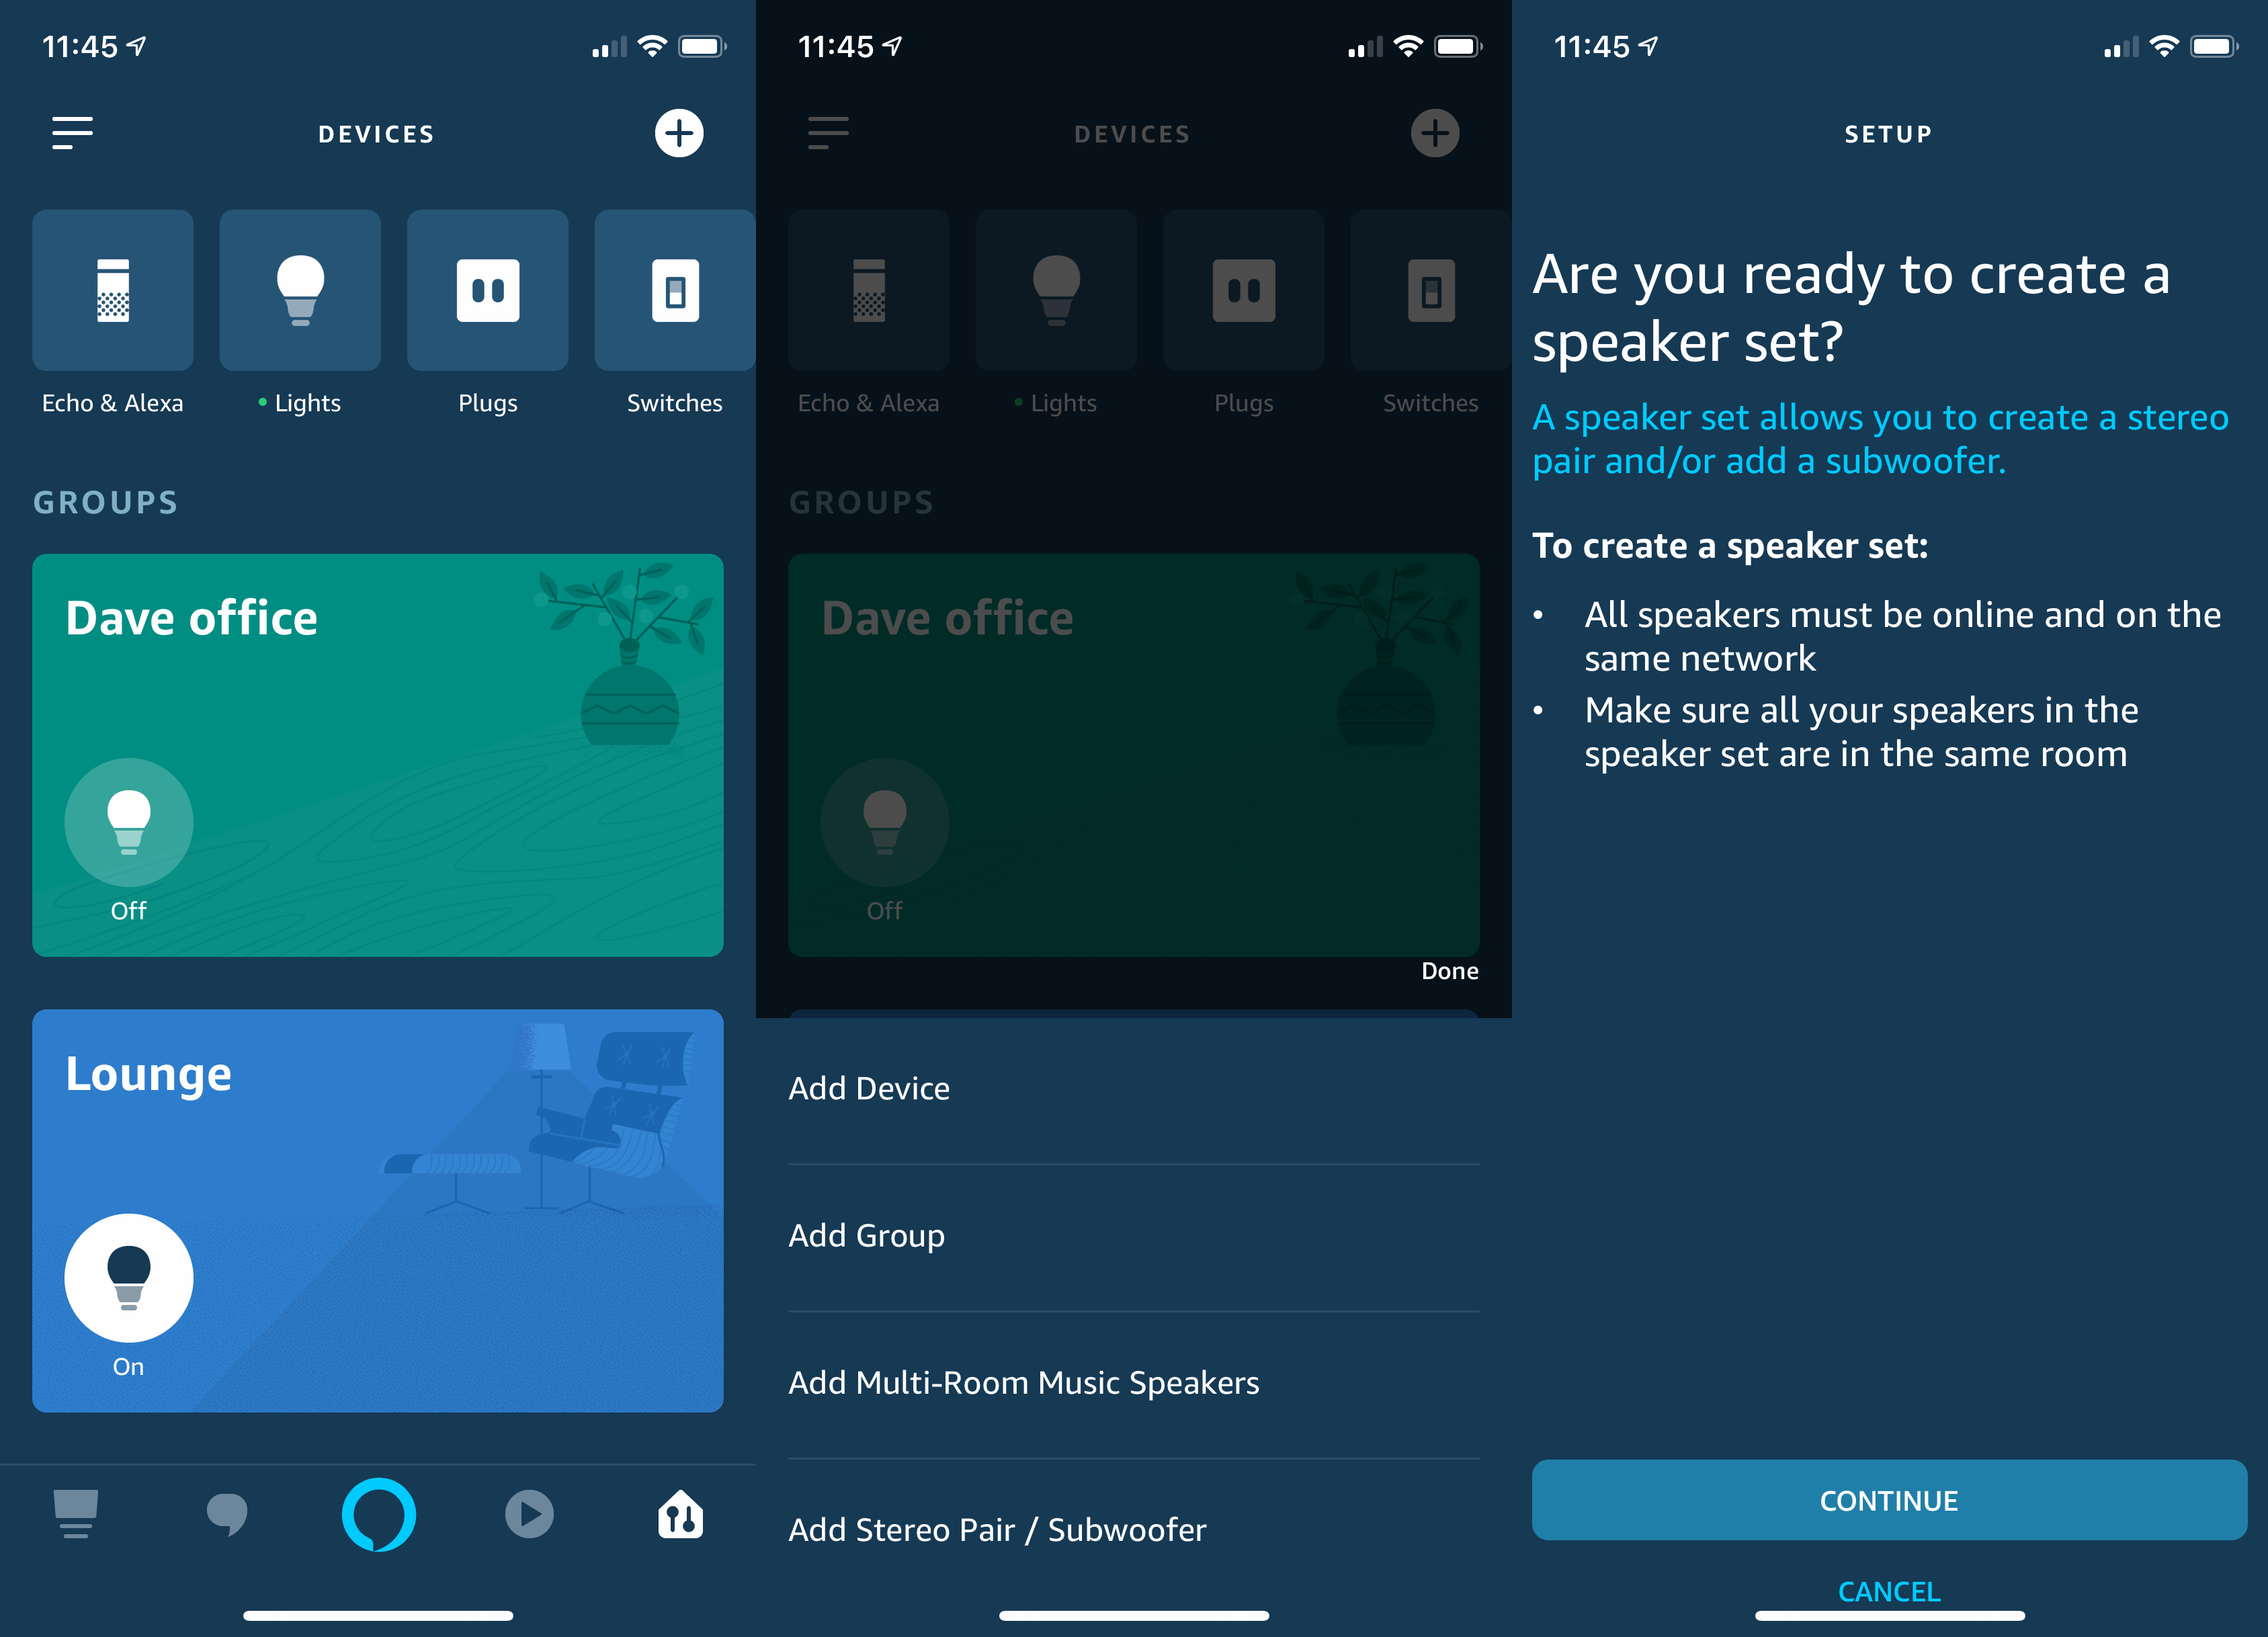
Step 1 – Create a speaker group with the Sub
Open the Alexa app and tap the Control icon at the bottom-right of the screen. Tap the Plus icon and, from the menu that appears, pick the Add Stereo Pair/Subwoofer option. Read the instructions to ensure your speakers are in the right state for pairing and then tap Continue.
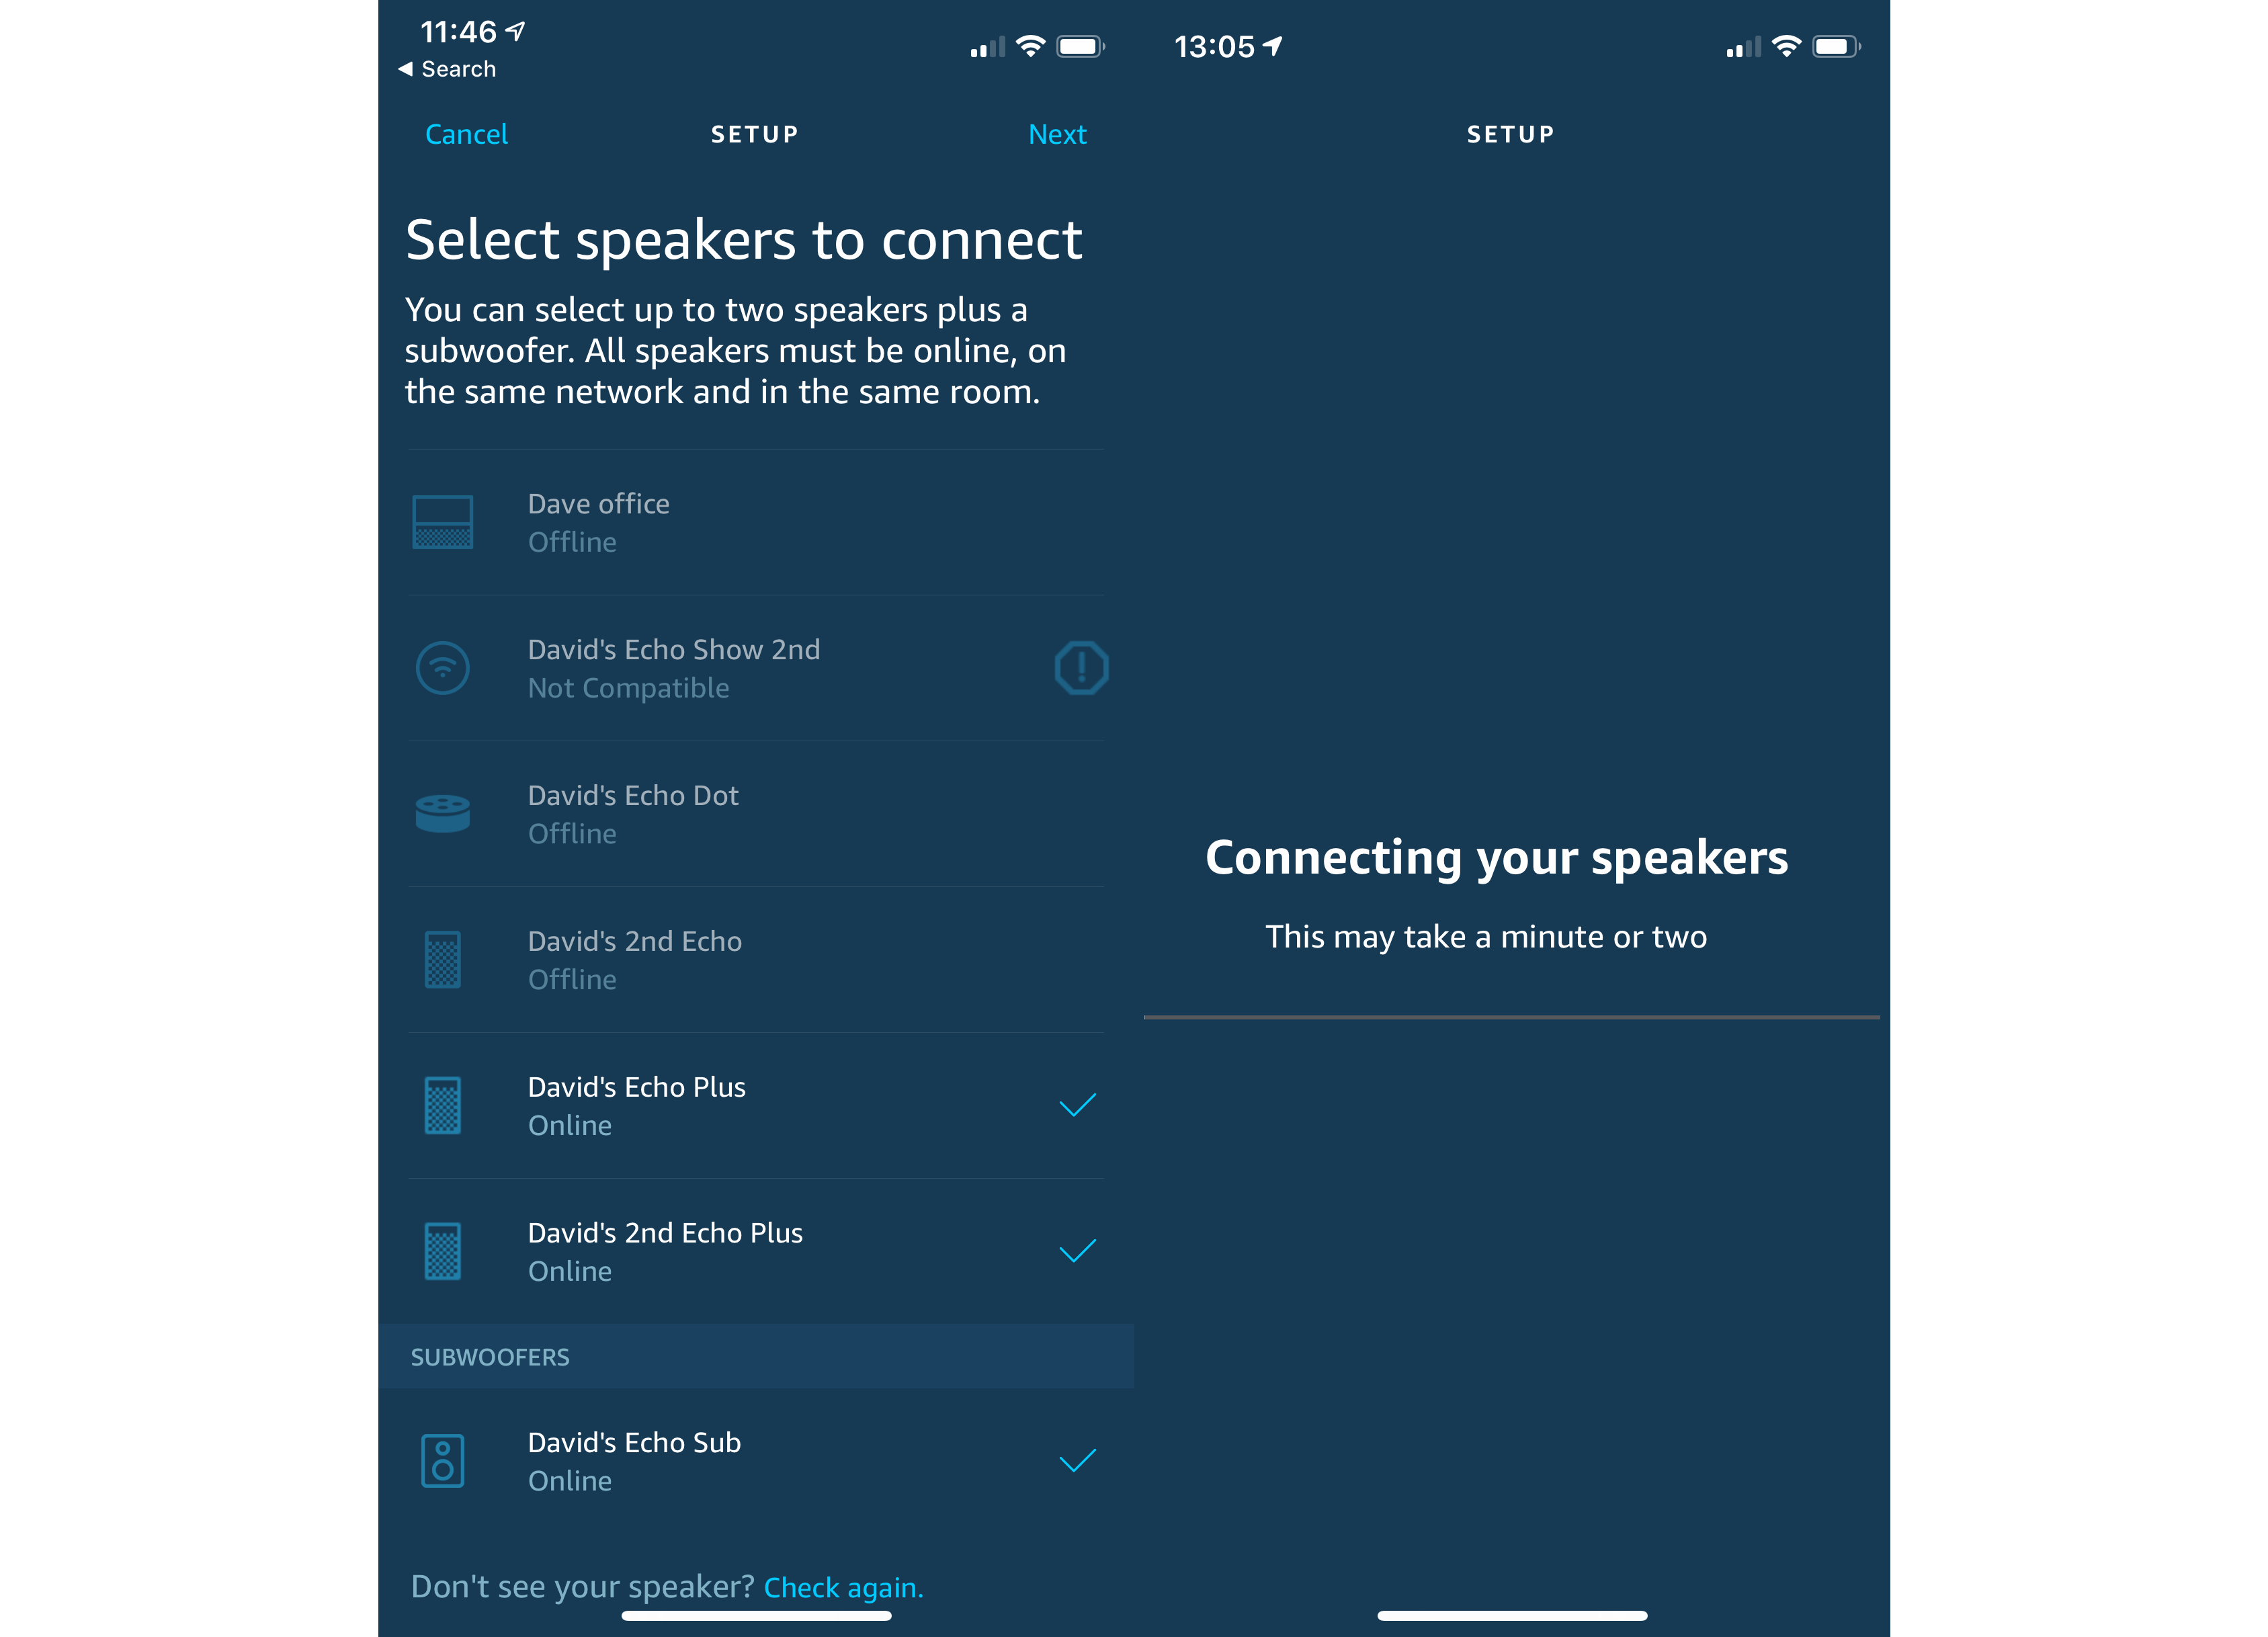
Step 2 – Select the speakers to use
From the list of your Echo speakers, tap the Echo Sub first. This will change the list above, so that you can only select the speakers that are compatible with the Sub. You can select one or two speakers from the list. The latter creates a stereo pair and works only if you select two speakers of the same type from this list. Once done, tap Next and the speaker group will be created.
Step 3 – Manage Alexa EQ settings
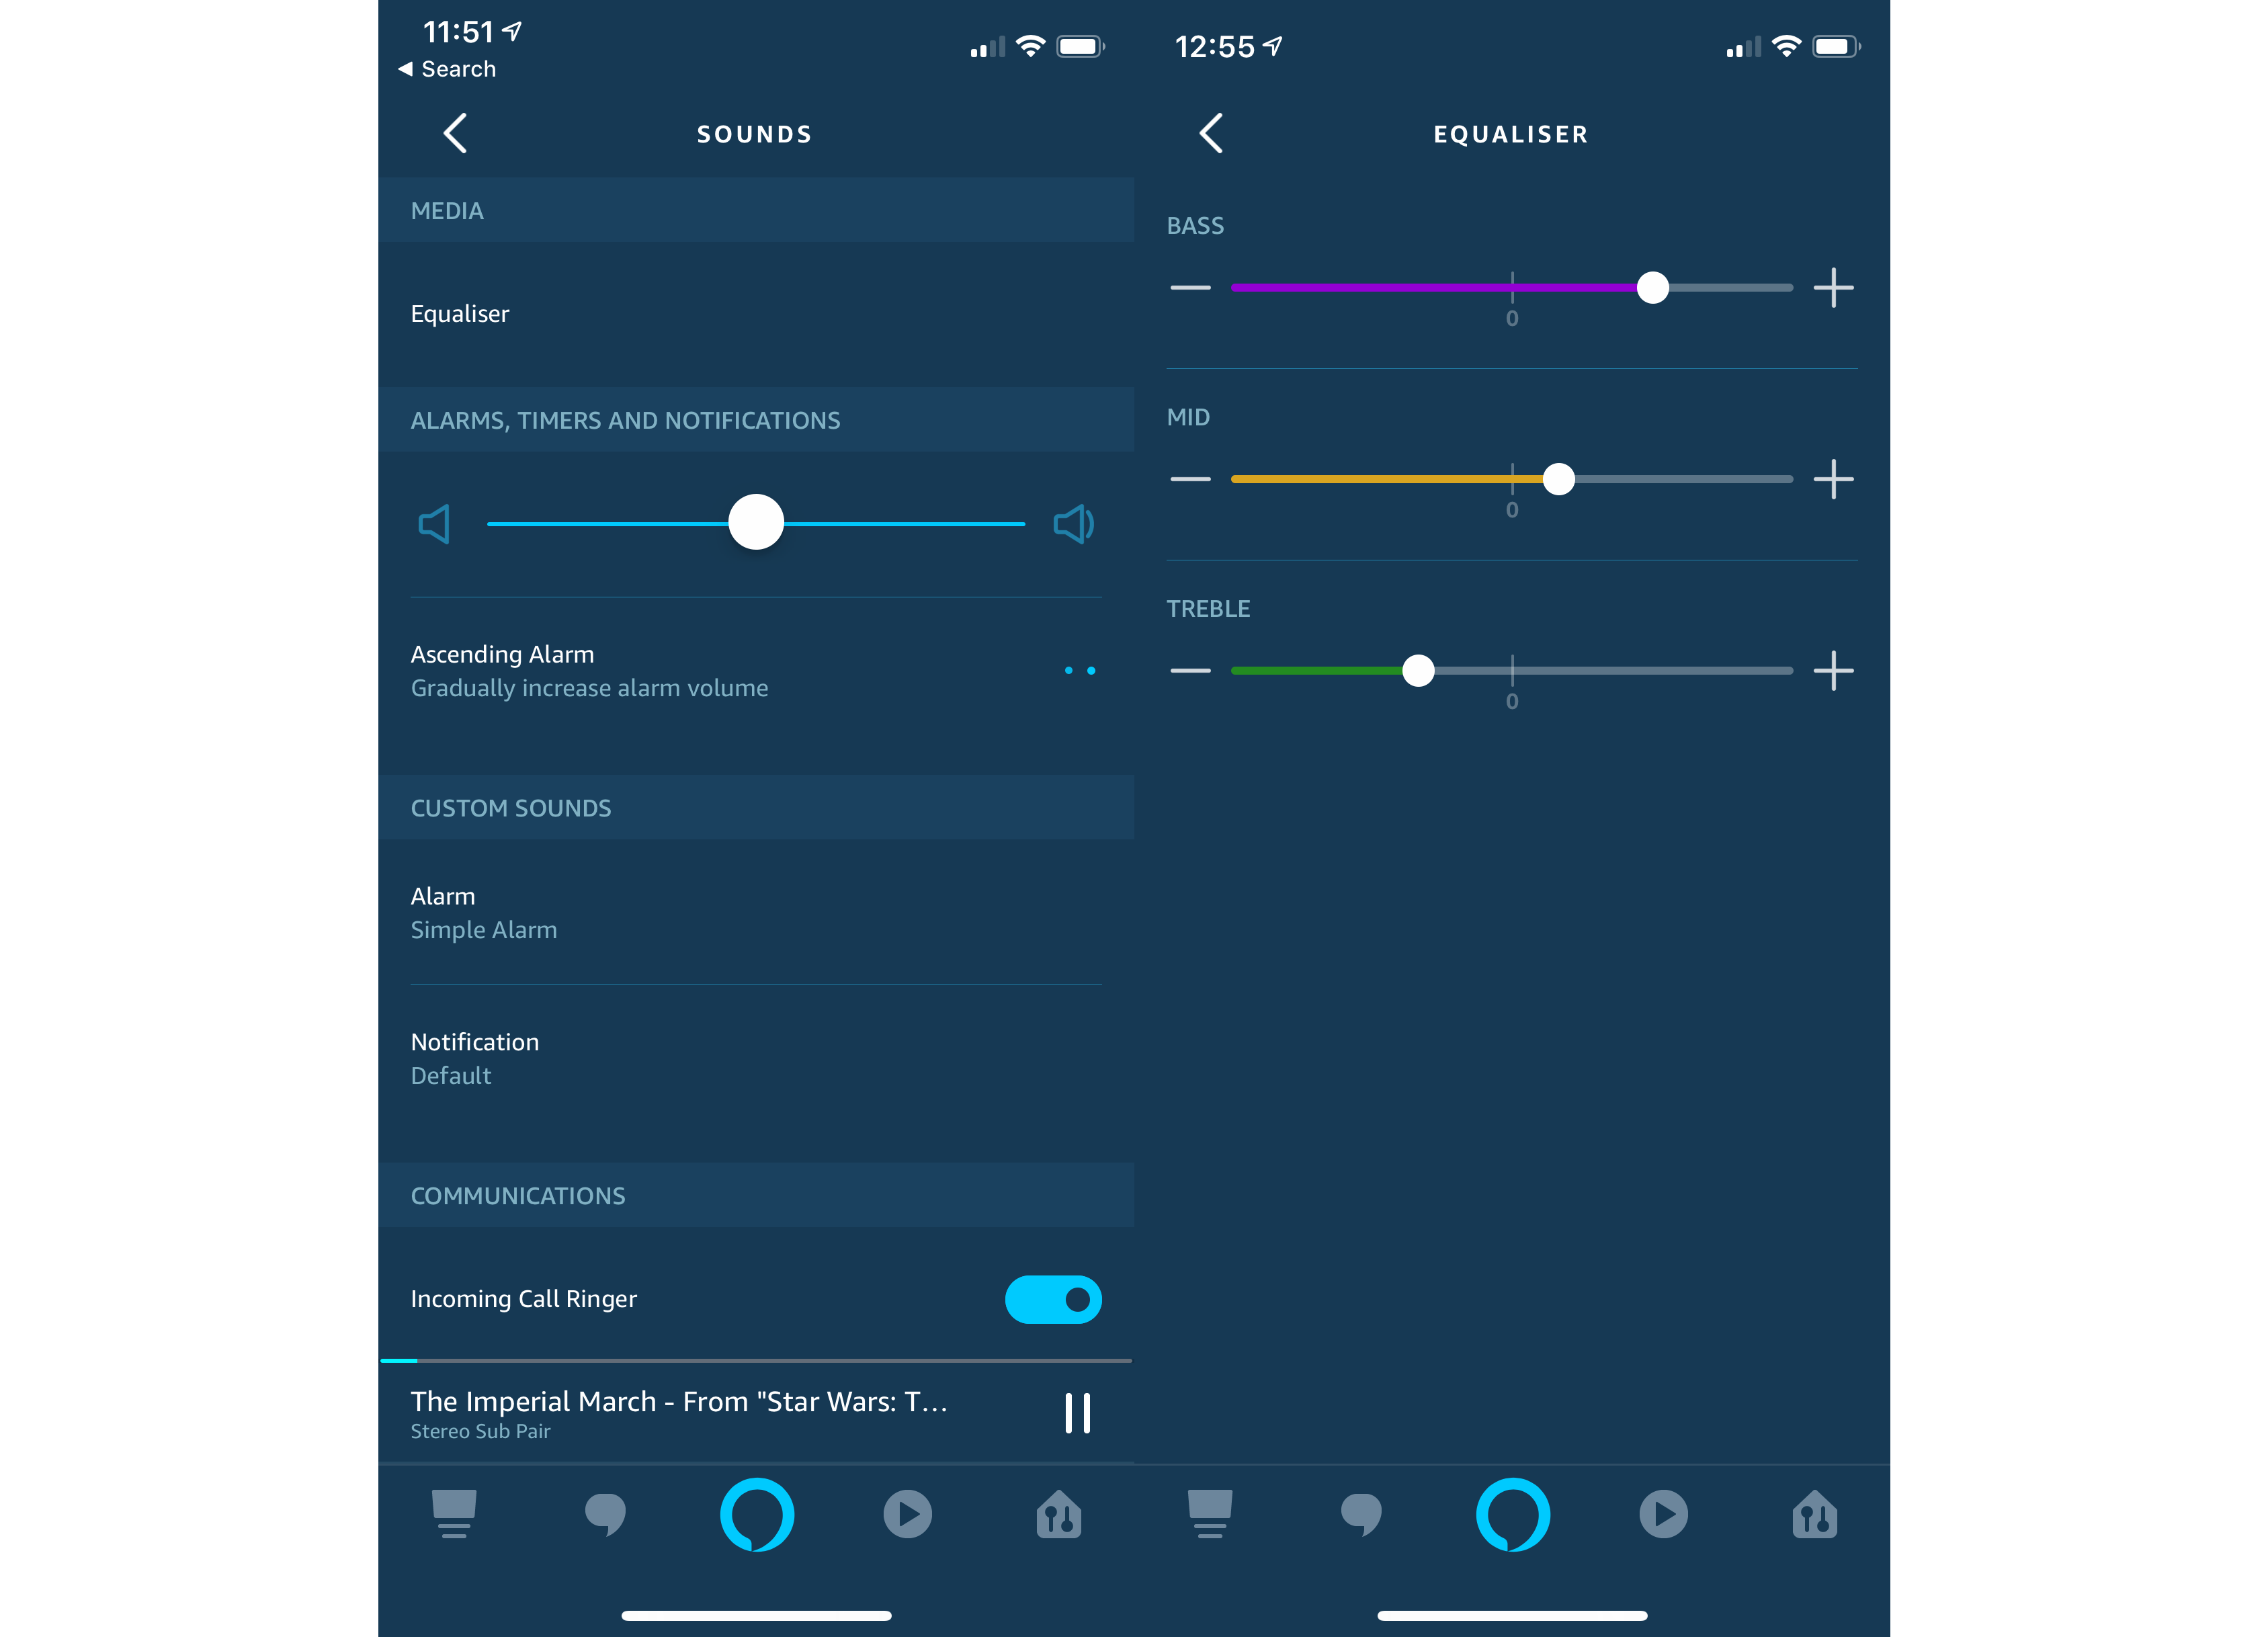
You can adjust the sound of your speakers using the EQ settings. Go to the Alexa app and tap the control icon (bottom right). Then tap Echo & Alexa and select one of the Echo speakers that’s in a speaker group with the Sub. Note: you can’t get to the EQ if you pick the Sub.
Tap Sound under General and then select Equaliser under Media. You can use the sliders to increase or decrease the bass, mid-range or treble. Tap the back arrow when you’re done. Note that EQ changes apply to all speakers in a group.
Step 4 – Delete the Sub pairing
If you want to attach the Echo Sub to a different product, you’ll have to delete the pairing first. Go to the Alexa app and tap the Control icon (bottom right); select your speaker group from the bottom of the page. Tap Delete Speaker Set and you’re done.
Editorial independence
Editorial independence means being able to give an unbiased verdict about a product or company, with the avoidance of conflicts of interest. To ensure this is possible, every member of the editorial staff follows a clear code of conduct.
Professional conduct
We also expect our journalists to follow clear ethical standards in their work. Our staff members must strive for honesty and accuracy in everything they do. We follow the IPSO Editors’ code of practice to underpin these standards.