Apple Home and HomeKit Review

Apple Home and HomeKit Review
Apple attempts to dominate the smart home
Verdict
Apple Home and HomeKit have evolved and now form the basis of a powerful home automation system although wider device support would be nice.
Pros
- Siri control is excellent
- Can use an Apple TV, iPhone, iPad or HomePod for a hub
- Encrypted communication
Cons
- Limited device support
- Home app doesn't give full control over all accessories
- Requires iOS devices
Key Specifications
- Siri integration
- Works with HomeKit-compatible products
- Requires iOS 10 for Home app
What are Apple Home and HomeKit?
Apple was one of the first companies to try and centralise smart home device control into one app, launching HomeKit alongside iOS 8 back in 2014. It was a rather limited attempt that only gave control via Siri. With iOS 10, Apple upped the stakes adding in the Home app. Now, the system has evolved and improved, with the Home app available on iOS and macOS Mojave.
The main changes are that Apple has relaxed the way it requires manufacturers to join in. Previously, manufacturers had to have a hardware encryption chip, but now Apple is allowing software encryption instead, opening up the road for more devices. The Apple HomePod launch provided a way for simpler voice control with a smart speaker, competing with the likes of the Amazon Echo and Google Home.
Powerful and simple automation complete the system and, for Apple users with the right kit, Home and HomeKit prove to be a winner. The lack of support outside of Apple smartphones and iPads, and some big smart home device names not being supported reduces the appeal a little.
Apple Home and HomeKit – Compatible devices
Apple used to have very strict hardware requirements for Home and HomeKit compatibility and wanted every company to include an encryption co-processor. This meant that existing manufacturers often had to release new versions of hardware: HomeKit support was a big reason behind the launch of the newer Philips Hue bridge.
Apple has since relaxed its rules a little and now HomeKit and Home will work with devices that have had a software upgrade. For example, the excellent Netatmo Presence outdoor security camera now works with Apple Home.
Even though Apple has relaxed its requirements, the range of supported devices lags behind the likes of those for the Google Assistant or Amazon Alexa. There are some notable big exceptions, such as the lack of support for the Nest Learning Thermostat (or any other Nest product), and the majority of smart appliances, such as the Dyson 360 Eye robot vacuum cleaner.
Support is better than with Samsung SmartThings, however, with more big names supporting Apple’s system. Apple has a full list of supported devices, but it includes the likes of Philips Hue, LIFX, Tado and many Netatmo products. As with all systems it pays to check which devices are supported before you buy anything.
Apple Home and HomeKit – Setup
Apple has improved its setup procedure to the point, where devices can now be added via the manufacturer’s app and included in Home. That’s an improvement over times of old, where you had to set up devices through the Home app only. Installation requires scanning the unique HomeKit code, which is usually printed in a device’s manual and on a device itself. Without this code, you can’t add any devices, so don’t lose it.
For devices that have been software upgraded, you’ll usually generate a software code. Save this as an image file for safety, as it’s a one-time process to do and your device will never be compatible with HomeKit without this. For devices that connect through a hub, such as the Philips Hue lights, you need only add that single device to the Apple Home app; all devices that connect through the bridge will be discovered automatically. For smart devices that don’t use a bridge, such as LIFX bulbs, each device has to be added independently, which is a bit of a pain.
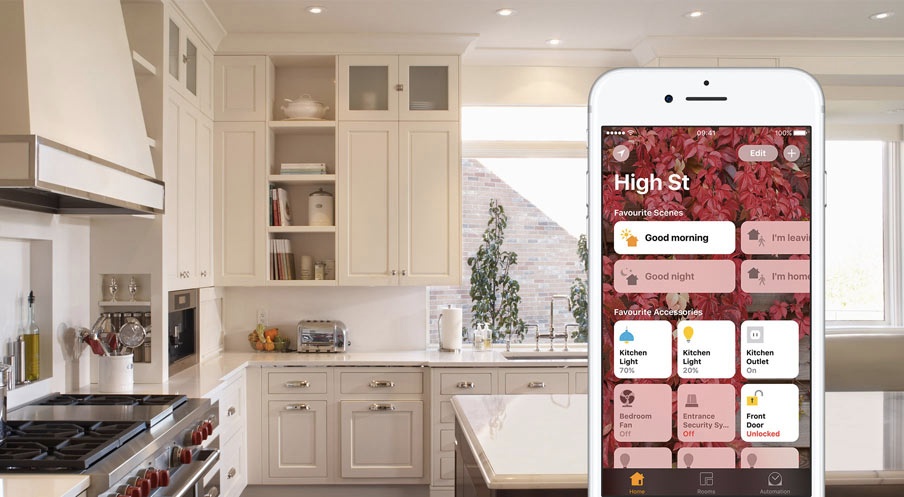
Once devices have been discovered, they can be grouped into rooms and your Favourite devices appear both on the Home screen of the Home App and in iOS Control Centre. If you’d like to remote control your devices, you need a compatible fixed product at home that remains connected to your home network. This can be an Apple TV, an iPad that’s left plugged in or, more recently, a HomePod.
Cleverly, any hub can be used to remote control any compatible Bluetooth devices. If you’ve got a Bluetooth smart lock, for example, you can control it from anywhere in the world, provided the device is within range of one of your HomeKit hubs.
Apple Home and HomeKit – Device control
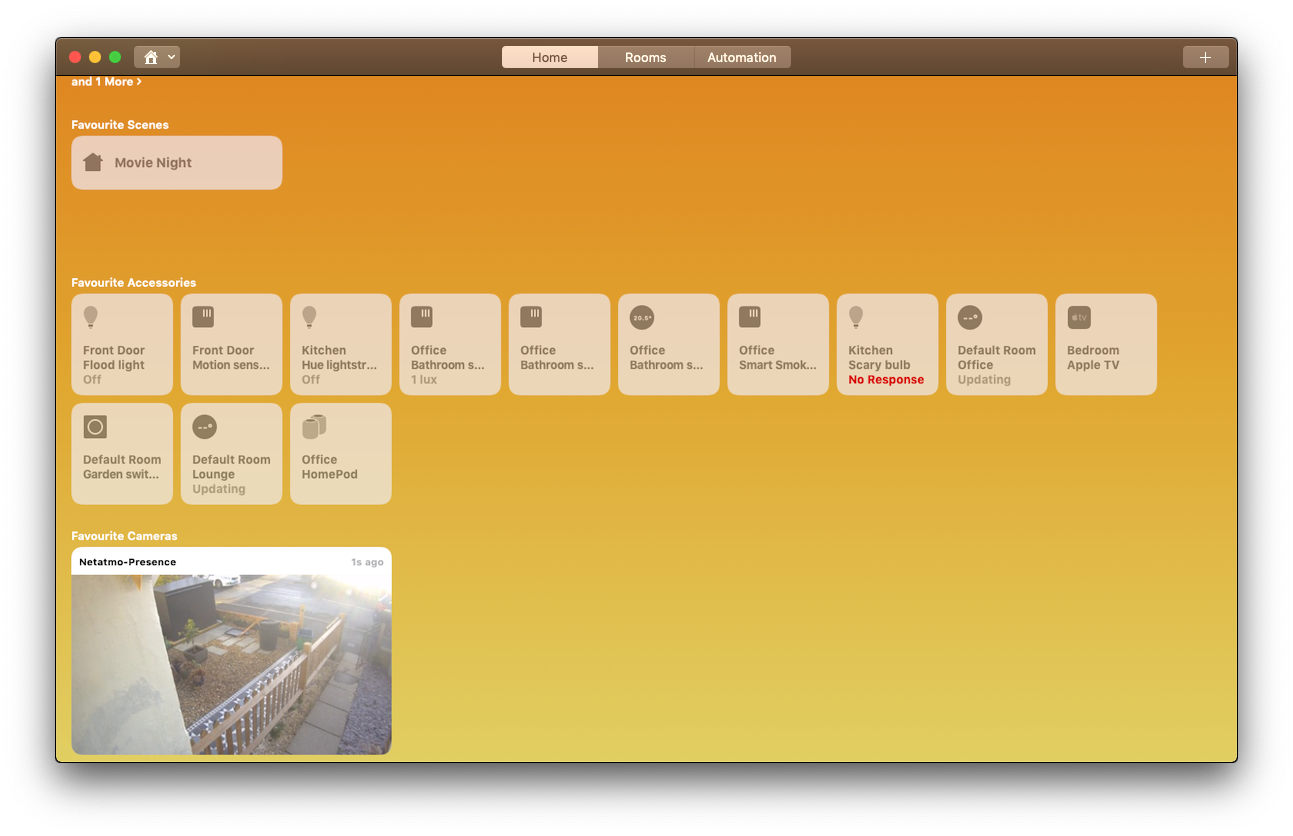
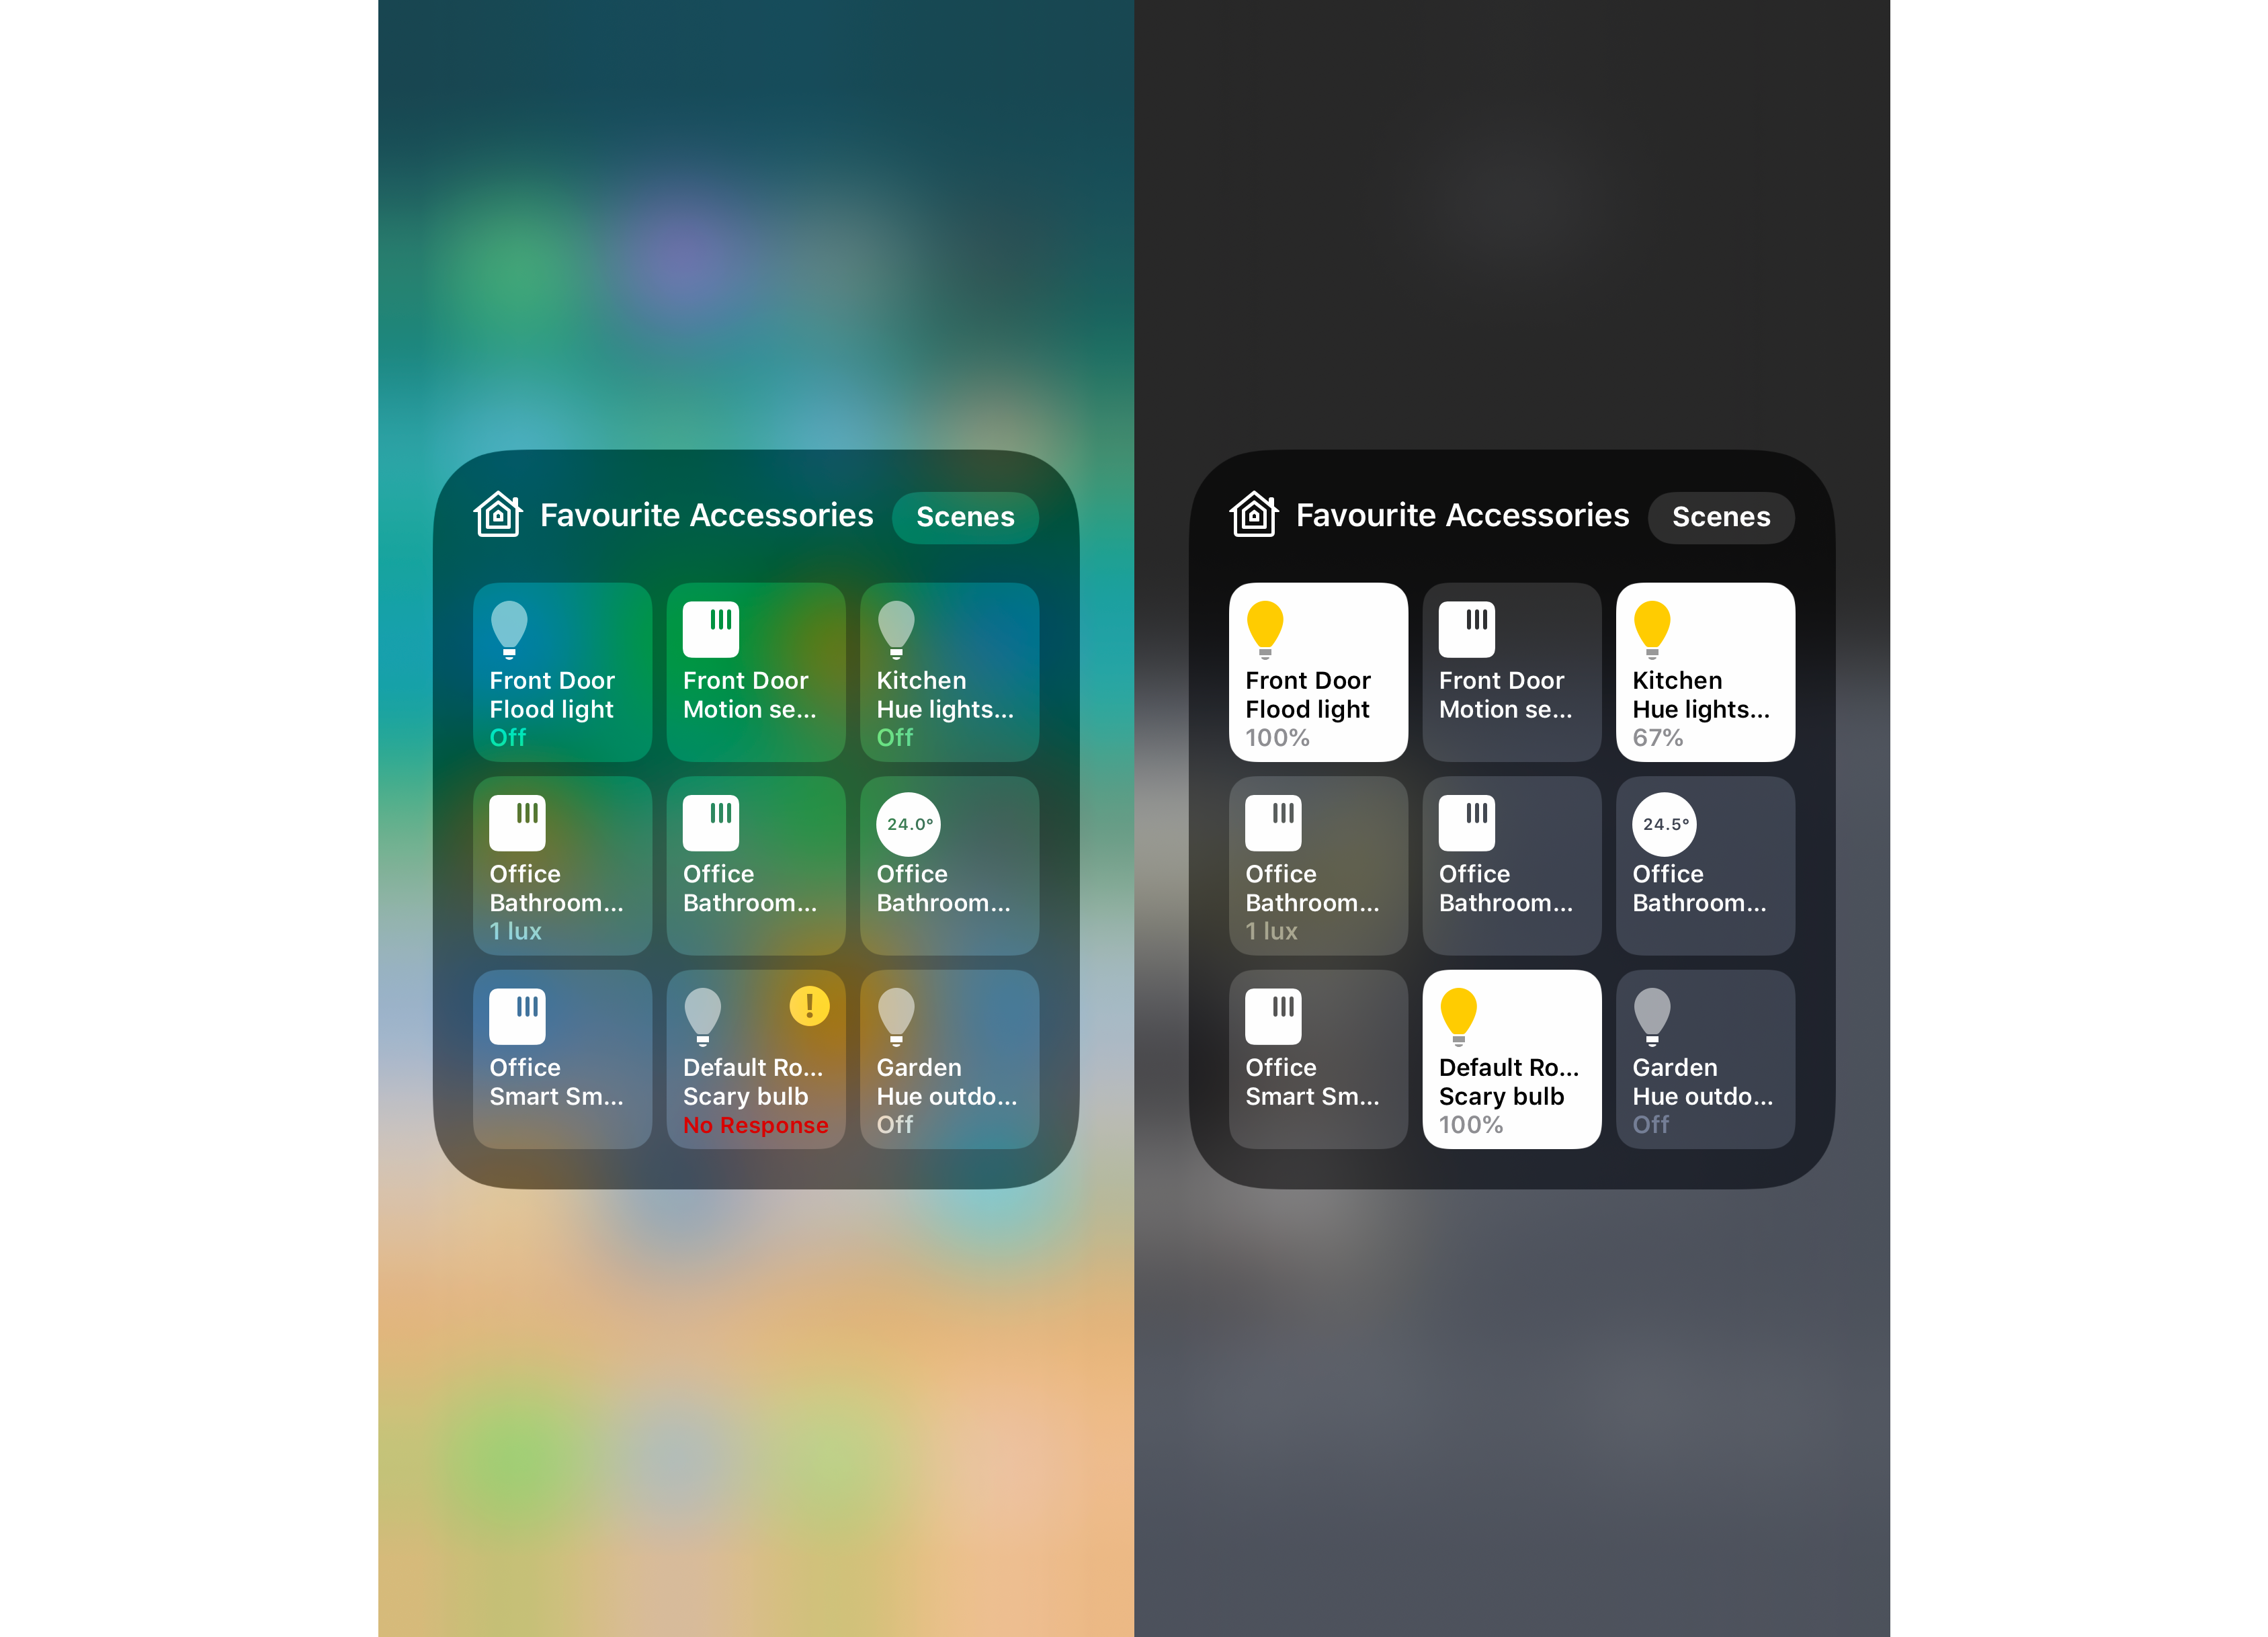
Both iOS and macOS Home apps are laid out in a similar way, so it’s easy to jump between the two. All devices fit into uniform icons in the Home app, with little icons to let you know what the type of device is, such as a light bulb. The icons aren’t quite up to the usual standard of Apple products and are a little basic. If you have room names that are too long, Home can truncate them on the icon, which looks a little ugly: ‘Default Ro…’ for example, rather than ‘Default Room’.
Some devices appear in the app that you can’t do anything with, such as the Apple TV and the Philips Hue Hub. These can clutter up the app, so I recommend putting them into one room out of the way. The HomePod smart speaker is managed through the Home App and tapping the icon will play/pause the last music selection.
For devices that you can control, the options differ by device type. With light bulbs, tapping or clicking the icon turns the light on or off. On iOS, a long press brings up a slider to adjust brightness or, depending on the bulb type, adjust colour and temperature. For macOS, getting the brightness control needs a right-click to select the Show Control option. It would have been nice if Apple had implemented Force Click support instead.
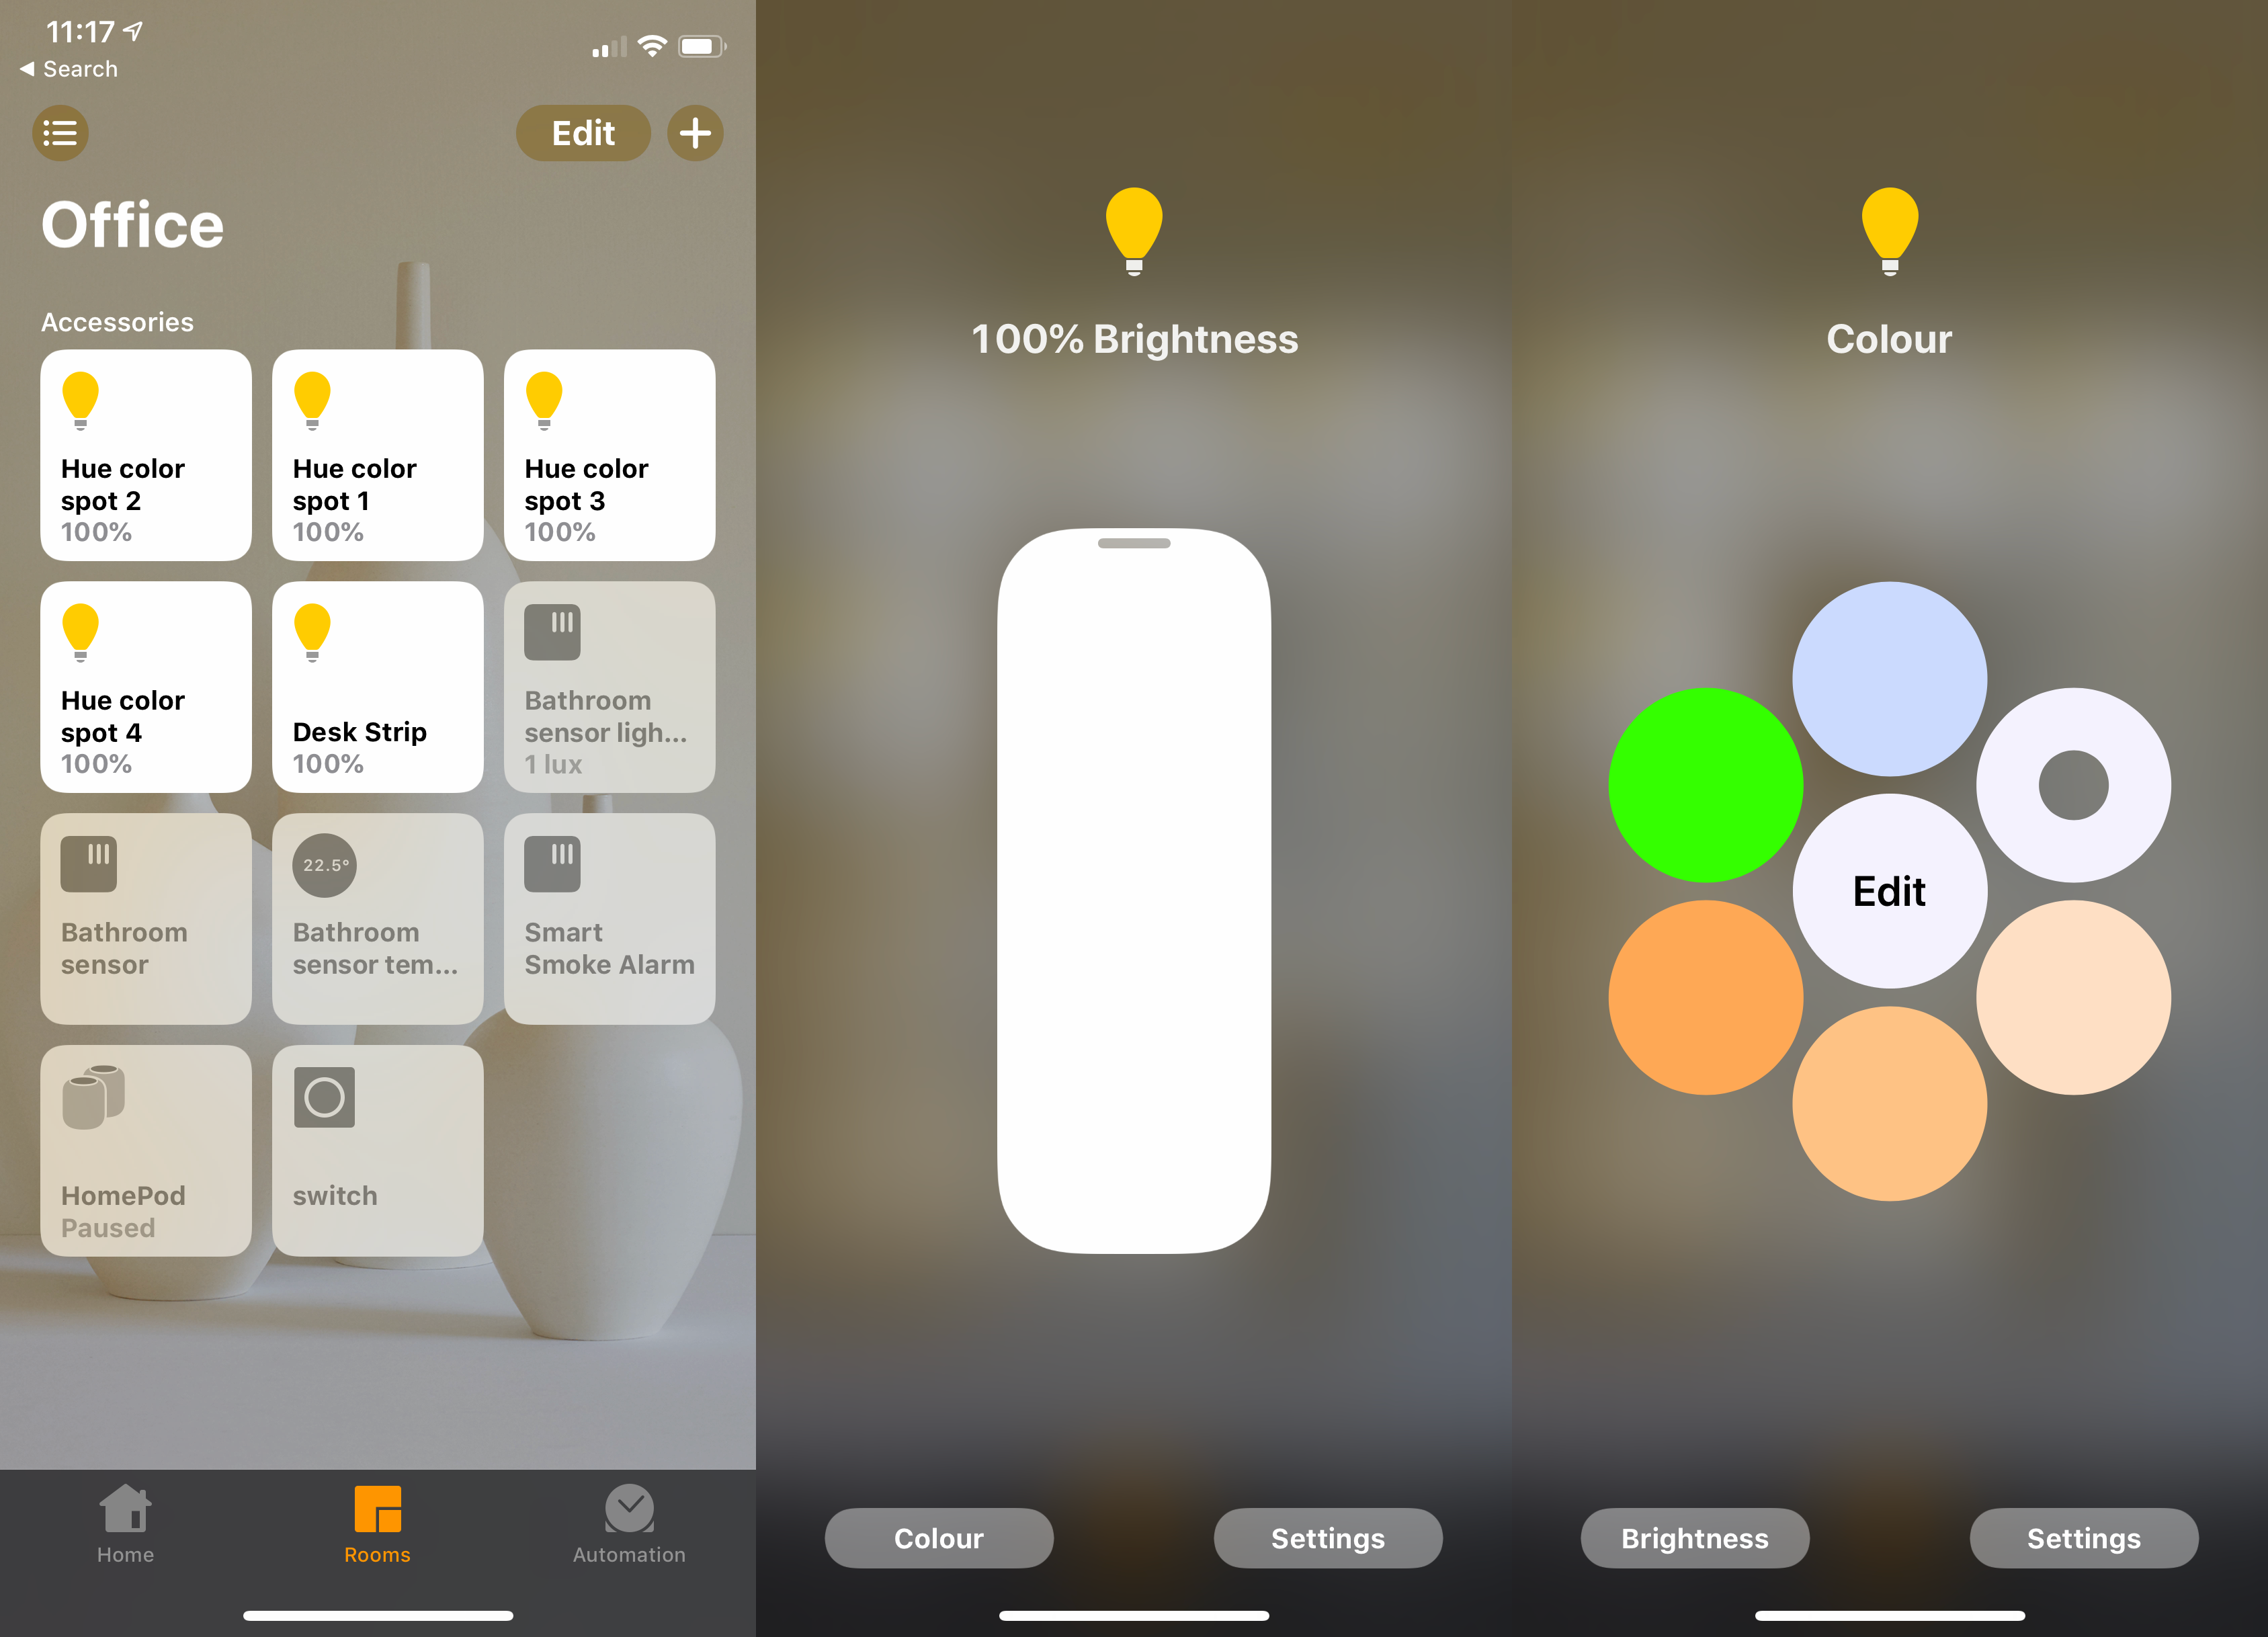
Apple has updated HomeKit with Adaptive Lighting. For compatible bulbs, you now get the Adaptive Lighting choice, which sets your bulbs to a colour temperature that matches that of daylight outside, starting with a warmer light, automatically moving brighter and colder in the middle of the day before dimming again at night. It’s a great addition, making lights feel more natural. And, this feature adds something over what manufacturers provide. For example, Philips Hue bulbs support Adaptive Lighting but don’t have a similar feature in the Hue app.
The only potential issue is how you control the feature. With Hue bulbs, if you use a control device, such as a dimmer switch, it will turn Adaptive Lighting off and you’ll have to use the app to re-enable it. To get around this, I have added a Flic 2 Button into my office, which is now HomeKit compatible. I use the regular Hue switch to control the modes and brightness I want, but the Flic button is there to turn on Adaptive lighting when I want them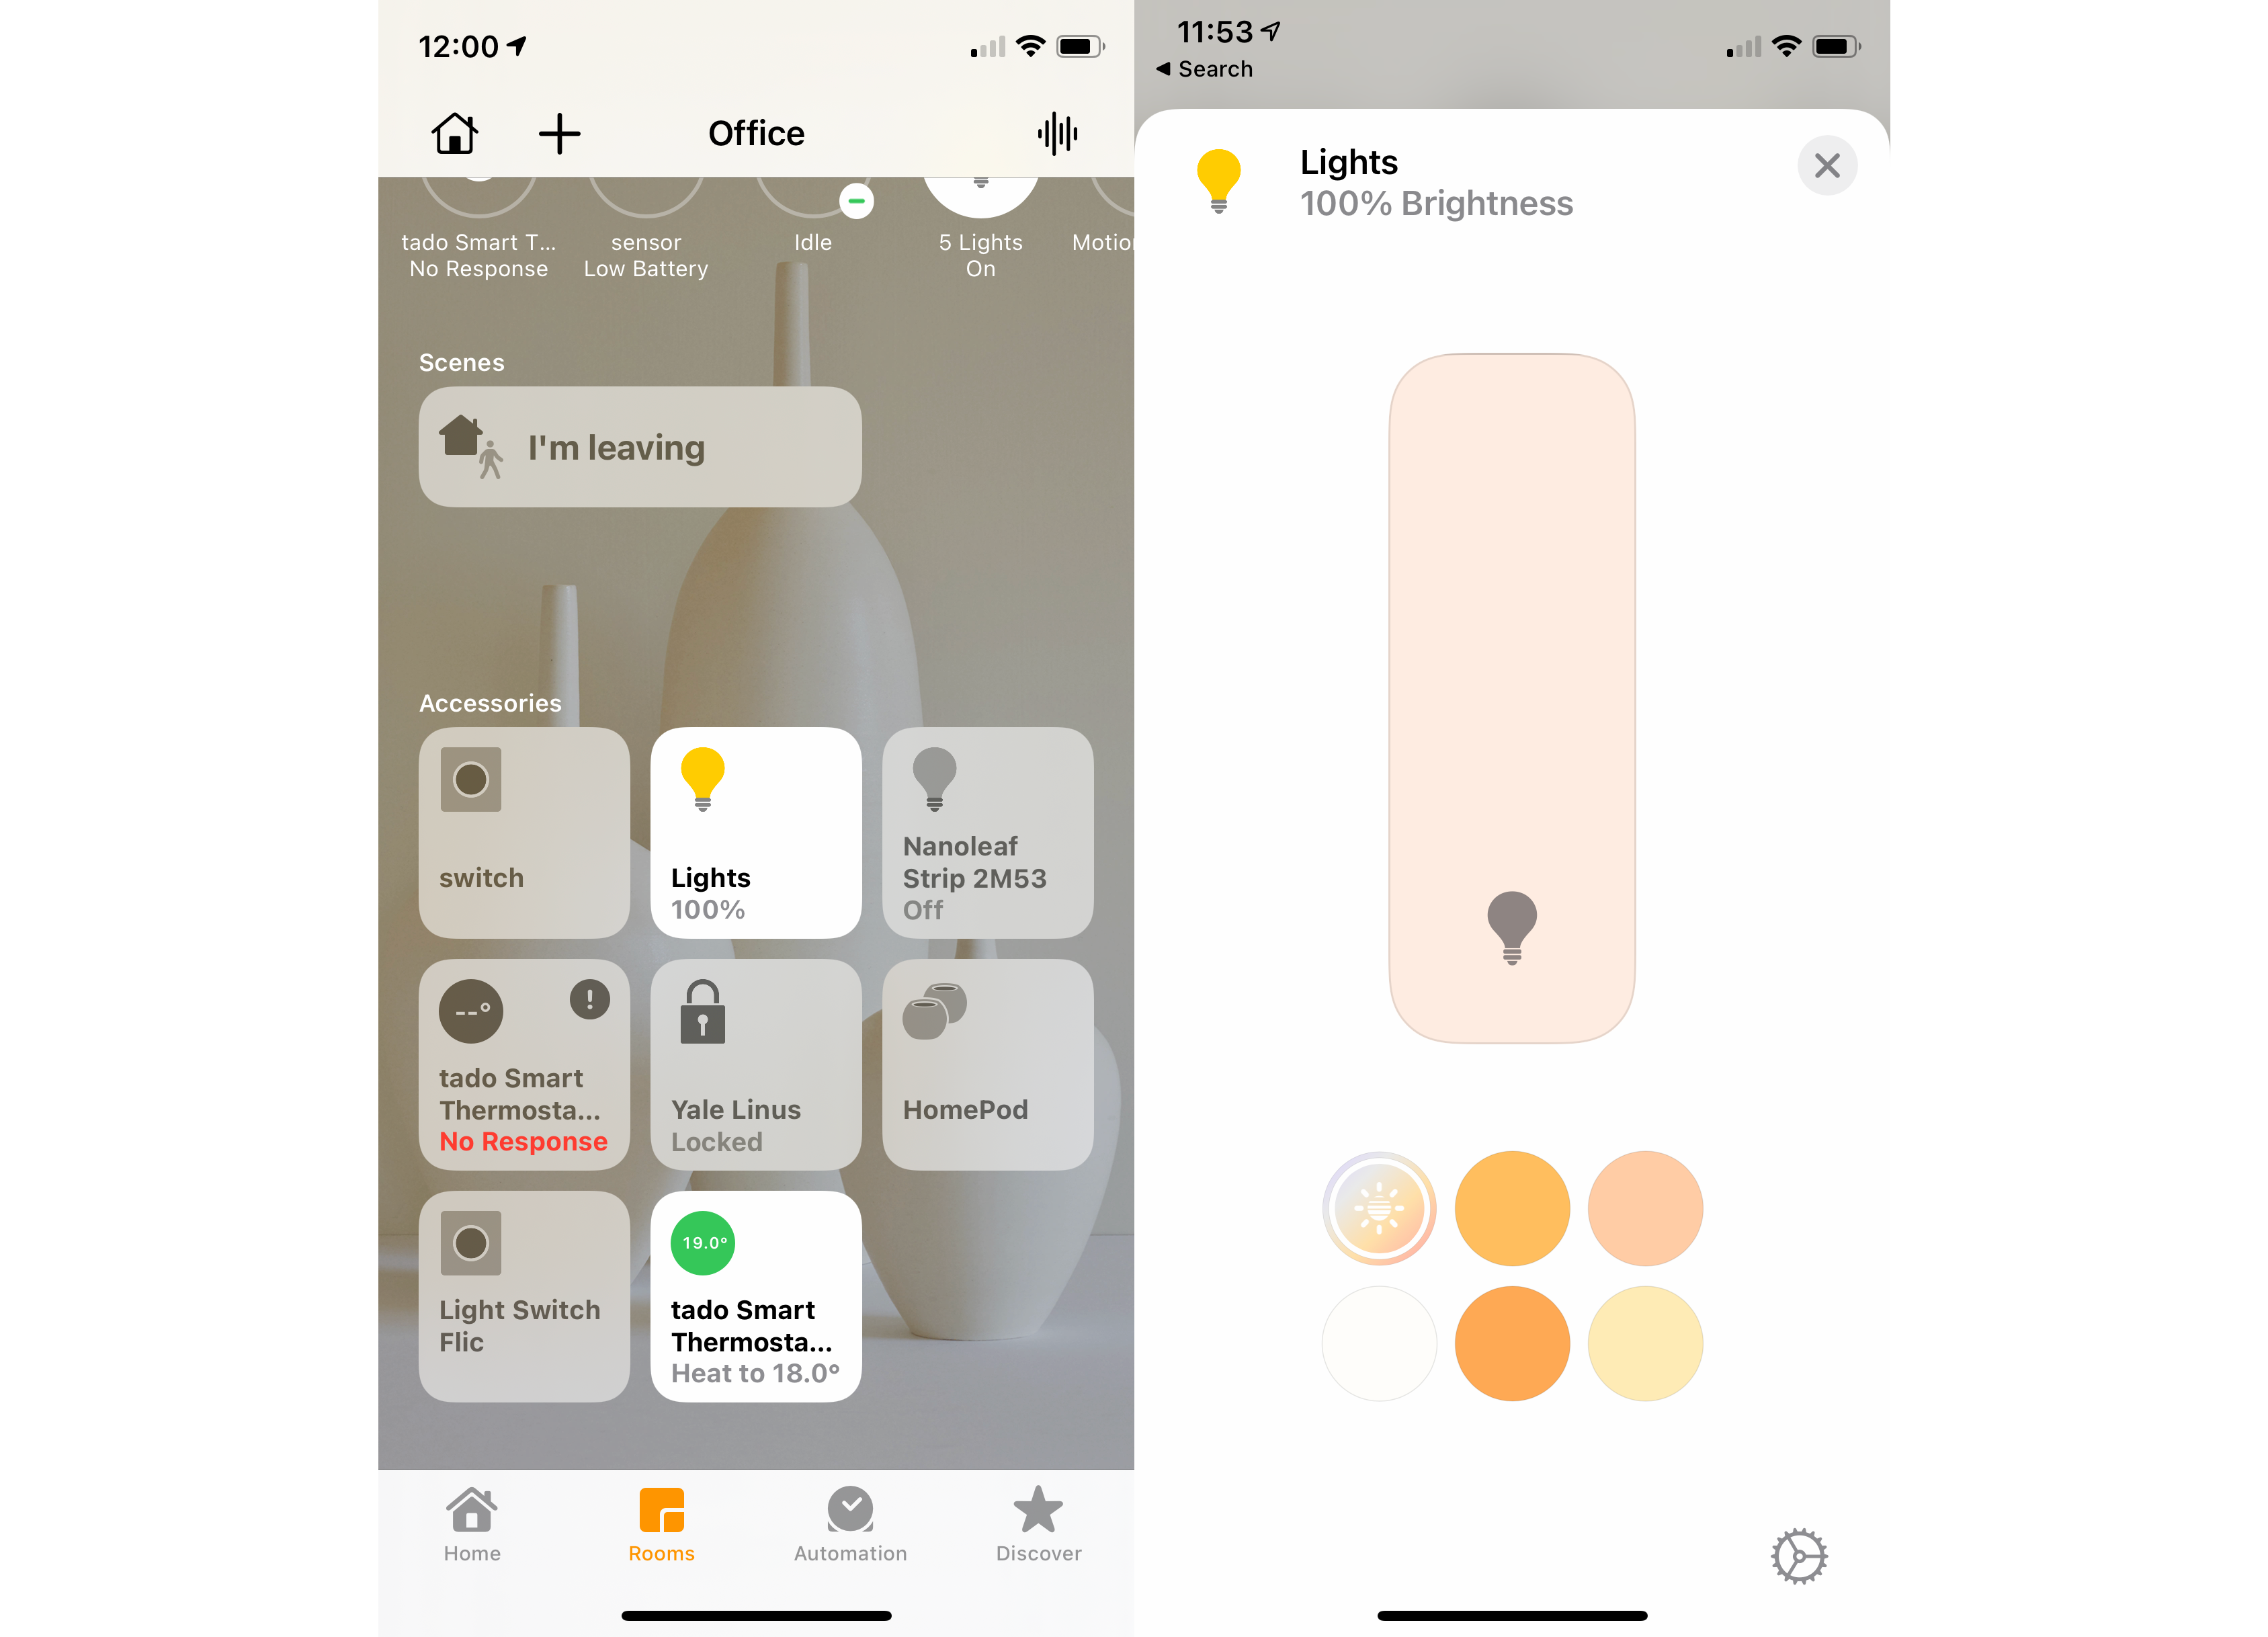
Thermostats give you a slider to adjust the temperature, although what happens depends on the device. For example, with a Tado Smart Thermostat, adjusting the temperature will put the thermostat into Manual mode. Depending on how you’ve configured Manual Mode in the Tado app the change can be permanent, for a set time or until the next scheduled change. Control, as you can see, isn’t quite as granular here as through the app.
There’s no option to turn a room on or off with a single command, so you can’t control a bunch of lights together this way. Instead, you have to create Scenes, which lets you set default settings for lights and other devices. For example, you could have Movie Night, where you dim down the lights and stick up the temperature. It’s trivial to create a Scene that turns everything off, but it would be nice to have this as a default.
Scenes aren’t pulled through from other devices, either. So, if you’ve spent a lot of time making a scene in the Hue app, you can’t trigger it in the Home app and will have to replicate the settings with a new HomeKit scene. Having your favourites available from Control Centre is a real bonus, as you can quickly get to your top devices or scenes.
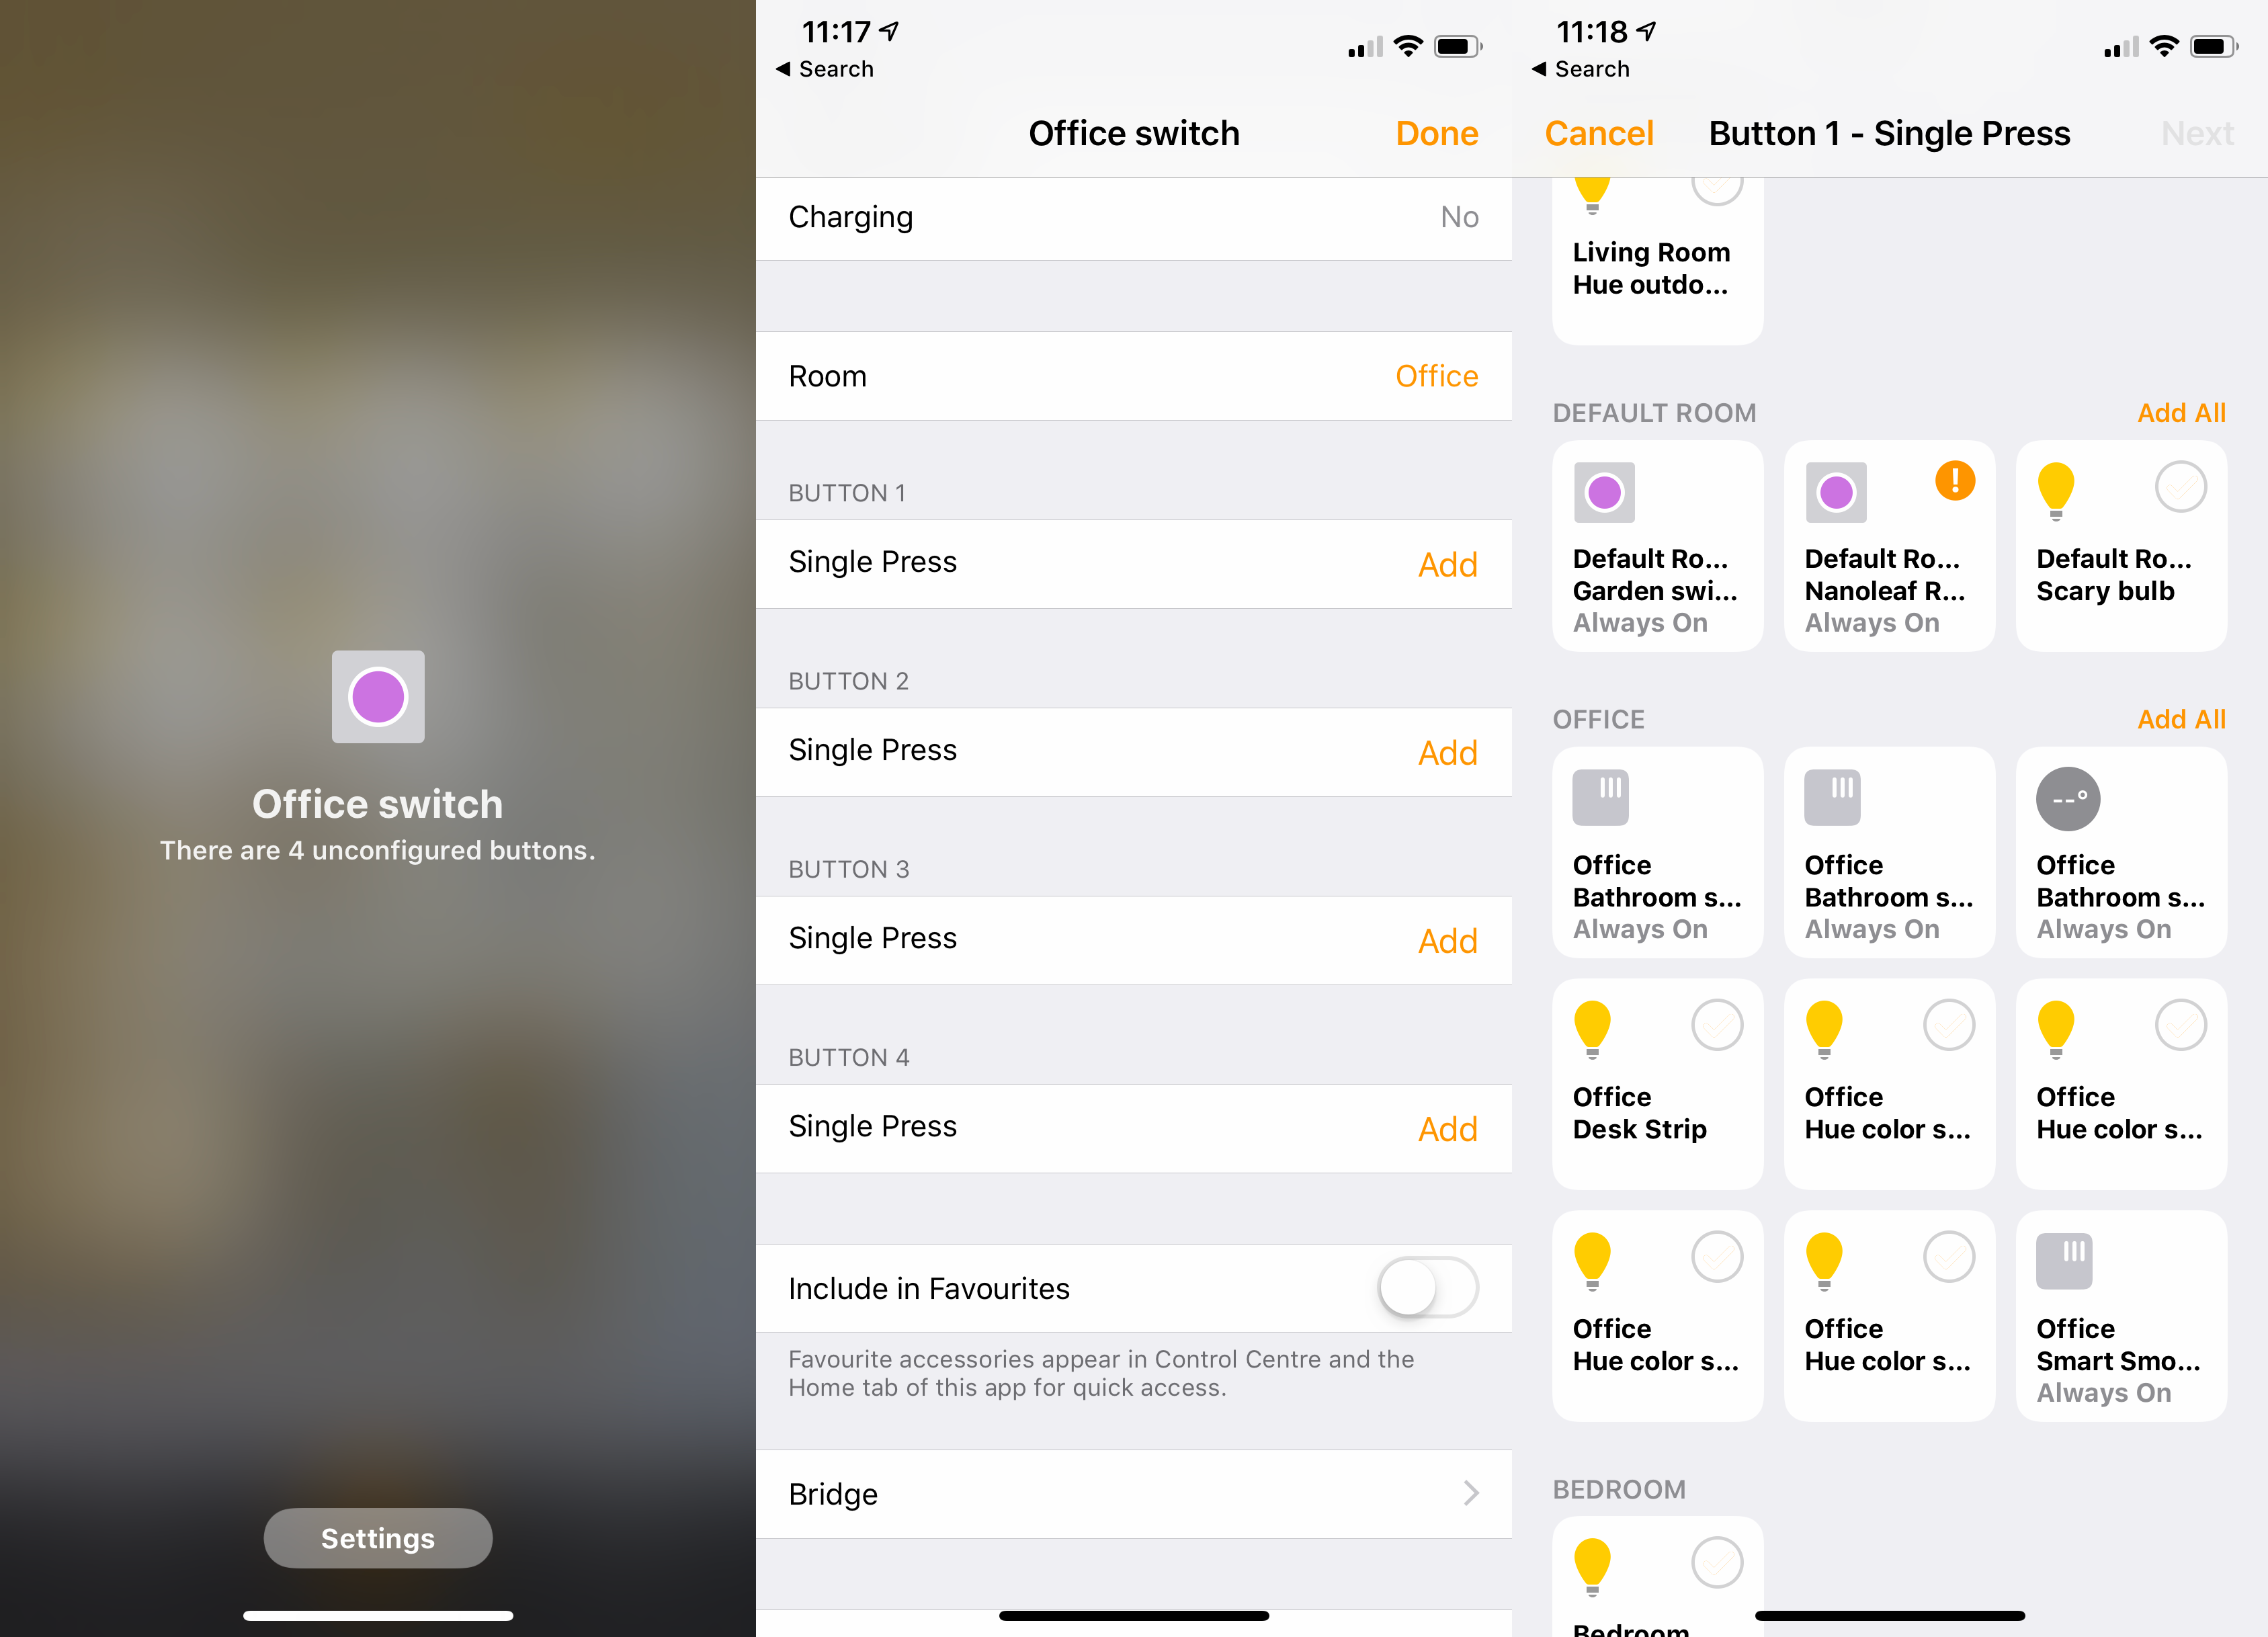
There are some devices that you can’t directly control, but that you can programme, such as the Flic 2 buttons or Philips Hue Dimmer switches. For the latter, for example, you can set default actions when you press any of the buttons. In this way, you can make the Hue switch do other actions, such as turning up your heating or triggering a scene.
The control isn’t as granular as in the Hue app. With the Philips app you can set what happens on multiple presses of the on button, using it to cycle through your favourite scenes; the dim and off buttons then work as expected. And, be careful, as setting controls in the Home app doesn’t replace the modes set in the Hue app, so you can have unexpected things happening.
The Home app also supports video feeds from the likes of the Netatmo Presence security camera. This feed lets you see what’s going on, but doesn’t provide any recording options. As such, it’s neat to have everything in one place, but you’ll still need the manufacturer’s app for control and recording.
Finally, you get devices where you can only use the sensors as part of a routine, such as motion sensors or smart smoke alarms. Make sure that these are marked as a Favourite, as you’ll clutter up your Home page with devices that you can’t directly do anything with. Homes can be shared with other iCloud users, so you can set up one set of smart devices and have multiple family members able to control everything.
HomeKit Secure Video
HomeKit Secure Video is a way of using your iCloud storage for video from cameras, such as the Arlo Pro 2. You have to have a subscription to iCloud, although video storage currently doesn’t count towards your limit. With supported cameras, this can save you money on cloud subscriptions, plus you get some additional features, including facial recognition and activity zones.
It’s a great tool, but it isn’t widely supported mostly, I believe, because manufacturers would rather you spend money on their cloud storage, rather than you giving money to Apple. You also have to be careful, as moving to HomeKit Secure Video turns off features in the camera’s main app, so you might lose an option that you use regularly.
Apple Home and HomeKit – Siri and HomePod
Siri control of your devices is the same whether you’re using an iPhone, iPad, HomePod or HomePod Mini. Arguably, the HomePod makes things easier, as it’s always listening and gives you smart speaker control in the same way as, say, an Echo smart speaker. Siri control lets you do the basics, such as setting a light bulb to a set colour. Siri understands colour temperatures, such as ‘cold white’ or ‘warm white’, too.
Having the HomePod Mini makes a big difference, as you can now more affordably add Siri control to multiple rooms. Even better, the HomePod Mini supports the low-energy Thread control, too, letting you connect devices directly, such as the new Nanoleaf bulbs.
For supported doorbells, such as the Netatmo Smart Video Doorbell, you can now use your HomePods as internal chimes, broadcasting when someone is at the door. You can’t, however, answer your door directly from a HomePod, although you can do through the app.
While the Home app doesn’t give you control over an entire room, Siri does. For example saying, “Hey Siri, turn off office” will turn off all lights in the matching room name, even those not grouped together. Siri responds in a friendly, human-like way. To my ears, the responses are a little neater than the more mechanical replies from Alexa or the Google Assistant.
The bigger issue is getting Siri to reliably understand you and I’ve found that this voice assistant gets things wrong more often than Alexa or the Google Assistant. The gap is closing, but there are still moments of frustration getting Siri to do what you want.
Apple Home and HomeKit – Automation
Automation is Apple’s way of getting smart home devices to play nicely together. Think of it as a turbo-charged IFTTT, if you will, with faster response times. Automations consist of two parts: a trigger that defines when something happens, and actions, which define what smart devices should do. For example, a trigger could be turning a thermostat down, or setting a light to a certain colour: you get the same level of control over a device in an Automation as you do in the Home app.
Every device you add to an Automation has to be set up manually, which can be time-consuming if you’ve got a lot of devices, such as lights, that you want to control. However, you can also run Scenes if you’ve got a pre-defined one that would do the same job. Automations can be triggered by four things. First, you can set things to happen when everyone leaves, or someone arrives home. This is a handy way of turning off everything when you go out, but it’s a shame that there’s no option to turn off the HomePod.
Next, you can set a time of day, which can either be a specific time, or something a bit more elastic, such as sunset or sunrise. It’s a shame, that you can’t set lights to gently increase in brightness to help wake you up. Next, you can set Automations based on when a device is controlled. So, turning on one light could trigger other lights to turn on automatically, too.
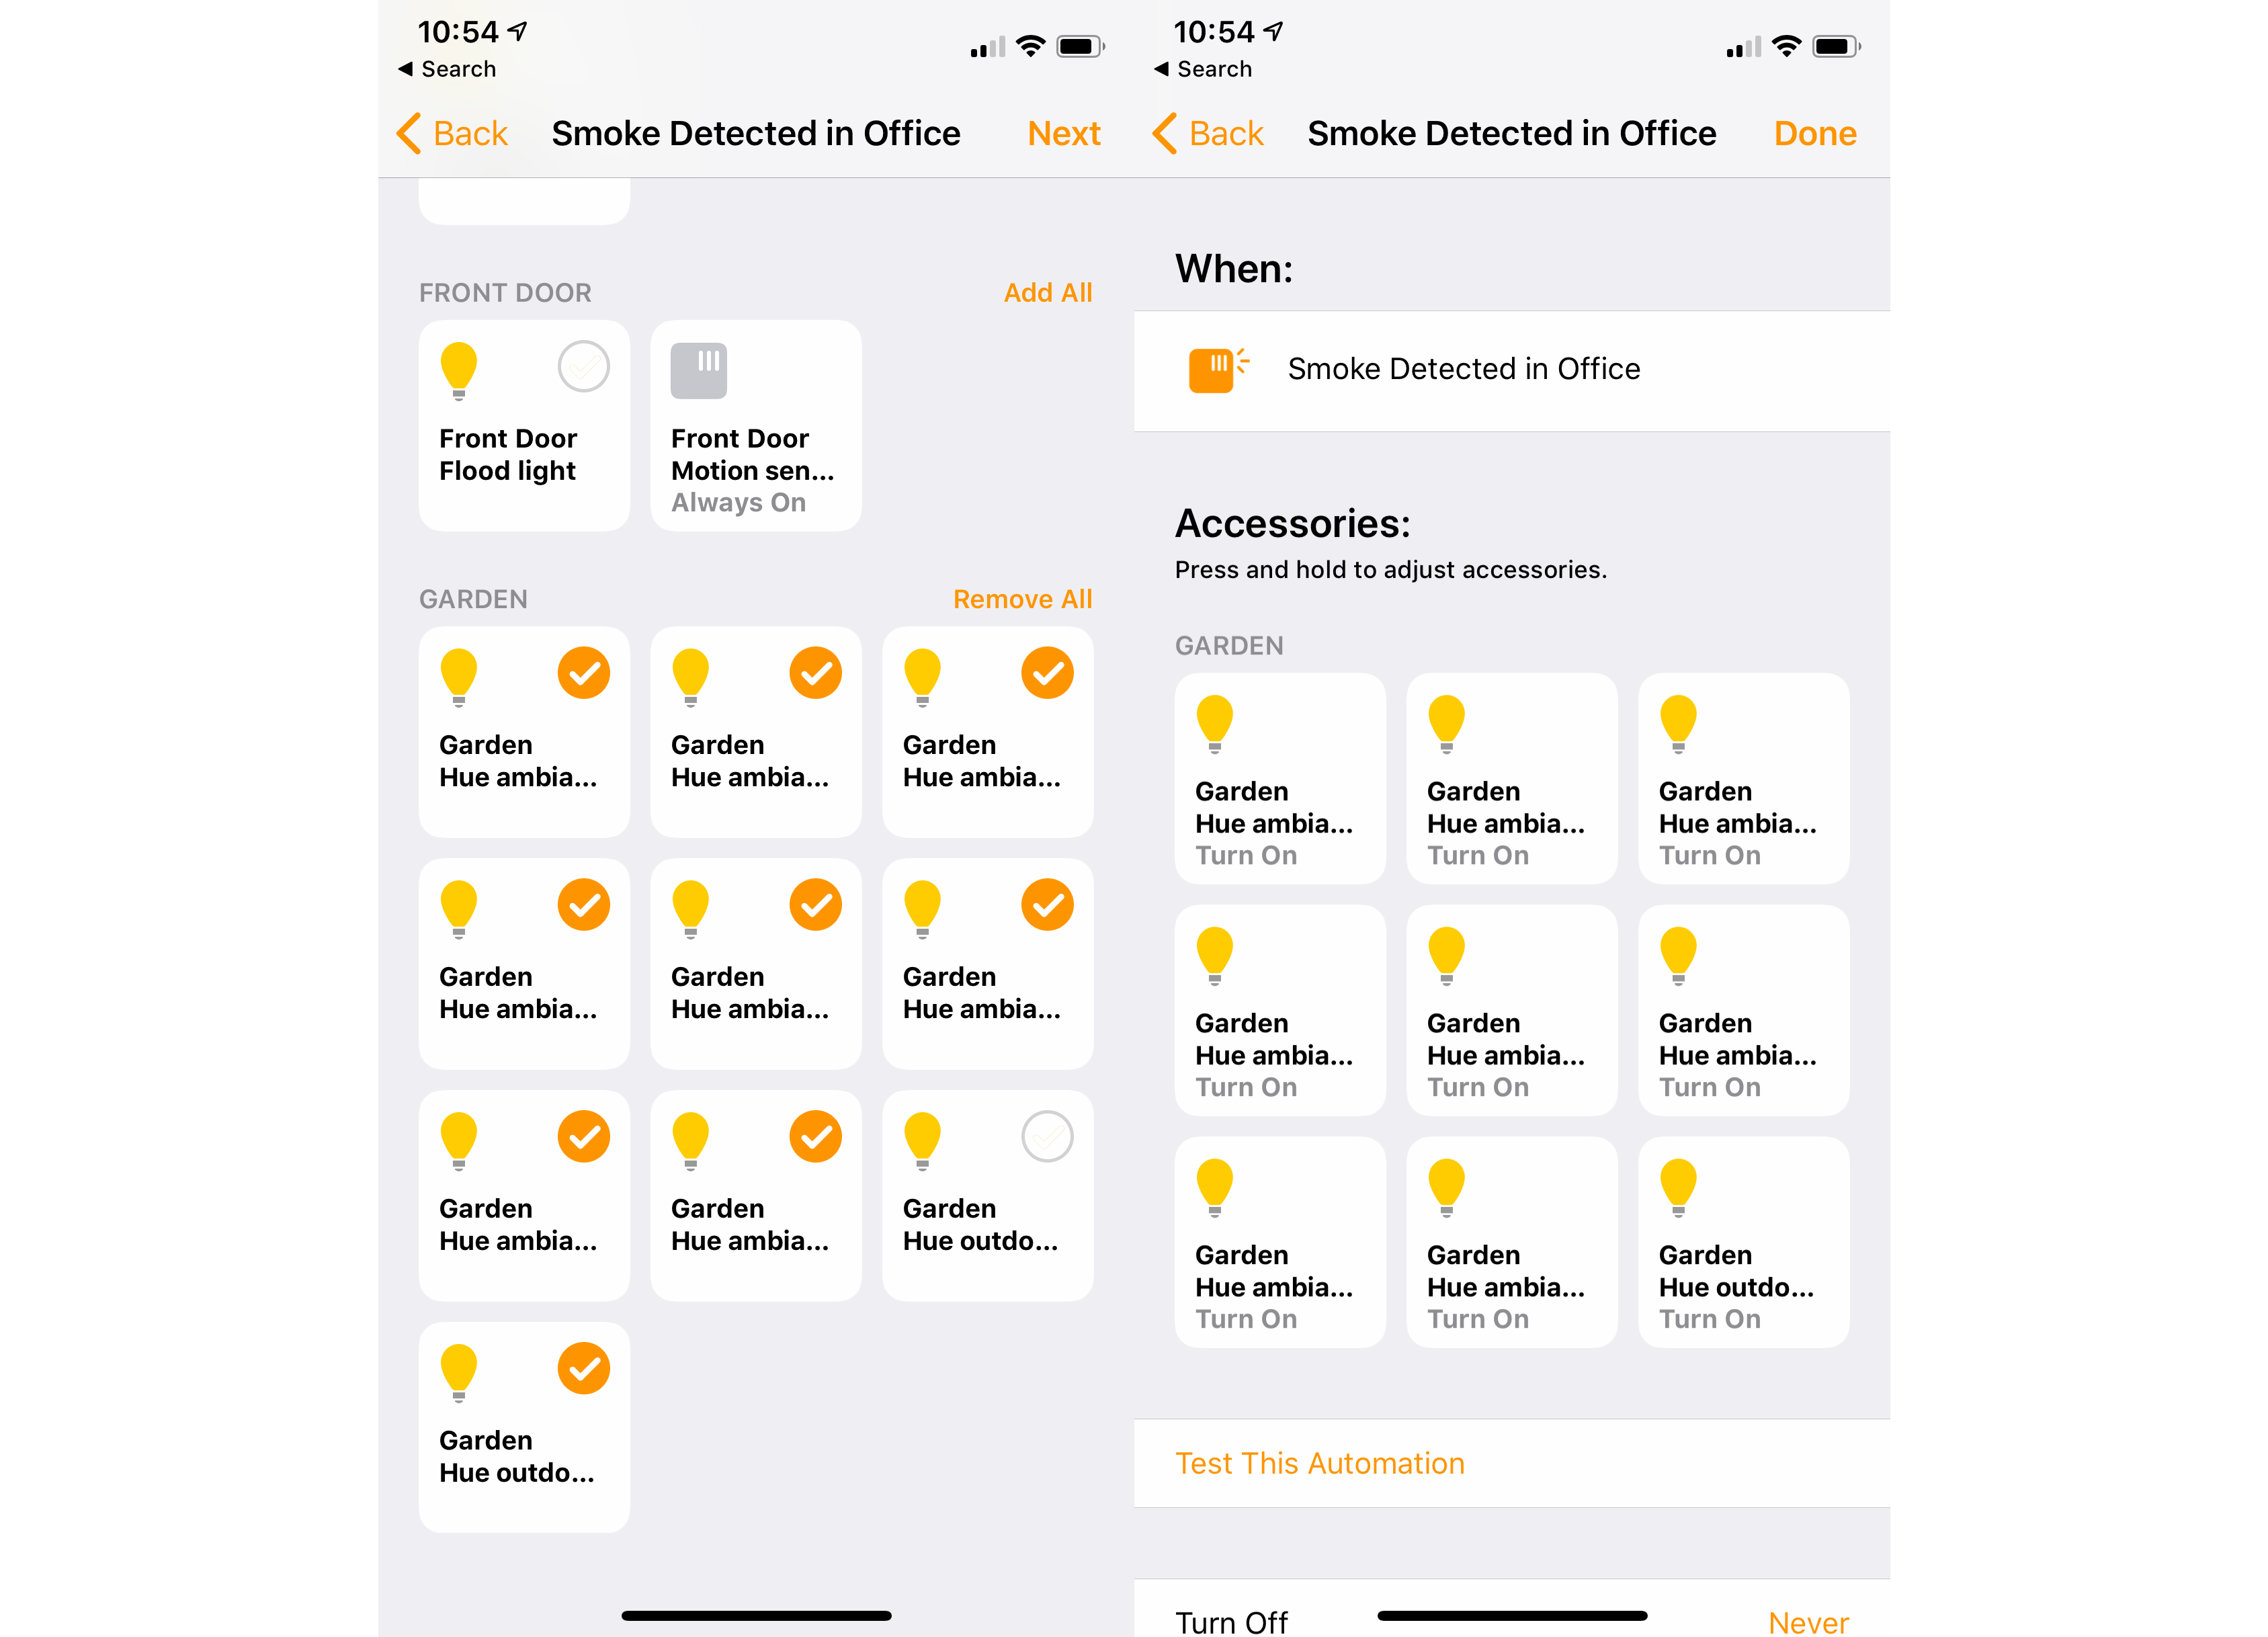
Finally, you can set Automations based on when a sensor detects something. This could be setting all of your lights to red when a smoke alarm, such as the Netatmo Smart Smoke Alarm, picks up a fire, or turning on lights automatically when your front door camera picks up motion. Cleverly, you can set the time period that the automation works at, say disabling motion detection turning on a light during the day.
Automations are a powerful and simple way to get more out of your smart home devices. Compared to SmartThings, Apple’s implementation is far easier to get to grips with, but in some ways Home and HomeKit are almost too simple.
For example, you can have your lights turn off when a motion sensor stops detecting motion, but this happens instantly with Apple Home. With SmartThings, you can set the period without motion before the automation would run, say only turning off a room’s lights when motion hasn’t been detected for ten minutes.
Why use Apple Home and HomeKit?
Apple Home and HomeKit have come a long way since the launch of the Siri-only service. Now, with the Home app across iOS and macOS, you get a single interface for all of your smart home devices. The number of supported devices has dramatically increased, too, while the level of control and range of Automations have improved.
For all that, Home and HomeKit still aren’t as extensive as some other systems. It’s likely that you’ll end up with some smart home kit that doesn’t work with Apple’s ecosystem and will need to use Alexa or the Google Assistant for voice control here. That said, for homes with predominantly Apple devices and the right range of supported devices, Home and HomeKit are powerful ways of controlling and automating your home.
How we test phones
We test every mobile phone we review thoroughly. We use industry standard tests to compare features properly and we use the phone as our main device over the review period. We’ll always tell you what we find and we never, ever, accept money to review a product.
Trusted Score
Editorial independence
Editorial independence means being able to give an unbiased verdict about a product or company, with the avoidance of conflicts of interest. To ensure this is possible, every member of the editorial staff follows a clear code of conduct.
Professional conduct
We also expect our journalists to follow clear ethical standards in their work. Our staff members must strive for honesty and accuracy in everything they do. We follow the IPSO Editors’ code of practice to underpin these standards.