
Want to get the most out of Windows 10? Here’s the handy features, tips, tricks and tweaks we’ve discovered to help you become the master of Microsoft’s latest OS instalment
Hopefully by now you’ve taken the plunge and upgraded from Windows 7 or Windows 8.1 to Windows 10.
If you’ve read our review, then you’ll know we’re generally fans of the changes Microsoft has made, especially the return of the Start Menu and the surprisingly powerful Cortana integration.
Like any new OS, the only way you can find out what it’s truly capable of is by spending some decent time with it. We’ve now had the pleasure of being able to get to know Windows 10, and there’s a few things we think will help you make the most of the biggest new changes.
WATCH – See what’s new in Windows 10
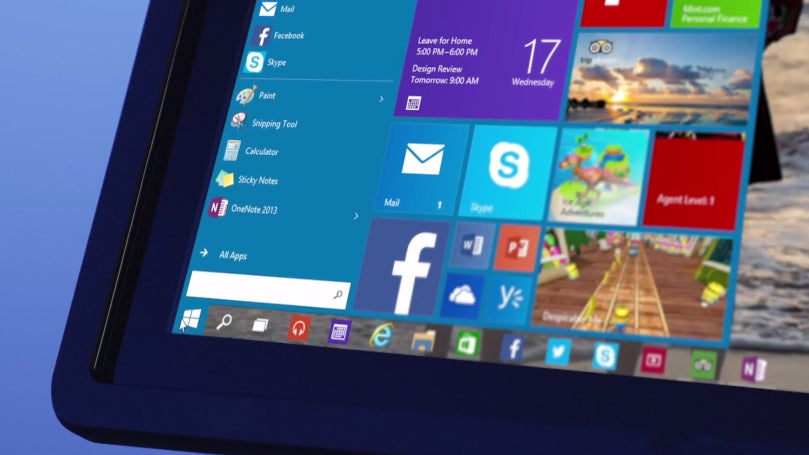
Customise the Start Menu
The return of the Start Menu is a pretty big deal in Windows 10 and that’s because you’re likely to spend quite a bit of time with it. Whether it’s using it in the more traditional Windows way or using Cortana to search for content on your PC or the web, it’s a welcome addition.
Pulling in the tiled user interface from Windows’ tablet mode means you get to access Live Tiles all without exiting the desktop mode. If you’re not a fan of how these tiles look or how they are arranged, this is something you can fix.
Simply hover the mouse cursor over a tile and right click on your mouse or the right side of your touchpad. Now you’ll see options to resize tiles to make them smaller or even wider. You can also pin programs to the task bar at the bottom of the screen or remove (Unpin) from the Start menu altogether – holding down on the tile does the same thing on a touchscreen.
If you’re not a fan of the Live Tiles, which are basically constantly updating widgets like the ones you get on your phone, select ‘Turn the live tile off‘ and it’s all done. You can always add them back later simply by dragging the app back to its vacated space.
Related: Windows 10 vs Windows 7: Should you upgrade?
Create a virtual desktop
A favourite with Mac OS X users, the ability to have multiple desktops running concurrently is now included in Windows 10 and it’s great. Whether you have loads of apps open or a week’s worth of Office documents, virtual desktops lets you organise your space.
To set one up, tap or click on the small icon – or press Windows key + Tab – to the right of the Cortana search bar and this will bring up all of the your open windows. If you scan your eyes to the bottom right hand corner you should see the option to ‘+ New desktop‘.
Learn useful Windows 10 keyboard shortcuts
For those times when you just want to get to specific modes and features much quicker, we’ve picked some of the most useful shortcuts for PC users including how to start using Microsoft’s multi-tasking window snapping feature in seconds.
Snapping a window: WIN + LEFT or RIGHT (can be used with UP or DOWN to get into quadrants)
Switch to recent window: ALT + TAB (unchanged) – Hold shows new Task view window view, let go and switches to app.
Task view: WIN + TAB – New Task view opens up and stays open.
Create new virtual desktop: WIN + CTRL + D
Close current virtual desktop: WIN + CTRL + F4
Switch virtual desktop: WIN + CTRL + LEFT or RIGHT

Open File Explorer to ‘This PC’
One of the more annoying quirks of Windows 10 is that the file Explorer by defualt now opens to a view of your recently used files and folders, putting access to the list of your drives an extra click away.
Thankfully you can change this back to a more familiar view by heading to the View ribbon at the top of Explorer, clicking on Options and changing the drop down menu from Quick Access to This PC.

Help Cortana know you better
Cortana, Microsoft’s intelligent assistant listens out for your voice, so you can quickly jump into a search, but by default it will respond to anyne who shouts out ‘Hey Cortana’. You can set it up to only recognise your dulcet tones though, just click the Cortana box, head into the Settings page and toggle the ‘Respond Best To Me’ slider.
Now, Cortana will attempt to learn your voice. She’ll give you six phrases to repeat, once that’s done, and it might take a few attempts, you’ll have the sassy personal assistant all to yourself.
Fan of Windows 8? Try using the Tablet Mode
Any fans of Windows 8 out there? Hello? Ok, so not many of us are lovers of the fully touch-friendly UI that Microsoft has pushed into the background. Tablet Mode, of course, gets rid of the desktop and lets the Start Menu take center stage.
To access it, Tap on the ‘notifications’ icon (it looks like a message) on the taskbar – or swipe in from the right side if you’re using a touchscreen – in the taskbar to bring up Action Centre. Click the ‘Tablet Mode’ and repeat the method to exit it again.
Incidentally, if you’re using a hybrid device – a Surface Pro 3 for example – popping the keyboard out should automatically bring up Tablet Mode, which is a nice touch.
Related: Windows 10 vs Windows 8.1
How to put ‘switch to Tablet mode’ as a default
If you’re really a big fan of the Tablet mode and want your laptop or PC to boot up into the touchscreen-friendly version of Windows 10 every time you log in, you need to go into the System settings to do this.
Head to the Windows Start Menu and select Settings. Look for the Tablet mode option and when selected it’ll give you a drop down option for ‘When I sign in‘. Here you choose to boot up in whatever you used last or automatically switch to tablet or desktop mode every time.
Play Xbox One games on your Windows 10 PC
One of the nicest additions to Windows 10 is its integration with Microsoft’s gaming console, the Xbox One. Game streaming lets you beam titles from your console to your laptop/desktop in another room. You could say it’s Microsoft’s competitor to Remote Play streaming on the PS4 and PS Vita, though it’s a far better implementation.
The simplest way to activate it is to open up the Xbox app on your Windows 10 PC, ensure your console is on and connected to the same Wi-Fi network and tap the Xbox One symbol you should see appear on your PC or laptop.
There is a slight lag introduced by playing this way but for slower paced games it works brilliantly.
For a more in-depth look at this Windows 10 mode, you can read our how to stream Xbox One games to a Windows 10 PC feature.

How to use Game DVR to record non-gaming content
If you own an Xbox One, then there’s a lot of reasons to like the more console-friendly Windows update. One of the best features is the new Game DVR feature letting you record clips of your games.
There is, however, a way to take advantage of the gaming feature to use for other areas of Windows 10 – like simply recording an app or a piece of software.
The first thing you need to do is head to the Xbox Windows 10 app, which you can find easily using the Start Menu.
You’ll need to log in with a Microsoft account attached to your Xbox gamer tag or create a new one if this is the first time you’ve set one up.
Jump into the Xbox app settings and this where you can adjust things like the duration of clip recorded, video quality and keyboard shortcuts for additional features like taking screenshots.
Once that’s done, press the Windows key and G key on your keyboard. Alternatively, you can plug in an Xbox One controller and press the white Xbox button in the middle of the pad.
A prompt will ask you if you want to open a game. Say yes and a floating toolbar will give you the tools to capture content. It doesn’t work with Skype unfortunately, but should work with most other Windows 10 features.
Saved videos can be found in the Game DVR section of the Xbox app, or inside here C:users%username%VideosCaptures, which is set up as the default location.
Related: Why Continuum is Windows 10 Mobile’s killer feature
Install updates at the most convenient time
Windows 10 will force you to accept updates to the operating system, but the installation process can be delayed by up to six days. You can set this up by opening the Start menu, going into Settings, then Updates and Recovery, and choosing Notify to schedule restart.
Get faster updates with P2P
This next tip starts in the same place as the previous one, so stay locked in the Updates and Recovery menu. To ensure your updates are always downloaded quickly and efficiently, you can utilise peer-to-peer tech. Tap on Advanced Options, then Choose how updates are delivered and select Updates from more than one place to ‘on’ – see below for how to ensure P2P updates don’t suck up all your bandwidth.
How to disable Windows updates from using your bandwidth
Something that early adopters have found is that by setting up those faster updates described in previous tip, it will use your internet connection to share updates with other users. It’s called the Windows Update Delivery Optimization and works in a very similar fashion to a peer-to-peer network that’s commonly used for things like torrent sites.
If you’d prefer not to share the bandwidth love then there’s the option to turn it off, but it’s not as straightforward as you think.
To disable it, go to the Windows Start Menu and select Settings. Click on Update & Security and under the Windows Update tab, click on the Advanced options. Select the ‘Choose how updates are delivered‘ option.
You should now see the option to select whether updates from Microsoft are received from ‘PCs on my local network‘ or ‘PCs on my local network and PCs on the internet‘. Select the former if you value your bandwidth more than those speedier updates.
This also allows you to push Windows updates to other PCs in your home without downloading the update multiple times.

Doodle on a web page
Lots of Windows 10 computers have touchscreens, a perfect addition to take advantage of the new doodle features in the new Edge browser. Just tap the pen and paper icon in the Edge’s menu bar, choose your pen of choice and start doodling.
Holding down on the pen type will bring up a variety of hues and sizes, you can copy regions of the page too and save them to OneNote.

Have your say with Windows Feedback
A great new feature of Windows 10 is the Feedback tool. If you’ve got an issue with the OS you can use it to search out possible solutions to your problem, send feedback to the Windows team or add your support to an existing issue.
It’s basically a self-helping community with Microsoft keeping an eye on things to see what it can improve. You’ll need to have a Microsoft account to use it but it’s one of the most useful reasons to sign up for one.

Going back to Windows 7 or Windows 8.1
If Windows 10 isn’t the radical overhaul you’d hoped it would be and you’re left pining for the old times, you can still step back in time and go back to a Windows 7 or 8.1 life. You’ll have a month to revert back to the older version, so make sure you’re definitely sure this is what you want to do.
The first step is to back up anything you’ve downloaded or saved during the time you’ve had Windows 10 running. You could use an online cloud storage service like OneDrive or Google Drive or go old school and opt for an external or USB drive.
Go to the Windows Start menu and click the Update & Security option. Select Recovery and you should see an option to Go Back to Windows 7 or 8.1, depending on what you had last running on your device.
Once you’ve filled in a blue form saying why you’ve had enough of Windows 10, you can begin the very simple process of rolling back.
Depending on how much you’ve managed to install during the brief Windows 10 opening window, this could take a few minutes or a little longer.
Have you spotted any great Windows 10 hidden features? Let us know in the comments section below
Editorial independence
Editorial independence means being able to give an unbiased verdict about a product or company, with the avoidance of conflicts of interest. To ensure this is possible, every member of the editorial staff follows a clear code of conduct.
Professional conduct
We also expect our journalists to follow clear ethical standards in their work. Our staff members must strive for honesty and accuracy in everything they do. We follow the IPSO Editors’ code of practice to underpin these standards.