The TrustedReviews 3DS Transfer Guide
If you just bought a sparkling New 3DS or New 3DS XL, you might be wondering how to transfer all your data from your old machine to your new one.
You can transfer all your photos, music, apps and games from your old 2DS, 3DS or 3DS XL with 7 steps – although it might not seem too simple at first, but we’re here to help you through the process.
What you’ll need:
- Your current 3DS, 3DS XL or 2DS
- The SD card with all your content on it
- Your New Nintendo 3DS or New Nintendo 3DS XL
- A microSD card of equal size to your original SD card
- A size 0 Phillips screwdriver
- A computer
- Wi-Fi access
- PC/Mac with an SD card reader
Note: The New 3DS and New 3DS XL both come pre-equipped with a 4GB microSD card. This is larger than the standard 2GB SD card that comes with the original 3DS, but it might not be large enough for your gaming needs.
We’d recommend picking up at least a 16GB microSD card, or a 32GB (the maximum supported size) card if you can spend a little more. It’ll save you having to do this transfer process again in the future, or having to have your content across multiple microSD cards.
See also: New 3DS vs 3DS

1. Turn on your New 3DS or New 3DS XL
Get your brand new 3DS out of the box and run through the set-up. Do not create a new Nintendo Network ID on the new system, as that will overwrite your old Nintendo ID that you’ll later transfer over.
Then go into the System Settings > Other Settings and then head to Update System in the fifth tab.
2. Prepare your old 3DS console for the transfer
While you’re getting your New 3DS ready, you can start making the preparations for moving over your content from your old trusty console.
Take out your current SD card and put it into a PC or Mac with an SD card reader. Copy all your files off your old SD card and put them in a new folder on your computer.
See also: New 3DS vs New 3DS XL

3. Start the System Transfer
When you’ve safely stored all your content from your old 3DS and the software is all up to date for your new machine, you’ll need to grab your New 3DS.
In the System Settings, go to Other Settings and then choose System Transfer on the third tab. Then you’ll need to do the same on your old 3DS.
When you’ve got both consoles at the same stage, you’ll need to choose the “Transfer from a system in the 3DS family”.
See also: Nintendo 2DS vs 3DS vs 3DS XL
![]()
![]()
Now, on your OLD 3DS choose “Send from This System” and on the NEW 3DS choose “Receive from Nintendo 3DS”. Doing this will cause both your devices to connect via Wi-Fi.
4. Confirm that you really want to transfer
When the transfer process begins, you’ll be repeatedly asked whether you really want to transfer the data between the two models. Once you’ve confirmed, you’ll then be asked whether you want to delete all the data on your New 3DS’ microSD card. Touch the “Delete” button and affirm that there have been no other SD cards associated with your New 3DS.
Finally, select “Yes” when your New 3DS asks if you used an SD card on your old 3DS.
![]()
![]()
5. Pick the easier PC transfer
Now, Nintendo’s system transfer offers you two options as to how to transfer all the info from your old 3DS to your new one.
We’d really advise picking the easier “PC-based transfer” option rather than the Wi-Fi alternative. Trying to transfer your data between 3DS models over Wi-Fi is a very long process, especially if you’ve got more than 4GB of content on your old 3DS.
After you’ve opted for the PC transfer, select “Move”.
When you’ve done that, all you need to do is wait for any data not stored on your SD card to move between the two systems – including your Nintendo Network ID. Just sit back and wait for the Pikmins to do their job.
6. Transfer your SD card information
Right, now comes the most complicated part of the transfer – actually moving all your content from your old SD card to the new microSD.
You’ll need to grab your microSD card and an SD card adapter in order to make the transfer. But first you’ll need to free the existing microSD in the New 3DS or New 3DS XL.
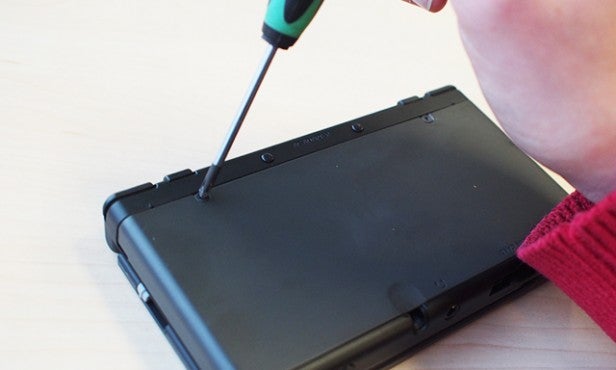
With your new console turned off turn it over. On the back and near the top of both the New 3DS and New 3DS XL are two small screws. Grab your size 0 Phillips screwdriver and unscrew the screws. Thankfully the screws don’t come out completely, but you’ll hear a reassuring click when they’re as loose as they’re going to go.
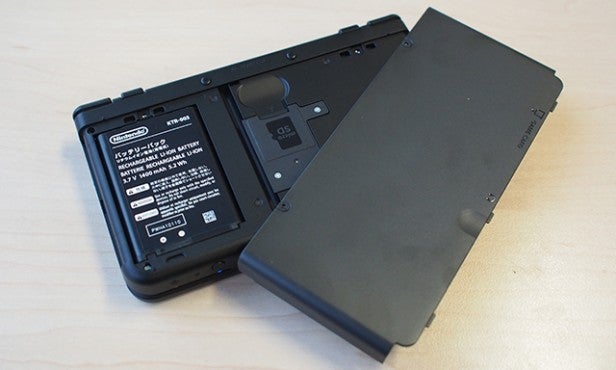
Find the two holes at the side of the back panel of the New 3DS and New 3DS XL and lift it off entirely. You might need to apply a little force.
Underneath the panel you’ll see the microSD card and the battery. Grab your microSD card and either use that one to store all your data, or replace it with the larger sized option.
The microSD card needs to be inserted into the SD card adapter and then into your computer. Copy and paste all the 3DS game files onto the new microSD card, which could take a while to complete.
7. And you’re off
When the transfer completes, put your newly stocked microSD card directly into the back of the New 3DS, replace the back plate and secure the screws.
Your New 3DS or New 3DS XL will recognise all your old games and other content and your menu should look very familiar. Finally, the transfer is complete and you’re ready to roll.

Editorial independence
Editorial independence means being able to give an unbiased verdict about a product or company, with the avoidance of conflicts of interest. To ensure this is possible, every member of the editorial staff follows a clear code of conduct.
Professional conduct
We also expect our journalists to follow clear ethical standards in their work. Our staff members must strive for honesty and accuracy in everything they do. We follow the IPSO Editors’ code of practice to underpin these standards.