It’s National Space Week, and we’ve got some tips to help you take some great shots of the night sky, using various pieces of tech including your smartphone.
1. Choose your equipment
As with anything, how much you want to invest to help you take pictures of the skies can vary greatly, ranging from nothing at all to thousands of pounds.
But, the good news is that you don’t necessarily need anything too high-end, technical, or expensive to get you started. You should think about what it is that you want to photograph; the moon and the stars are a relatively uncomplicated task, while planets and so on require a little more advanced gear.
If you want to stick with your smartphone, you can definitely take great pictures of the night sky, but if you want to get closer to celestial objects, you can buy telescopes which work with your smartphone’s camera. Similarly, you can also use compact cameras, CSC and DSLR cameras depending on what you already have (or want to buy).
A good starting option is the Celestron Inspire 70AZ Refractor Telescope, which comes with an inbuilt smartphone adapter.

2. Think about zoom
If you’re using a smartphone on its own then you’ll be limited pretty much to one focal length – some notable exceptions aside.
However, if you’re thinking about getting more serious, have a look at some of the long zoom cameras on the market. You want to get as close as possible to the subject, and if that’s the moon that means a pretty big zoom.
Compact cameras with a 30x zoom should be the minimum you’re aiming for, but a good option is also a bridge camera. Something like the Nikon P900 for example offers a whopping 83x zoom and with that you’ll be able to photograph the surface of the moon easily, and, what’s more you’ll be able to use it for plenty of other subjects too.
For DSLRs and CSCs, you could invest in a very long zoom lens, such as 300mm or 400mm prime lens, but these tend to be hugely expensive and their other uses are pretty limited, unless you happen to also be a sports or wildlife photographer.
If you’re working on a budget, perhaps consider a superzoom lens instead – an 18-250mm or 18-300mm should get you a little bit closer without breaking the bank too much.
3. Invest in the best tripod you can afford
One thing you will definitely need before you get started is a way to keep your camera or smartphone as still as possible. You’ll be experimenting with reasonably long shutter speeds and perhaps even long telephoto lengths, making a tripod an essential purchase
The differences between tripods tend to come down to how sturdy or otherwise they are; the cheaper they are, the less sturdy you’ll find them and you could find image shake creeping into your images. If you want to keep costs low, consider other ways to keep your tripod steady, such as by hanging a heavy bag off the central column to keep it weighted down.
You can pick up specialist tripods for your smartphone, but again look for something which keeps the device as still as possible. Also look out for tripods or tripod heads which give you full flexibility of movement, allowing you to point your camera at various parts of the sky as necessary.
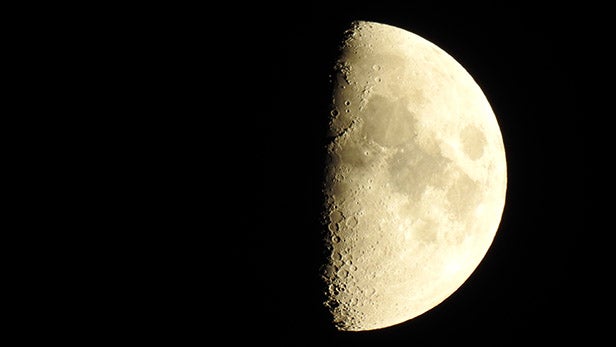
Related: Sony RX100 V vs RX100 IV (Taken with a Nikon P900)
4. Getting aperture and ISO right
It takes some experimentation to get different looks when it comes to night time photography. If you’re photographing the moon, or a just a star filled sky, then you’ll be thinking about wide apertures. In other words, the bigger the f number, the better.
If you can take control of settings on your smartphone or camera, then set a wide aperture (such as f/2.8 or f/4) to let in as much light as possible.
When photographing the moon, setting a wide aperture may throw the exposure off if the only bright object in the scene is the moon. You may find that you need to adjust exposure compensation to make up for that to make an overall balanced image.
When it comes to ISO, the higher the speed, the more sensitive to light the sensor is. However, you also risk image noise creeping into the shot, so go for a mid-range ISO, such as ISO 800 or ISO 1600 to get a good balance of light sensitivity but without degrading image quality too much.

5. Adjusting shutter speed
As you’re essentially trying to get a lot of light onto the sensor for this kind of photography, the temptation can be to open up the shutter for a long time. However, if you’re photographing stars, you’ll need to bear in mind that they move – albeit very slowly. Shutter speeds of longer than around 15-30 seconds will result in “star trails” – where the stars appear as curved lines across the sky.
This can actually be intentional and result in an unusual and creative effect, but if you’re not looking to do it then you need to keep shutter speeds relatively short – try around 8-10 seconds at first and see how that looks.
From there you may want to start experimenting with longer and longer speeds until you’re happy with the look you have achieved.
Here’s where it’s important that your tripod is as sturdy as possible, but in order to reduce camera shake even further you might want to use a timer delay (2 or 10 seconds) which you can do either on your smartphone or with a dedicated camera. You may also want to consider a remote release so you don’t have to touch the camera at all.

6. Photo editing and shooting in raw
In order to get a finished result which is closer to what you saw than the camera is capable of producing, don’t be afraid to experiment with photo editing.
Whether that’s something as simple as a few filters on your mobile or something more extreme on your computer, adjusting colours and brightness shouldn’t be shied away from if it helps to correct (rather than all out change) a scene.
For example, light pollution can cause a yellow cast to appear on your images. In editing, you can reduce this so that the image appears bluer and more representative of how the sky actually looks.
If possible, always shoot in raw format so you’ve got the most information to work with when it comes to editing – many mobile phones these days offer this capability, as do all premium compact cameras, CSCs and DSLRs.
Another option is photo stacking, where you merge various images together into one for a balanced look. This can work particularly well where you have a large expanse of sky behind a foreground object – take one exposure for the sky, and another for the foreground object and merge the two together in post production. You can download free software which will do this job for you while you’re experimenting with different looks.
Related: Best Cameras 2016
Watch: Canon 5D Mark IV – What you need to know
Used this guide to help you take any snaps of the night sky? Let us know how you got on in the comments below.

Editorial independence
Editorial independence means being able to give an unbiased verdict about a product or company, with the avoidance of conflicts of interest. To ensure this is possible, every member of the editorial staff follows a clear code of conduct.
Professional conduct
We also expect our journalists to follow clear ethical standards in their work. Our staff members must strive for honesty and accuracy in everything they do. We follow the IPSO Editors’ code of practice to underpin these standards.