20 macOS Sierra Tips and Tricks to get the most out of your Mac

Our guide to macOS Sierra tips, tricks and hidden features will turbocharge your Apple software experience.
Whether you’re a pro user or a complete novice, here are 10 of the best OS tips and 10 secret Siri commands to try out today.
1. Switch Night Shift on for a better night’s sleep
The latest macOS beta, version 10.12.4, comes with a feature which has been available on iOS since version 9.3 – Night Shift. The feature is designed to gradually shift the display of your MacBook from a blue tint to the warmer end of the colour spectrum as the day turns to evening. Why? Well blue light has been linked to upsetting the body’s circadian rhythm and causing insomnia.
Now the feature has made its way to Apple’s Desktop OS, you can spend your evenings and nights imbibing all manner of insightful article (read: checking facebook) without fear of your night being disrupted by the laptop’s blue light-filled display.
The Night Shift feature can be turned on by going to the Notification Centre, which can be opened by either swiping onto the trackpad with two fingers from the right-hand side, or clicking the Notification Centre icon in the menu bar (see below).

Once opened, you should see a new Night Shift switch in the Today section of the panel. To experiment with different Night Shift settings, head into System Preferences where you’ll be able to schedule Night Shift to activate at Sunset and deactivate at Sunrise, or set your own schedule. You’ll also be able to set the colour temperature of the display.
As mentioned, Night Shift for macOS is currently only available in the Sierra 10.12.4 beta, which can be downloaded through Apple’s Developer Centre or the software update function in the Mac App Store. A word of warning though – as with all betas, there’s no guarantee you’ll be getting a stable build, so it’s probably a good idea to backup all your files before you go trying out the latest beta.
2. Use picture-in-picture mode for iTunes and Safari
The iPad got a picture-in-picture (PIP) mode back with iOS 9, letting you keep videos on the desktop while you got on with other work. Now macOS Sierra has the same feature, available for individual videos in iTunes and Safari. Turning it on is easy. With iTunes, just fire up the app and start playing a video. Hover over the video window and you can click the pop-out icon.
With Safari, you can only use PIP mode with supported websites. This includes YouTube and Vimeo, but not Netflix at the moment. I’ll show you how to turn on PIP on YouTube, although the process is similar for other video content on different sites. Go to YouTube and find a video (the TrustedReviews channel has a rather good selection). Right-click the video once and you’ll see the YouTube menu; right-click again to bring up the Safari menu and select Enter Picture-in-Picture.
Related: MacOS Sierra review

In both iTunes and Safari, the video will pop out into a floating menu that appears at the top-right of the screen. You can drag the video’s borders to make it bigger or smaller, and move it to one of the other corners (you can’t free place PIP video). When you’re done, hover over the video and click the icon at the bottom left to pop the video back to its source. PIP isn’t quite as useful on a Mac as it is on an iPad, but it could come in handy now and then.

3. Synchronise your Desktop across all devices
Who doesn’t use their Desktop as a dumping ground for all kinds of files? Who forgets that they’ve done that, only to switch computers and find out that they can’t see an important file? Banish this problem forever with the new iCloud file sharing feature.
Essentially a Dropbox competitor, the new iCloud file sharing option automatically backs up files stored in your Documents and Desktop folders. Unfortunately, it’s both locations or nothing, and you can’t exclude individual files or folders, so make sure you have enough iCloud storage space before you continue.
Go to System Preferences > iCloud and click Options next to iCloud Drive. Select the Desktop and Documents Folders. Now, every file saved to your Desktop or Documents folder is shared between all of your devices; existing files on your Desktop are copied to a new folder, also located on the Desktop.
Bear in mind that if this is the first time you’ve done this and you have a huge number of files, it’ll take a long time to sync the files for the first time. After that, future syncs will be shorter.

4. Save space with Optimized Storage
Apple has been notoriously tight on storage space, with most of its Macs having relatively small SSDs unless you pay big money to upgrade. If your Mac is a little full, you can reclaim some space. Go to System Preferences > iCloud and click Options next to iCloud Drive. Tick Optimize Mac Storage and files that you don’t use very often will be uploaded to iCloud only and removed from your computer. All files still look as though they’re on your computer, but the iCloud-only ones have to be downloaded before you can open them. Optimized Storage is integrated with Time Machine, so your latest backup will have a copy of all files, even those stored in iCloud only.
5. Clean out the clutter and reclaim disk space
Apple has added a second way to deal with a full disk. Click the Apple icon and select About This Mac. Click the Storage tab and click Manage and you’ll get a list of options that can save disk space. First, you can turn on iCloud Photo Library, which uploads any images and videos stored in Photos to iCloud. Depending on disk space, original photos are replaced with lower-resolution versions; opening an image downloads the full version.
Clicking Optimise next to Optimised Storage will remove iTunes films and TV programmes that you’ve already watched; you can download them again if you want to watch offline.
Empty Trash Automatically is a handy feature that will clean out files automatically, 30 days after they were deleted. Finally, click Review Files to find files that you may no longer need: large files, downloads and browser files. You can manually select and delete the files that you no longer need.
6. Use the shared Universal Clipboard
Wouldn’t it be brilliant if anything you copied on one of your Apple devices was available to paste on other ones? With macOS Sierra and iOS 10 your wish has come true. Best of all, there’s very little configuration needed to set this one up. In fact, all you need is for all of your devices to be signed into the same iCloud account, connected to the same network and to be within Bluetooth range (Universal Clipboard doesn’t work over the internet for security reasons).
You’ll also need to turn on Handoff. To do this in Sierra, go to System Preferences > General and select the Allow Handoff between this Mac and your iCloud devices. On an iOS device, go to Settings > General > Handoff & Suggested Apps, then tap to turn on Handoff.

Now, just copy anything (text, an image, and so on) on one device, and hit paste on another and that’s it. Copying and pasting is usually instantaneous, but you have to wait a little bit if you’re copying a large image or a lot of text.
Related: Want to install macOS Sierra on an older, unsupported Mac? Try this hack
7. Unlock your Mac with your Apple Watch
If you’ve got an Apple Watch running watchOS 3 and a recent Mac (2013 or later), you can automatically unlock your Mac when your Watch is nearby. This feature works using Bluetooth, with the Mac able to sense how close your Watch is: it won’t unlock if you’re a few metres away, for example.
To use this feature, you have first to turn on Two Factor Authentication on both your Mac and your iPhone. To do this on your Mac, go to System Preferences > iCloud and click Account Details. Enter your iCloud password if prompted and click the Security Tab. Click the Set Up Two-Factor Authentication option. On your iPhone, go to Settings > iCloud, and tap your Apple ID. Select Password & Security and the option to enable two-factor should be at the bottom of the screen.
Now, on your Mac go to System Preferences > Security & Privacy, and tick the box labelled, Allow your Apple Watch to unlock your Mac. You have to have your Watch turned on and unlocked to complete this step. Now, when you next get close your Mac, it will unlock automatically without you having to do anything, and your Watch will buzz to let you know.
If you can’t see the option to enable two-factor on your Mac or iPhone, then it’s probably because you have Apple’s similarly-named two-step authentication turned on. Go to your iCloud account online and log in. Under the Security heading disable Two-step authentication. You can now enable Two-Factor Authentication from your phone and Mac.
Related: 6 macOS Sierra problems and how to fix them
8. Pay for things with Apple Pay
Why reach for a credit card when you can pay for things in Safari using Apple Pay? Now, when you get to a site that supports it, you’ll see an Apple Pay icon that you can select for check-out. Just choose this checkout option and you can authenticate your payment using your Watch or Touch ID on your phone.

9. Use AI search in Photos
Photos has become a lot smarter, and AI can now recognise objects in your photos, automatically categorising images. Type ‘forest’, ‘beaches’ or ‘lions’ into the search and Photos will display matching images. It’s not 100% perfect and can miss some pictures, but it’s still impressively powerful (and a little scary).

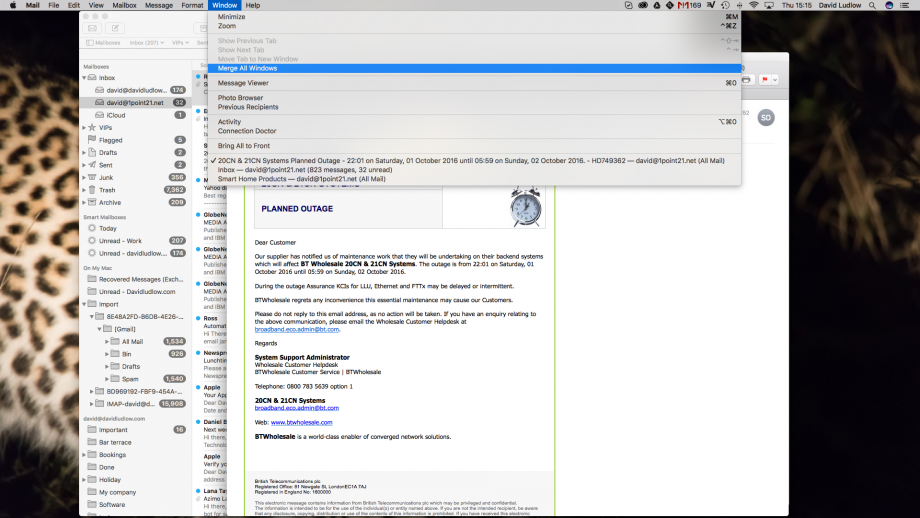
10. Use tabs everywhere
Cut down on desktop clutter by taking advantages of tabs in (almost) every application: every app that uses the standard window manager now supports tabs, those with custom interfaces, such as Word, do not.
To collate all windows of one app together, you can use the Merge all windows option, which is usually located in the View or Window menu, depending on the app. Alternatively, you can use the Show Tab Bar option in the View menu, then you drag-and-drop open windows, combining them into one tabbed window. Depending on the application, you may also get a ‘+’ icon to create a new tab with a new document; for example, this option is available in TextEdit.

Related: Apple takes the Windows 10 route to pushing macOS Sierra adoption
10 Siri tips:
Siri tips by Charles Rowley
Siri arriving on macOS has us all bringing out the crazy questions, trying to confuse its poor digital brain. But, there’s more to Siri that the absurd and it can make life on your Mac easier and faster. So, instead of forcing the digital PA to drop the sass bombs by asking it to divide zero by zero, why not give these handy Siri for Mac commands a go instead? Here are nine of the best things you can ask Siri to do in macOS Sierra.
1. Pin Siri results
Once Siri’s given you a bit of information that’s useful, you can now save the results in Notification Center. Just click the ‘+’ icon next to the result, and it will move into Notification Center, which you can get by swiping in from the right with two fingers on a trackpad, or by clicking the icon at the top-right of the screen.

2. FIND OUT WHAT FLICKS TO WATCH

Some of Siri’s Mac-based skills are exactly the same as its smartphone counterpart’s. That’s anything but an issue, though. Siri’s pretty handy on your pocket blower, so rejoice in being able to do things like checking football scores, finding your nearest coffee shop, and checking which movies are being shown at a cinema near you.
By asking “When’s Star Trek Beyond showing near me,” not only will Siri tell you when the film you’re interested in is scheduled at your local cinema, but it will also give you an insight as to how people are reacting to the film. Because maybe that latest Adam Sandler flick isn’t quite as hilarious as the well-edited 14-second trailer would lead you to believe.
3. ENJOY HANDS-FREE TWEETING

Handling social media accounts isn’t what big shots do, and just like any minor celebrity or mid-sized company with interns, you can get a taste of the high life by turning your back on manual Twitter updates. Assuming you’ve synced macOS Sierra to your social media accounts, here’s how to let Siri take the reigns.
Once you’re all hooked up, just tell Siri to “Tweet” followed by your sub-140-character message of choice, then your verbal commands will be transformed into a fully formed tweet. You can even throw in hashtags simply by saying the word “hashtag” – Siri’s now smart enough to sub out the word for the symbol.
It’s not just Twitter you can post to without lifting a finger, either. To get Siri doing your Facebook posts for you, simply say “Post to Facebook” followed by whatever social status you want to throw down.
4. FIND YOUR HOLIDAY PHOTOS WITHOUT THE FAFF

One of the coolest new macOS Sierra features is the Skynet-style Photos app. As well as keeping all your images safe and secure, Photos has added some AI-enhanced street smarts. Among these is the ability to work out not only where photos were taken, but what’s going on and even who is in them – creepy, but also cool.
This makes searching for specific snaps much easier. Commands such as “Show my photos from yesterday” or “Show me photos taken in Spain” will now utilise Photos’ enhanced smarts to do just that. With Photos also set to learn who’s in the snaps you’ve taken, you’ll soon be able to voice search for images of your mates or selfies of you and your bae too.
Related: How to download the macOS Sierra public beta today
5. GET A LITTLE PEACE AND QUIET

Sometimes when you’re sat at the computer, you just want a little, well… alone time – for watching the latest Bond film or catching up on the day’s sporting action, obviously. With Siri’s skills at your disposal, you can kill all the distractions just by shouting, “Do not disturb.”
Customisable in Settings, this “Do not disturb” command can be used to curb all manner of annoyances, with everything from Calendar alerts and Messages notifications being turned off, allowing you to enjoy your film without your email inbox pinging every 12 minutes.
6. FIND YOUR DOCUMENTS THE EASY WAY

We’ve all been there. You know you looked at a specific document just a couple of days ago, but are unable to find the sodding thing in the mass of desktop clutter that you meant to sort out weeks ago. Thankfully, the days of mind-numbing manual searching are behind us – Siri for macOS is coming to your rescue.
Asking Siri to “Show me documents opened this week” will help narrow down your spreadsheet hunt massively – and it doesn’t stop there. Ask a follow-up query like “Only show ones with ‘accounts’ in the title” and your desired documents should spring forth, with no button presses or endless searches required.
7. GET REMINDERS BASED ON YOUR LOCATION

Location tracking is both sinister and handy in equal measure. Fortunately, this Siri-aiding enhancement falls on the useful side of the fence. Because your Mac knows where you are (and where you live and work), it can use its geo-smarts to give you prompts and reminders when you arrive at the office or return home after a busy day.
This can cover off pretty much anything from picking up something to eat, reminding you to wish your bezzie a happy birthday, or asking Siri to “Remind me to call Mum when I get home.” You’ll never be accused of forgetting your folks again.
Cheers, Siri.
Related: Can I upgrade to macOS Sierra?
8. MAKE FACETIME CALLS QUICKLY

So Siri’s reminded you you’ve got to call your mum, but that’s not a cue for your digital PA to clock off for the day – there’s more that it can help you with. Letting you leave your phone firmly in your pocket, Siri commands such as “FaceTime Mum” will get the call going without you having to lift a finger.
You don’t need to look someone in the eye to talk to them, either. If you own an iPhone as well as a Mac -– and your phone’s on the same Wi-Fi network as your laptop – you can use Siri to make an actual call by saying, “Call Mum, home.”
Phone in another room? Don’t worry about it – by syncing wirelessly with your computer, you can simply chat and listen using your Mac’s integrated mic and speakers.
9. MUTE THE VOLUME

Got a call incoming? You no longer need to worry about faffing around pausing tunes in Spotify or trying to remember which keyboard shortcut lets you mute the music – Siri can do it all for you.
Simply yell: “Mute the volume,” and Siri will do just that, culling the audio while keeping everything running in the background so you can answer your call in peace. Other commands such as “Pause my music” will also do the trick.
10. CHECK YOUR COMPUTER’S STORAGE

Beyond helping you find lost documents, Siri on Mac can serve up plenty more useful functions, too. Like what? Well, it can keep tabs on the state of your machine for a start. Calling out, “How much free space do I have on my Mac?” will save you much menu and settings hopping, presenting your device’s storage options front and centre.
It’s not just a passive experience, either. Commands such as “Adjust my brightness” and “Turn the volume up” can be used to tweak your system’s settings without all the usual faff and effort.
Related: 12-inch MacBook (2016) review
Watch The Refresh: The best tech gossip and reviews every week
Have we missed any macOS Sierra tips or tricks? Let us know in the comments below.
Editorial independence
Editorial independence means being able to give an unbiased verdict about a product or company, with the avoidance of conflicts of interest. To ensure this is possible, every member of the editorial staff follows a clear code of conduct.
Professional conduct
We also expect our journalists to follow clear ethical standards in their work. Our staff members must strive for honesty and accuracy in everything they do. We follow the IPSO Editors’ code of practice to underpin these standards.