Sections
- Page 1 Impossible Project I-1 Review
- Page 2 Image quality, performance and verdict Review
Verdict
Pros
- Quirky and simple
- Bluetooth enabled
- Compatible with original film
Cons
- Large design
- Expensive to run
- Mixed results
Key Specifications
- Review Price: £229.00
- Instant analogue camera, compatible with Polaroid film (600 type and I-type)
- 82-109mm lens with five-zone autofocus system
- 12 LED ring flash
- Bluetooth
- Full manual mode with Impossible app
- 440g (without film pack)
What is the Impossible Project I-1?
The first Polaroid-format camera designed in 20 years, the Impossible Project I-1 is compatible with both 600 film and I-type film in either colour or black-and-white.
Entirely point-and-shoot, it is possible to have manual control of the camera by hooking it up and controlling it via your phone. When you take a photo, the classic Polaroid film will be ejected from the camera and you’ll have a real-life hard copy print that you can keep forever.
Impossible Project I-1 – Design and Handling
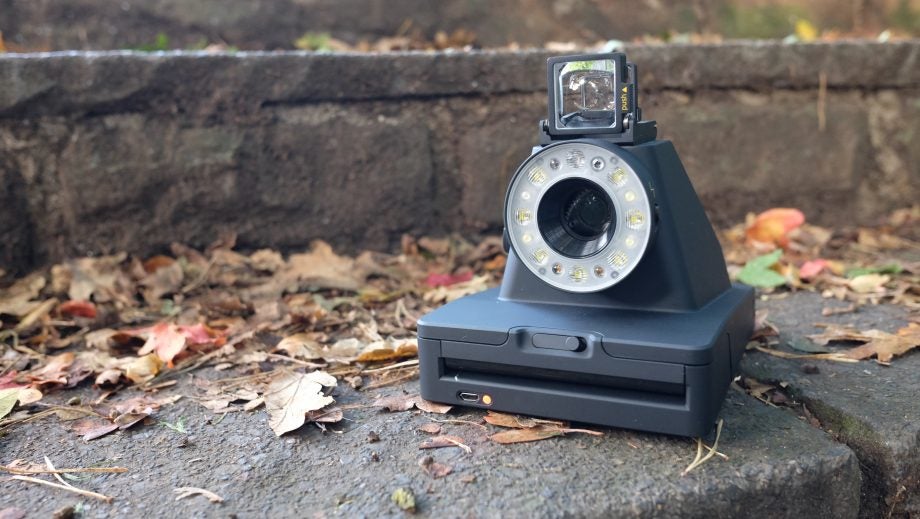
To say that the design of the Polaroid I-1 is “eye-catching” is a slight understatement. It’s certainly going to attract attention when you’re out and about using it; whether or not you like the design will be entirely down to personal taste, of course.
The large body is a necessity to encase the Polaroid film that sits inside the bottom of it. That film went out of production many years ago – until the Impossible Project stepped in to revive it, that is. The company was doing such a good job in creating the film that it decided it was time to produce a modern version of the Polaroid classic.
Related: Best Cameras 2016
An example of this modernity lies in how the camera is powered – by a battery that’s charged via a micro-USB port inside the camera. You can plug it into a wall socket as you would a phone charger, or into your computer; the latter will result in a longer charging time, however.
Although the camera looks strange, it doesn’t take too long to become acquainted with the various dials and buttons that you’ll need to operate it.
One of the most important features is the ring flash around the front of the lens. Not only will you need to use this for most shots, the LED lights around it cleverly provide status information about the camera – including battery life and how much film is left.
For example, pushing the shutter release while the camera is off will set off a number of lights. Count these to estimate how much battery is left; if only three lights flash then it indicates that there isn’t enough battery power to use the flash.
Inserting the film is straightforward: simply unwrap it from its foil packaging and insert it into the film slot at the bottom of the camera. Once you’ve pushed it in, the black dark slide will be automatically ejected.
When you switch on the camera, a number of lights will flash – count them to determine how much film is left. Each film pack contains eight shots; and there are eight lights. To remind you that you’ll need a new film pack very soon, and when there’s just one shot left, the top light will glow red; if there’s no film left, the light will flash red. Since there’s no digital element to this camera, if there’s no film inserted, it won’t do anything.

In terms of knowing when to use the flash, Impossible suggests use in all scenarios but the very brightest of sunlight. When the flash is triggered, the main eight LED lights – along with four supplementary lights – will flash.
Around the ring flash you’ll find two switches: one that turns the flash on and off, and another that’s basically exposure compensation; there are only three options for this – standard, one step positive and one step negative.
Flip to the side of the camera and there’s a large round dial that can be rotated into three different positions to turn the camera on, off and to Bluetooth mode. There’s a line across the dial and around the edges – line up the two marks to switch on the camera, which is a very quick way to know by sight whether the camera is on or off.
Once you take a photo, it will pop out from the front of the camera, and you’ll see it’s protected by a thin piece of flexible rolling plastic called the “frog tongue”. If you remove the film beneath this, make sure you shield it from light during the developing time.
If you’re outside and it’s cold, keep the film somewhere warm – such as a pocket – while it’s developing. How long it takes to develop will depend on whether you’re using colour or black-and-white film, but it can take anything from 10 minutes up to around 25-30 minutes.
Impossible Project I-1 – Viewfinder
In order to try to frame your shots, you can use the viewfinder that’s attached to the top of the camera with magnets.
The viewfinder collapses into itself when it isn’t in use; you just give it a gentle push on the side when you want to open it.

We should point out that the finder is intended only as a guide. There are silver markings engraved on it to help you align the view. If you hold it around 4-5cm away from your eye and look for the silver dot to be in the middle of the finder, then you know it’s roughly aligned. It will take you some time and practice to get to know exactly what’s likely to be in the frame and what isn’t.
Impossible Project I-1 – App
When you use the I-1 in isolation, it’s completely point-and-shoot. However, if you download the I-1 app then you can take full manual control of the camera.
The app is free to download for Android and iOS, and has a number of different features worth investigating. In order to use it with the camera, you need to switch the power dial to the Bluetooth position.
As well as manual mode, where you can take control of shutter speed and aperture, you can also use the app as a remote trigger or to set up the self-timer (useful for selfies). You can also create a double exposure (whereby the film is exposed twice for artistic effect), do some light painting using your phone, and set it up so that a noise (such as a clap or a shout) triggers the shutter release.

Editorial independence
Editorial independence means being able to give an unbiased verdict about a product or company, with the avoidance of conflicts of interest. To ensure this is possible, every member of the editorial staff follows a clear code of conduct.
Professional conduct
We also expect our journalists to follow clear ethical standards in their work. Our staff members must strive for honesty and accuracy in everything they do. We follow the IPSO Editors’ code of practice to underpin these standards.