Verdict
Key Specifications
- Review Price: £88.00
The progression from air to water as the primary method of cooling your PC’s CPU seems to have been ‘on the horizon” for a lifetime, but despite a shaky start there’s no doubt there are more people than ever before giving it a try.
One of the major benefits of the increasing acceptability of water cooling, apart from lowering prices, is that the additional research and development makes for better quality and generally more reliable components. Pumps, reservoirs, radiators and water blocks tend now to be designed and built to be used alongside each other. This means they often use the same connectors throughout, and these connectors are specifically matched to the type and the diameter of tubing that is to be used. The result is a far more integrated cooling circuit that’s generally more robust than trying to piece together a system using parts that are not necessarily well suited to each other, such as an aquarium pump from here with a car heater radiator from there.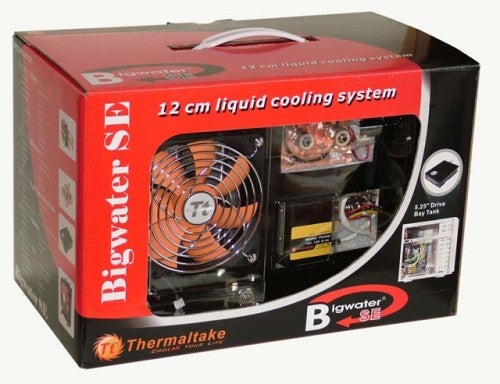
There are plenty of water cooling kits to choose from at the moment, at a broad spectrum of prices. Generally, I tend to prefer the external units such as Corsair’s Hydrocool and Koolance’s Exos when it comes to simplicity and ease of maintenance, particularly for the less experienced user. They also have the added benefit of being suitable for use with smaller cases, something not always possible with internal systems.
Today I want to take a look at an entry/intermediate level internal water cooling kit from Thermaltake, a company that’s far better known for its air cooling products and case range than for its liquid cooling know-how.

Christened the Bigwater SE, this compact water cooling setup aims to provide a simple and stylish solution for users of all experience levels.
Packaged in a relatively large box with a window cut-out, the kit comes nestled snugly in-between a pair of expanded foam trays. With one exception, the kit provides everything you’ll need to install and run the kit on any Intel LGA 775, Socket 478, AMD K8 or AMD K7 system. What Thermaltake neglected to include though, is a funnel, an error all the less forgivable due to the very narrow filler on the reservoir.
The kit comprises of four main components which I’ll cover in turn, starting with the reservoir. The reservoir is moulded from slightly cheap-looking semi-transparent plastic and sits inside a steel enclosure designed to be mounted in a free 5.25in external drive bay. Two short silicone rubber pipes sprout from the rear, each sporting a screw-lock connector on the end. The pipes run though a spring shroud which also helps to protect them against kinking.
At the front of the reservoir is a transparent section which serves as a water level indicator. This isn’t always easy to see and could have really used a little rear illumination.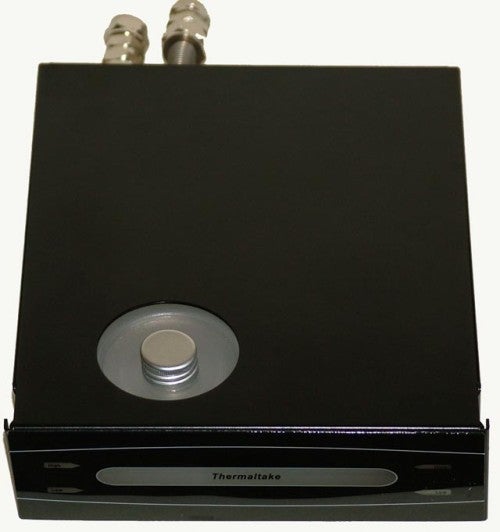
On the top of the reservoir is a very narrow filler hole with a worryingly thin looking tin screw cap of the type often found on cheap, throw-away drinks bottles. Be careful where you put it while topping up as I doubt you’d ever get it back into shape if you trod on it.
On a more positive note, the filler hole has a slightly concave dished area around it to capture any wayward drips to prevent them running off into your case; a handy feature considering the lack of a funnel.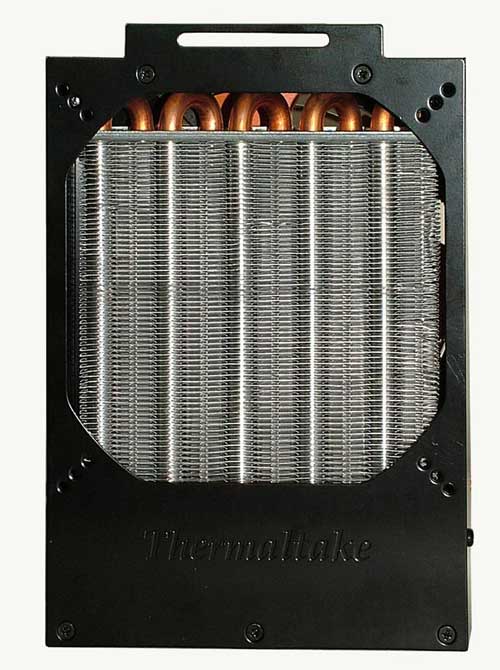
While the idea of a water reservoir that resides in a free 5.25in drive bay seems perfectly sensible, there are two caveats. The first is that you actually have to have a free 5.25in external drive bay, while the second is that unless your case uses some kind of quick release drive retention or drive rail system, you’ll need to release the fixing screws and slide the unit out about 3 inches every time you need to top up, which barring leaks should be every couple of months or so. Not a deal-breaker, but certainly an inconvenience. If you have one, a single thumbscrew is probably enough to hold the reservoir in place making things a lot quicker to get at later.
The radiator is a fairly efficient looking multi-pass aluminium affair, which means care needs to be taken to use the proper water additives. Copper and aluminium (the water block is copper) in the same system react chemically and so tend to corrode quickly if you use just water.
The radiator is cooled with a 120mm x 25mm fan, which, if used with the supplied expansion slot-mounted controller, can be set anywhere between 1,300 and 2,400RPM. No details are quoted for the fan but it’s very similar, if not the same as the fan is used on Thermaltake’s Big Typhoon cooler and this is good to around 54cfm of air.
Two screw-lock connectors sit on brass extension pieces at the top of the radiator, one of which wasn’t tight when I checked it and needed to be pinched up slightly. Don’t go too mad, as these brass couplings use ‘O’ rings, so a good, hard tightening by hand or a fairly tame turn with a spanner should suffice.
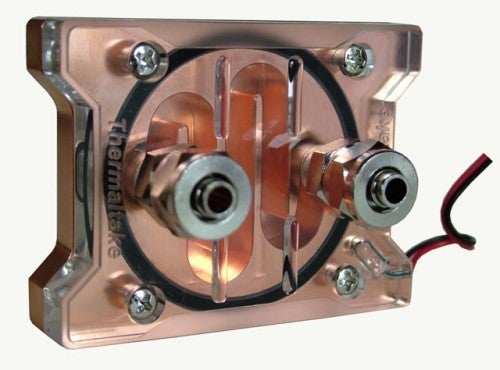
The water block is a fairly traditional two-piece copper and acrylic affair with the water transported through an S-shaped channel machined into the copper. A blue LED is also employed, sitting in a hole cut in the acrylic top. This requires a feed from a spare three-pin motherboard header or four-pin Molex to three-pin adapter.
The base of the block was flat but not particularly smooth, though it’s unlikely to impact on cooling efficiency.
The final part of the kit is the pump. This comes built into a sealed, box-like smoked plastic housing measuring a rather compact 66 x 61.5 x 36 mm. Inside the pump enclosure is a blue LED which is partly cosmetic and also serves to confirm the unit is receiving power.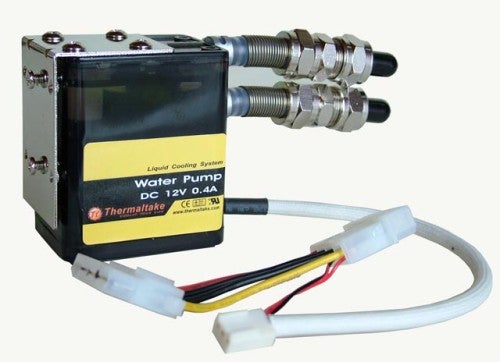
The pump generates a virtually inaudible 18dBA of noise while pumping a relatively tame 90 litres of liquid per hour. This may seem like a fairly lowly throughput from the pump but the extra heat picked up due to the water’s slower passage through the water block is balanced by the extra cooling it gets by spending longer in the radiator. Provided radiator and water block are well matched it should actually make no difference how powerful your pump is.
The pump is rated at 12V DC and is powered directly from an available four-pin Molex connector.
The kit includes a 500cc bottle of UV reactive coolant with corrosion inhibitors and Thermaltake recommend using only its coolant. You’ll need about 400cc for a complete initial fill leaving 100cc for further top-ups. Additional bottles can be purchased from Thermaltake.
Installation is relatively straightforward provided you have a suitable location, either internally or externally, for the radiator and fan assembly. You may need to remove your motherboard though, in order to attach the water block retention bracket.
The pump can be mounted using the supplied screws or alternatively with the self-adhesive Velcro pad, also supplied.
Mounting the radiator and fan assembly on the outside of the case requires using the supplied expansion slot blanking plate which has two cut-outs for the feed and return water pipes and a smaller cut-out for the power feed to the fan to pass through. The fan controller sits in any available expansion slot location.
The water pipes had a higher tendency to kink than most I’ve worked with in the past so exercise a little caution and if necessary increase the radius of your bends slightly.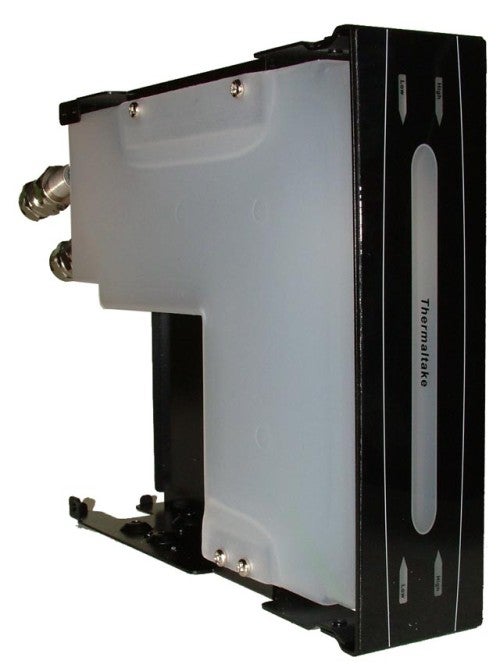
With no ATX power bypass lead supplied to verify circulation of the water before powering up your PC for real, the manual instead suggests you simply switch on your PC. This is fine if the water does make its way around the circuit but slightly less fine if it doesn’t. Also, this method means the motherboard is live straight away so if there are any leaks and a jet of water squirts onto it, then there’s a fair chance you’ll ruin it.
Personally I always use a small wire or paper clip to bypass the motherboard on the ATX power connector and thoroughly check the installation first and I urge Thermaltake, and others, to supply one of the inexpensive, purpose-made adaptors than can safely perform the same bypass trick.
In the manual, Thermaltake suggests you lay the pump assembly on its back to purge it of air when power on for the first time, though I found the pump primed for me just fine without doing this.
After a couple of hours of monitoring to confirm the system was completely free from leaks, which it was, it was time to evaluate overall performance. Cooling efficiency was very good for a product in this class, though it naturally trailed some of the more expensive multiple-radiator systems.
Noise levels were also fairly restrained, even with the fan running at full tilt, though this will vary depending on whether you mount the radiator and fan internally or externally.
All told this was a very competent showing and I’d have no real worries using this kit even for moderately hardcore overclocking. It may not be the most efficient on the market but it’s vastly superior to air. 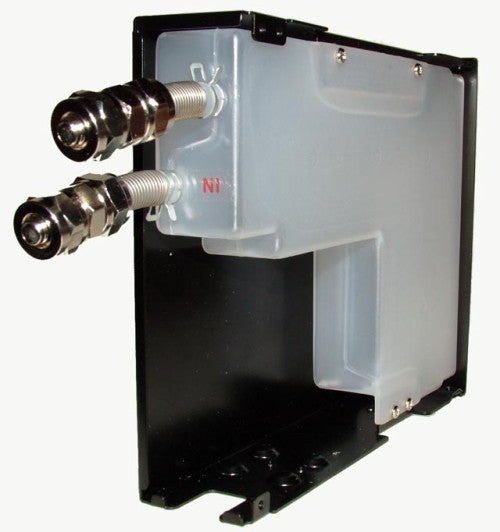
The only concern I do have is the quality of the parts. It’s not expensive for what it is but you can tell where the corners have been cut to keep the price low. None of the cutbacks have impacted on performance, but they are reflected in the look and feel of the product which may deter some. In short a bit of a rough diamond.
(table:results)
”’Verdict”’
I’m sure you’ll have no trouble finding water cooling snobs ready to talk this kit down, but in reality, despite its slightly “budget” look and feel, it works perfectly well.
It has its issues, such as needing to slide out the reservoir for topping up and the tacky looking filler cap. It’s also missing some of the nicer refinements like a flow indicator (available from Thermaltake separately), a coolant temperature readout, or even a funnel, but otherwise it’s a competent if somewhat unspectacular gateway to the wonderful world of water cooling.
Trusted Score
Editorial independence
Editorial independence means being able to give an unbiased verdict about a product or company, with the avoidance of conflicts of interest. To ensure this is possible, every member of the editorial staff follows a clear code of conduct.
Professional conduct
We also expect our journalists to follow clear ethical standards in their work. Our staff members must strive for honesty and accuracy in everything they do. We follow the IPSO Editors’ code of practice to underpin these standards.