Verdict
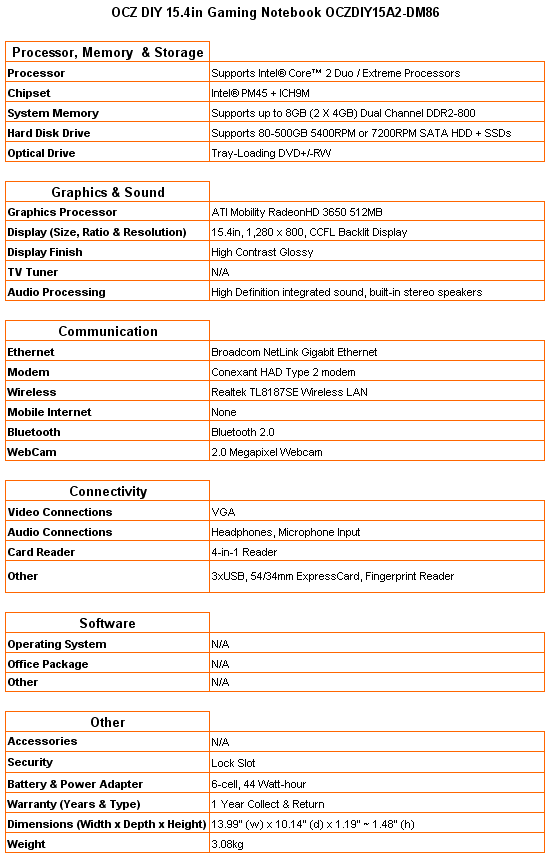
Key Specifications
- Review Price: £470.20
Notebooks have been slowly but surely overtaking desktop PCs as the first choice for many a home’s computer. However, there’s one area where they’ve always lagged behind. For someone willing to get their hands dirty, PCs have always had the potential to be easily upgraded or augmented. Notebooks, on the other hand, are somewhat trickier to tinker with. It’s this gap in the market that OCZ is trying to bridge with its range of DIY notebooks.
Available in 15.4in or 17in versions, the OCZ DIY notebooks aren’t what you’d call ultra-portables. Instead they’re aimed more at the desktop replacement and gaming ends of the market. As such one of the 17in versions is available with two ATI graphics cards running in CrossfireX, while all the other models have pretty decent graphics cards in the form either ATI HD3650, nVidia 8600M GS, or nVidia 8600M GT. The one we’re looking at today is the 15in Intel/ATI Edition, or the OCZDIY15A2-DM86 to give it its full model number. 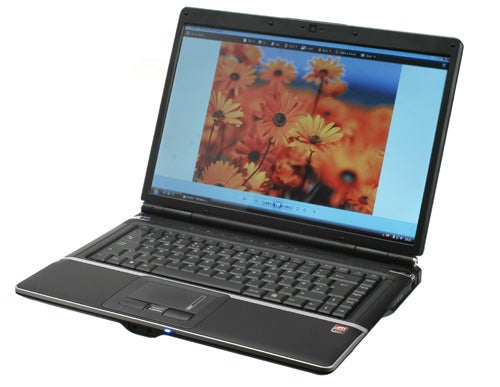
As will have become immediately obvious from the pictures on this page, the DIY element of these notebooks doesn’t come from the ability to build the whole chassis yourself, like some highly expensive Airfix kit. Straight out of the box, this looks much like any other notebook. It’s just that when you go to turn it on, nothing happens. This is because it ships without a CPU, a hard drive, or any memory (RAM). This is where the DIY element comes in.
You can spec up your own choice of these three components sourcing them from wherever you like and choosing the cheapest or fastest and most expensive available. So, if you are on a tight budget, you can use something like a 1.66GHz Intel Core 2 Duo with 2GB of RAM, and an 80GB hard drive to start off. When you then get a bit of extra cash you can start swapping components out, adding a faster CPU, up to 8GB of RAM, and a 500GB hard drive. 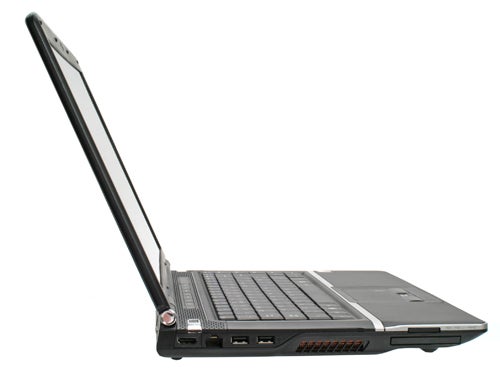
All well and good but immediately some of you may have noticed a fundamental flaw in this idea. If you’re into gaming and are choosing to buy one of these notebooks rather than one with a more modest graphics chip, then you’re probably going to be most interested in upgrading your graphics as this is still the primary bottleneck when it comes to gaming performance. However, this is not possible as the GPU is hardwired into the motherboard. So it strikes us that you’re probably only going to configure these notebooks once then just sell the whole lot on in a year or two’s time when you need the extra graphical performance of a new model. Regardless, though, the upgrade option is there if you want it.
For our testing we were provided with a 120GB 2.5inch SATA Apex SSD and 4GB of PC2-6400 DDR2 SO-DIMM RAM, from OCZ (obviously), and Intel’s top of the range Intel Core 2 Duo X9100 Extreme mobile CPU, which runs at 3.06GHz. 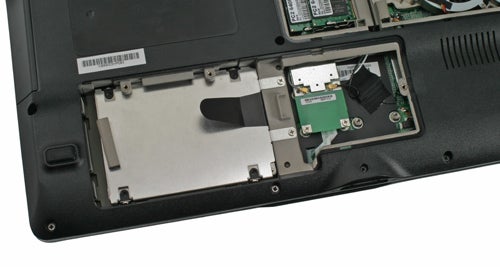
Fitting the various components is incredibly easy. We started off with the hard drive (or SSD in our case) as this is the easiest part of the procedure. Once you’ve unscrewed and removed the covering panel, you mount the hard drive in its little cradle provided in the box then slot this into position and screw the cradle down. Pop the panel back on and you’re done. 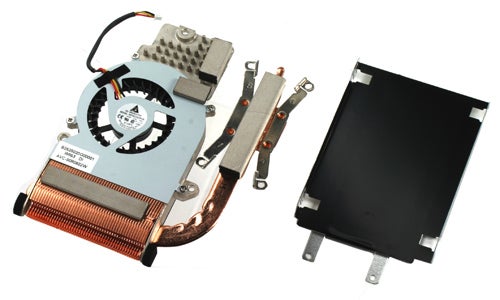
The CPU and memory are housed under a second panel that requires just one screw to be unscrewed and a good tug to remove. To the left are the two slots for the memory while on the far right is the graphics chip; inbetween is the CPU (which we’ve pictured already mounted in its pink socket) and below that is the northbridge. 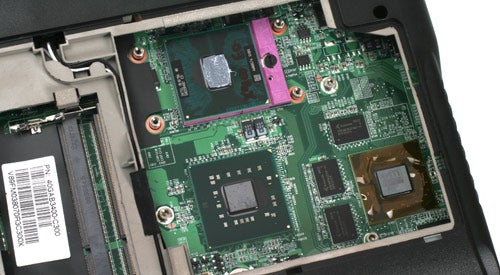
Adding in the memory is again very simple with not even a screw required to slide the sticks in and push them into their sprung retaining clips. Likewise, placing the CPU in its socket is very easy. Just make sure you’ve got the pins all lined up correctly (and that none of them are bent – something that’s easily done) and it should just slide into place effortlessly.
Being the tinkerers that we are here, we successfully did all this without consulting the manual, but if you’re less sure there’s a very clear How-To Guide on OCZ’s website that even an absolute novice should be able to understand.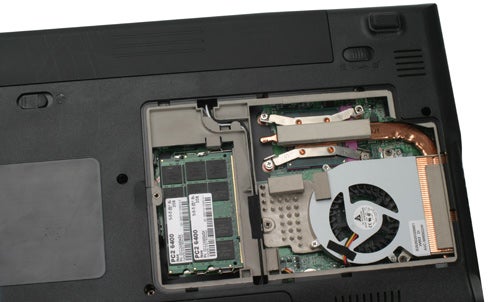
One thing the guide does gloss over, though, is how much of a pig the HeatSink/Fan (HSF) is to mount. This one unit covers all three of the aforementioned chips and comes prefitted with patches of Thermal Interface Material (TIM) that need to be aligned with these chips. On top of this you have to hook the cooling-fins under the edge of the notebook chassis to fit it in. It took us about five or six goes before we got the hang of it (which is why we end up adding our own TIM in the video) and even then it needed three takes in our video for me to do it smoothly. In fairness, though, unless you really go at it like a bull in a china ship, no harm should come to any of the components as you rummage around trying to get the HSF to fit.
About a dozen screws later and the HSF is fully secured and the panels are back in place. Now it’s just a case of fitting the battery and plugging the power adapter in. Assuming everything is still working and fitted correctly, a press of the power button should see your creation leap into life and you can now start installing your operating system of choice.
If any of you have ever tried reinstalling or upgrading the OS on your notebooks you’ll know it can sometimes be a real hassle trying to get hold of all the drivers and little utilities that make work all the various switches and dials for adjusting volume, screen brightness, and the like. Thankfully OCZ hasn’t slipped up in this regard and it provides a complete list of drivers and utilities for the DIY range on its website. The only problem being OS support is limited to Windows Vista. 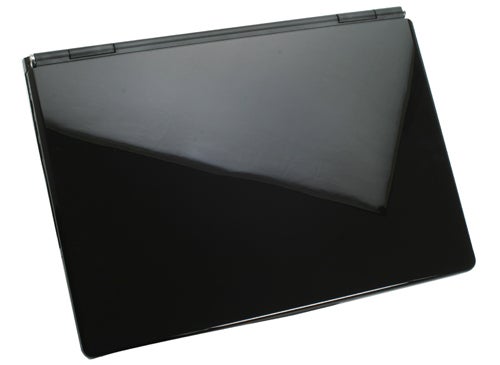
Once you’ve finished doing your bit of DIYing, this is of course just a normal notebook. So let’s see how it compares to the competition.
Aesthetically there’s little merit that we can lavish this model with. Its glossy black lid is dull, scratches easily, and attracts fingerprints with aplomb. Meanwhile the matte black of the rest of the chassis also does little to inspire. In fairness, we much prefer this plain and simple look to the gaudy gaming notebooks we so often end up with. 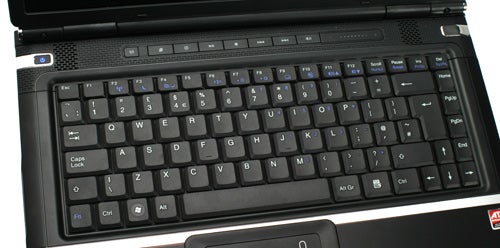
Reflecting this lack of style flair is the chassis’ distinct lack of finesse when it comes to build quality. All the plastics feel cheap, there’s a very noticeable clatter to the keyboard and the buttons for power and multimedia shortcuts that run above the keyboard are stiff and unresponsive. The two small speakers that sit below the screen are also rather feeble, though we do like that they’re on the top rather than hidden underneath like on some laptops. This means they can produce quite a convincing soundstage that makes gaming and watching movies reasonably immersive. 
All of which paints a less than favourable picture, so far, but our complaints are tempered by the fact this model is available for around £470. At this sort of money we wouldn’t expect anything too clever.
Where this chassis does redeem itself somewhat is its features list. Most of the modern prerequisites are present, with a 2.0 Megapixel webcam above the screen and an HDMI socket on the side – eSATA is the only obvious thing missing. There’s also a Blu-ray equipped version available for around £600, though our version just has a DVD Rewriter drive. 
Joining the HDMI socket on the left edge are two USB ports, an Ethernet socket, a 54mm ExpressCard slot, and an SD/SDHC/MMC/MS/MS Pro/RSMMC reader. Meanwhile the front is home to microphone and headphone jacks, which sit below the trackpad with its integrated fingerprint reader nestled between the left and right buttons – the left and right buttons that, just like the multimedia and power buttons, are horribly stiff and uncooperative. As for the trackpad itself, it is accurate enough, but the scroll section is too near the middle so it’s easy to accidently scroll rather than move the pointer and the scrolling action itself is far too sensitive. 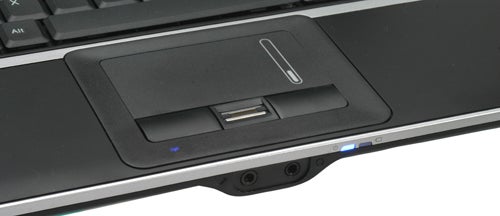
One USB port on the right edge and a VGA socket, Modem socket, and Kensington lock slot on the back round out the connectivity. 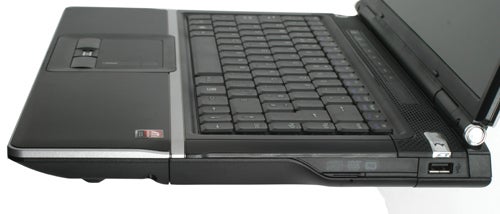
Joining the aforementioned hardware on the inside, this notebook has Draft-N wireless and Bluetooth connectivity while the screen is a conventional CCFL-backlit TFT. It’s not the best screen we’ve ever encountered with noticeable backlight bleed, mediocre viewing angles, a lack of brightness, and generally a slightly washed out look. However, sharpness and colour accuracy are perfectly adequate for most everyday use.
Its 1,280 x 800 resolution is also a perfect match for the system’s graphics card meaning it can cope with many modern day games at native resolution. Indeed, putting it to the test by playing Call Of Duty 4 on high detail settings we managed to get 41fps. Crysis proved more of a challenge with us needing to scale back to medium settings to get even 24fps at the native resolution. 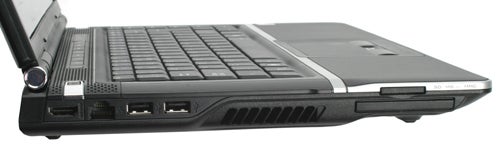
Obviously these scores were helped by the fact we’d stuffed our system with some extremely expensive hardware, but even if you used a more sensible CPU and a normal hard drive you’d get decent performance. Certainly, for the £700 or so you could build a system based on this chassis for, you’d be hard pushed to get significantly better gaming performance.
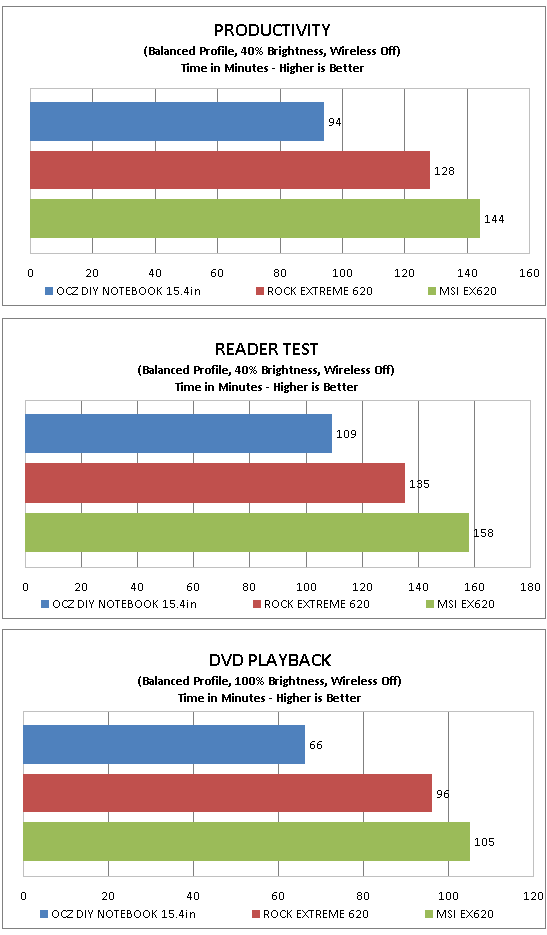
Being a gaming/desktop replacement oriented notebook, it should come as no surprise that battery life isn’t great, but we were disappointed to note quite how poor it was, with none of our tests pushing passed the two hour mark. The higher than normal power consumption of our CPU will have had some impact on these figures, though.
Perhaps the biggest problem for this particular model, though, is that literally as of today it’s end of line so you’ll be hard pushed to get hold of one. So, while we’ve included our original scores and fully assessed this particular model as though it were a full review, we would like you to think of it as more a proof of concept article. As such we feel OCZ is definitely on to something with the DIY line. Sure, it would be ideal if there was some way of upgrading the graphics as well but it’s still nice to have the other upgrade options. What’s of most concern is that this chassis is just a little to cheaply made for us to be satisfied. So when OCZ releases a new version, which we fully expect it to do, we’ll be hoping it has taken a step up the quality ladder.
”’Verdict”’
Despite poor battery life and an inability to upgrade the graphics on this apparently self-serviceable notebook, OCZ has still proven there’s potential in an upgradable notebook. Certainly if you can source your other components cheaply, this could be exceedingly good value for a gaming notebook. It’s just a shame this particular model is no longer available so you’ll probably have to wait until OCZ release the updated version before having a go yourself.

How we test laptops
Unlike other sites, we test every laptop we review thoroughly over an extended period of time. We use industry standard tests to compare features properly. We’ll always tell you what we find. We never, ever, accept money to review a product.
Trusted Score
Score in detail
-
Performance 8
-
Design 5
-
Value 8
-
Features 7
Editorial independence
Editorial independence means being able to give an unbiased verdict about a product or company, with the avoidance of conflicts of interest. To ensure this is possible, every member of the editorial staff follows a clear code of conduct.
Professional conduct
We also expect our journalists to follow clear ethical standards in their work. Our staff members must strive for honesty and accuracy in everything they do. We follow the IPSO Editors’ code of practice to underpin these standards.