Verdict
Key Specifications
- Review Price: £99.95
With today’s economic climate and the barrage of suggestions in the media to become “greener” and to “reduce your carbon footprint”, now seems the perfect time to take a look at the Wattson 01. At its most basic level, the Wattson allows you to monitor the real-time electricity usage in your home. Anyone who has ever tried to lose weight will know how you need to weigh yourself regularly to track your progress – equally, if you are attempting to reduce your power consumption, you need a way of gauging how much you’re using in the first place.
The Wattson is made up of two main components – the transmitter, which monitors your electricity usage and the main display unit, which collects the wirelessly transmitted data and interprets it appropriately.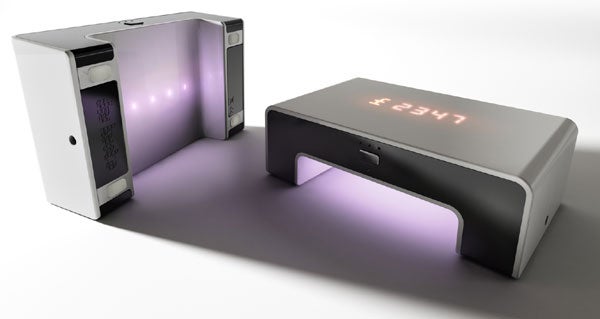
Unlike say, an ammeter, which measures current draw through it, the Wattson works on a different principle altogether. A current carrying wire produces a magnetic field and by measuring this field, it is possible to calculate how much current is being drawn in an unobtrusive manner. The Wattson comes with a small, shielded electromagnet, that you clip over the mains wire of your home’s fuse box. In most scenarios there are only two wires coming out of your fuse box and either will do. In my case, I had four, but judging by the green colouring, I assumed (rightly so) that these were for earthing only. It really is as simple as clipping it on to the cable and you don’t even need to turn anything off. The only screwdriver required is to open the transmitter to fit the four supplied AA batteries. These batteries should last 6-12 months, depending on your polling intervals – and the display unit will tell you if the batteries are running low.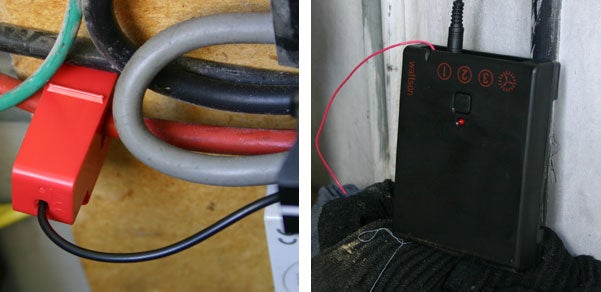
”’(centre)The sensor simply clips onto the mains cable at your fuse box(/centre)”’
After spending less than five minutes fitting the sensor clip, I powered up the display unit. According the well written manual, this should have been all that is necessary. However, all I was given was an “out of range” message. Putting the unit right next to the transmitter soon put that theory to rest.
The manual may be exceedingly well written, but it failed to mention one very important fact that I discovered while perusing the online troubleshooting guide. In order for the two components to work together, you need to pair the device, much like you do any other wireless equipment. This is done just like a wireless mouse with a teach and learn method. After finding myself a safety pin, I was soon collecting data about my household electricity use.
The main unit has an in-built battery, that on a full charge will last from five hours to several weeks, depending on the poll interval. Ours struggled to last more than a few minutes, so we can only assume it has been somewhat abused by journalists prior to myself. Charging is done via the supplied mains transformer – but it can also be powered by a mini-USB cable – although this won’t charge the device.
The main unit has a bit of an IKEA feel about it and I quite like the style. There is no technical reason why it is as big as it is, other than to be more aesthetically pleasing and to make a point to your visitors that you’re energy conscious. As well as displaying your current power consumption in Watts, there are multi-coloured LEDs on the back that glow varying shades depending on how much power you are using. If you tilt the device, the display switches from displaying how much power you are using, to your yearly projected bill. The display is reminiscent of a 1980’s alarm clock, so you’ll be thankful to know that you can select “night mode” which turns the display off. Unfortunately, this “night mode” is not automatic.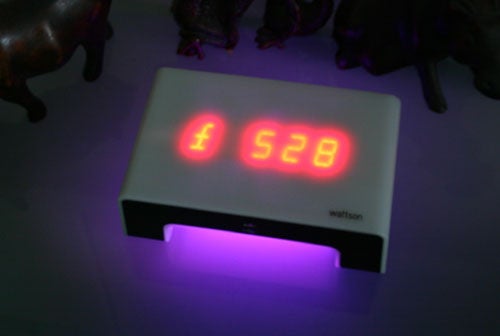
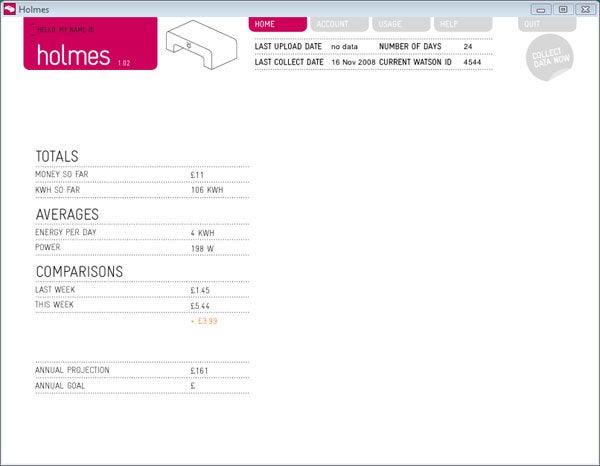
Plugging the Wattson into your computer via the supplied mini-USB cable and using the accompanying “Holmes” software is where the Wattson’s features start to show. The software is only available for Windows and Mac, which considering the device is only technically a USB to serial adapter (i.e nothing complex), we don’t know why DIY Kyoto couldn’t have coded something cross platform to allow Linux users in on the game. Obviously people trying to save money in their household wouldn’t be turning to free, open source software.
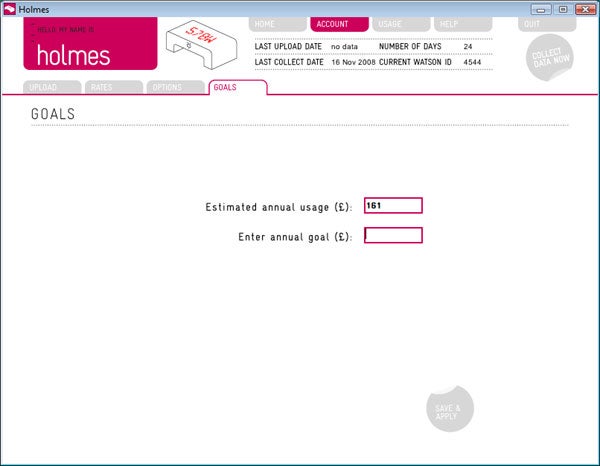
After dusting off a copy of Vista running on VirtualBox, I was able to take a look at the more advanced features of the device. Unbeknownst to you, the Wattson secretly stores your power usage every time it updates. When you plug it into your computer, you can download this data for analysis – automatically, if you so choose. Armed with said data, you can monitor your average and total electricity usage, in both terms of cost, power and carbon footprint.
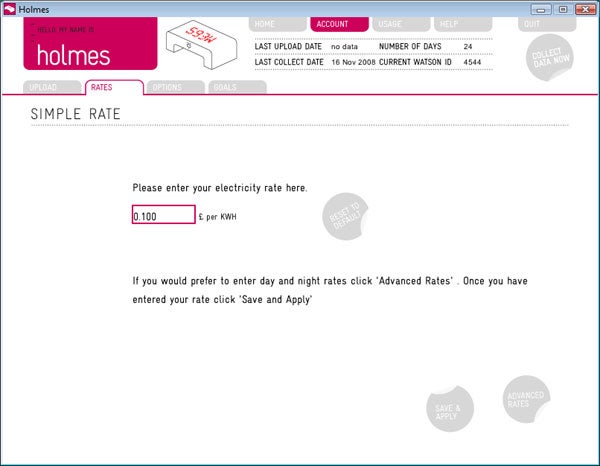
Some of you might be wondering how it gives you an estimated yearly cost at all. Out of the box, this is set at a default 13p per KWh, but via the software you can update this to whatever you are currently paying. Via the advanced settings, you can also specify a different night time cost if you happen to be on such a tariff. It won’t support more complex tariffs, such as the one I was on previously where I was charged a different rate for the first X units per month, than those after it. It is only supposed to be a guide after all.
It would be quite nice to be able to export this data as CSV to be used in a spreadsheet, but as of yet this feature is not supported. This is apparently coming in a future version, and hopefully after reading this article, along with a Linux version.
As previously mentioned, when plugged into the computer, it will power the device and automatically log the data. However, as the USB port is on the underside of the device, you can’t stand it upright to act as a display, as you would if you were using the power pack instead. This is a pity, as this is where I would happily leave the device 24/7, where I can keep an eye on usage. 
”’(centre)Running the kettle all day, every day for a year would clearly get expensive(/centre)”’
The reality of it is that you very rarely want to actually carry the device around. Perhaps you want to see how much power a particular device in your house is using, so you carry it over and do the switch on / switch off test. You soon get over this and end up leaving it in one place. In my situation is was the hallway as I could see it every time I went to the kitchen or left the house. If the device is not turned on, it isn’t collecting data and this will obviously affect your results. This, in combination with the USB connector issue, makes me wonder if the Wattson wouldn’t be all round more suited to having a dock, rather than messy cables.
The Wattson is very quick to react – assuming you have the polling interval set high enough. Obviously the more data being sent, the more accurate your averages are. I can see almost instantaneously, as the central heating kicks in, my power consumption jumps up some 100-150W for instance.
”’Verdict”’
The Wattson is a nicely put together package that is simple to install and a pleasure to use. Its data logging functionality is perhaps more than most people require, but justifies the slightly high price tag of £99.95. You certainly won’t re-coup your costs in money saved, but it looks nifty in your living room and is certainly easier than counting the blips on your meter.

Trusted Score
Score in detail
-
Value 6
-
Features 8

Editorial independence
Editorial independence means being able to give an unbiased verdict about a product or company, with the avoidance of conflicts of interest. To ensure this is possible, every member of the editorial staff follows a clear code of conduct.
Professional conduct
We also expect our journalists to follow clear ethical standards in their work. Our staff members must strive for honesty and accuracy in everything they do. We follow the IPSO Editors’ code of practice to underpin these standards.