Verdict
Key Specifications
- Review Price: £16.13
For some of us, the prospect of upgrading to the latest version of Windows is seen as a great opportunity to have a digital clear out and start afresh with a computer that only has what we need on it. You can reorganise all those photos, get rid of shareware programs you don’t use anymore, only install software you know is compatible and of course be safe in the knowledge that your PC is totally free of malicious software.
Conversely, there’s a lot of people that just want to click ‘go’ and leave Windows upgrade to do its thing. Then, when they come back, Windows is all shiny and new and everything else was where they left it.
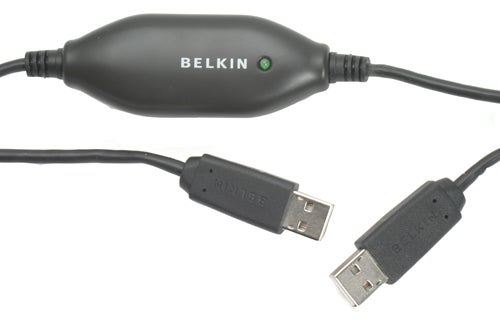
Now, traditionally the two upgrade paths have been mutually exclusive and you’ve had to choose between fully automatic or completely manual. However, with Windows Vista, Microsoft has added a piece of software, called Windows Easy Transfer, which makes transferring everything from one Vista computer to another, incredibly easy. The real boon, though, is that when combined with special USB cables, like this one from Belkin, this new software allows you to transfer data from your old XP installation to your brand new Vista computer.

Windows Easy Transfer, then, is a tool that’s built into Windows Vista that provides a single easy to use interface for transferring all your user accounts, files and folders, program settings, Windows settings, and, pretty much everything else you can think of. By default, all that’s left untouched are the basic Windows files and your actual programs but you can select/deselect as much as you like to be copied across.
There are a number of ways Easy Transfer can transport the data. First, by using a standard network, secondly you can use removable media like USB hard discs and writeable CDs/DVDs and lastly you can use a custom USB cable like this one. As well as providing a way of upgrading your XP installation, these USB cables are also the fastest way of transferring your data.
The transfer process doesn’t copy across actual programs so you’ll need to install them first. I say first as the installation process may overwrite your personal settings, so best to copy them over afterwards.
To do a Vista to Vista transfer you simply run the program on each computer and follow the onscreen prompts. To upgrade XP you must first install the transfer software that comes with the cable, and then run it.
To test how easy this process was, I installed Vista on a spare laptop then transferred everything from my work machine to the laptop. This included 40GB of music, several thousand photos, all my user settings and a miscellany of other bits and bobs.
Now, rather than trying to describe each step of the process, I’ve taken screen grabs from each computer along the way. I’ve then annotated each one to explain what’s happening. Hopefully that should give you an idea of what you can and can’t do and, really, how easy the process is.
The following pictures show a step by step walkthrough of how to use Windows Easy transfer using the Belkin direct cable transfer. In this example the user is called Test. My old computer is on the left and the new computer is on the right. Click the images for a full size view.
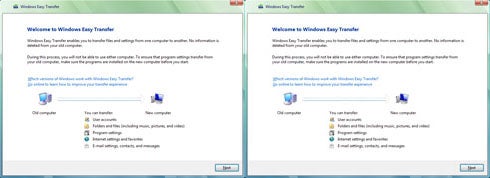
Starting the process simultanesouly on each computer, we’re greeted by a welcome screen. Click next.

Start a new transfer on both computers. You only choose to continue a transfer if you’re using CDs or DVDs to progressively transfer your files.
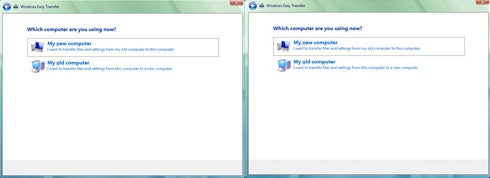
Select My Old Computer on your old computer and My New Computer on your new computer – told you it was easy!
Select the transfer cable option.

Wait for your computers to establish communication.
Up to this point the two processes are independent. So, you can run through to this point on one computer then go to your other computer and get to the same point where they’re both waiting to communicate. Then you must plug your cable in and the two computers will start to communicate. Or, of course, you can just do it simultaneously like I have.
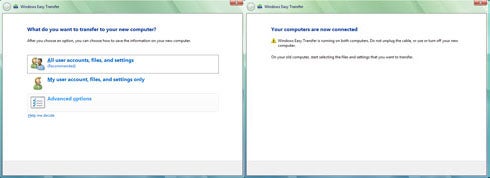
On your old computer, choose whether to transfer everything, just your user specific files and folders, or choose advanced to select exactly what you want to transfer. In my example i’ve chosen the advanced option.
From this point onwards you don’t need to tell your new computer to do anything and it just waits patiently until the transfer process is set going from your old computer.
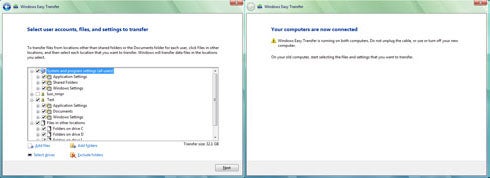
On your old computer, select what users, settings, files, and folders you want transferring.
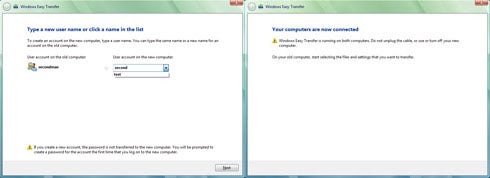
You now have to map the users on your old computer to the ones on your new computer. If you’ve setup user accounts on your new computer already then you simply select the user on the old computer and the user on the new computer and they are now associated. Otherwise you can simply create a new account on the new computer by typing in the new account name on the right hand side.
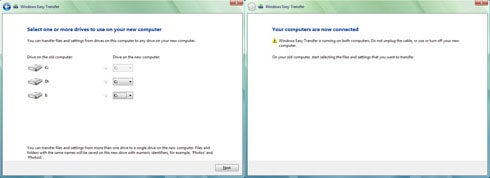
Select what drives you want copying across – I didn’t use this. Click next and the transfer begins.
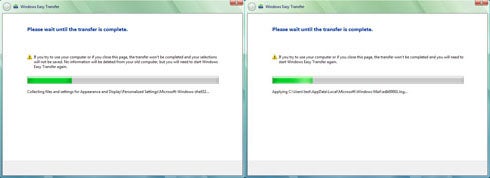
Transfer in progress.

Transfer complete.
As you can see, the process is pretty straight forward and, being USB 2.0, it is also fast. Also, those of you familiar with Vista will know that the way users and documents are organised in Vista is different to that in XP. Gone is the use of ‘My’ in front of your documents/music/videos folders and the confusing Documents and Settings folder has now been replaced by the much simpler Users folder. Thankfully this software interprets all those changes for you. So, where originally you may have had your music stored in C:Documents and SettingsYourNameMy DocumentsMy Music, Easy Transfer will move it to the appropriate, C:UsersYourNameMusic, folder.
The software is very good but it isn’t omniscient so if a program doesn’t store it’s configuration files in the standard places (e.g. C:Documents and SettingsYourNameApplication Data) then it may miss them. The simple way to check this, though, is to test all your programs after you’ve performed the transfer. If something doesn’t work correctly then you may have to contact the software vendor to find out how their software organises itself.
”’Verdict”’
Although there are other ways of running the transfer process, using a cable is the fastest and is the only way to transfer from XP to Vista. So, combined with the sub £20 price tag, you’re looking at a winning combination.
So, if you’re planning on upgrading to Vista but can’t face the prospect of finding, sorting and copying all your data across, then the Belkin Easy Transfer Cable for Windows Vista is the solution for you.
Trusted Score
Score in detail
-
Value 8
-
Usability 9
Editorial independence
Editorial independence means being able to give an unbiased verdict about a product or company, with the avoidance of conflicts of interest. To ensure this is possible, every member of the editorial staff follows a clear code of conduct.
Professional conduct
We also expect our journalists to follow clear ethical standards in their work. Our staff members must strive for honesty and accuracy in everything they do. We follow the IPSO Editors’ code of practice to underpin these standards.